

Equipment and user manual
Equipment and user manual for the EVOtd tandem parachute system. Document EH-TD400-2024 / EVOtd system. Revision 1, dated January 1, 2025.
Firebird USA LLC. Source publication contact details: 1405 Flightline Blvd, Deland, FL 32724, USA; 409 N Main St, Eloy, AZ 85131, USA. Email: usa@flyfirebird.com. Telephone: +1 747 300 8880. Website: www.flyfirebird.com.
Source reference · page 1
Warning and manufacturer disclaimer
!!! Warning !!!
This article meets the minimum performance and quality control standards required by a technical standard order (TSO). Installation of this article requires separate approval.
Use of this equipment in the United States and its territories should be in accordance with all USPA Basic Safety Requirement’s (BSR’s) included within USPA Skydivers Information manual (SIM), Section 2: Basic Safety Requirements and Waivers.
Use of this equipment outside of the United States should be in accordance with the controlling body for parachuting and skydiving in the country in which the equipment will be used & operated. If you use your Firebird product, or if you allow someone else to use it, you are acknowledging sport parachuting risk and accepting the fact that this equipment and its components may malfunction. If you are not willing to accept the risks of sport parachuting, or if you are not willing to accept the possibility that your Firebird product or its components may malfunction and perhaps cause you to be injured or killed, then we recommend you to NOT use it.
Disclaimer – no warranty
Because of the unavoidable danger associated with the use of this harness and container assembly, the manufacturer (Firebird) makes no warranty, either expressed or implied. This rig is sold with all faults and without any warranty of fitness for any purpose. The manufacturer also disclaims any liability in tort for damages, direct or consequential, including personal injuries, resulting from a malfunction or from a defect in design, material, workmanship or manufacturing whether caused by negligence on the part of the manufacturer or otherwise. By using this rig, or allowing it to be used by others, the buyer waives any liability for personal injuries or other damages arising from such use. If the buyer declines to waive liability on the part of the manufacturer, buyer may obtain a full refund on the purchase price by returning the parachute harness and container, before it is used, to the manufacturer within 30 days from the date of original purchase with a letter stating why it was returned. Save this manual, your rigger may not have an applicable manual and will need it to service your Firebird product.
This handbook applies to the parachute system EVOtd/ EH-TD400. This includes the EVO Harness/Container as well as the quick reserve canopy.
Unauthorized modifications or alterations will void the warranty and the TSO
Classification: Certified in accordance with FAA TSO-C23D.
| Location | Address |
|---|---|
| Florida | 1405 Flightline Boulevard, Suite 21, Deland, FL 32724, USA |
| Arizona | 409 North Main St, Eloy, AZ 85131, USA |
Email: usa@flyfirebird.com. Website: https://www.flyfirebird.com.
Source reference · page 4
EVOtd equipment limitations and certification
Certification
EVOtd Harness Container (see appendix page - 83)
- TD 400: EVOtd - Dual Harness / Dual Parachute Container and Quick Reserve.
- This article meets the standard performance and quality systems standards required by a FAA technical standard order (TSO).
- FAA approved & Certified under the TSO C-23D standards.
- Maximum combined weight of passengers & equipment shall not exceed 500 lbs. (226.8 kg).
- Shall not be operated at an airspeed exceeding 175 KEAS (207.1 mph) (333 km/h) in any of these configurations.
- Far 105.45 & TSO C23D iaw AS 8015 Rev B dictates parts of the nomenclature of this tandem system. the pilot parachutist in command and passenger parachutist herein can also be designated as Tandem instructor and tandem student.

Source reference · page 5
EVOtd tandem disc system
System operating data
| Property | Source specification |
|---|---|
| Container / passenger harness weight | 42 lbs (19 kg) / 7 lbs (3 kg), total 49 lbs |
| Maximum harness / container load | 500 lbs (226.8 kg) |
| Maximum canopy load | Q400: 500 lbs (225 kg); Q350: 475 lbs (215 kg) |
| Maximum deployment speed | 175 KEAS, 207.1 km/h |
| Maximum reserve repack cycle | As per national authority |
| Allowable service life | As per national authority |
| Container type | Main and reserve canopy container EVOtd |
| Number of reserve container flaps | 6 |
| Reserve pilot chute | Spring loaded, inside |
| Manufacturer | Firebird USA LLC |
| Reserve automatic activation | Reserve AAD ready: Vigil, Cypres, M2 |
| Harness material | Type 7, Type 8, Type 17, Type 13 |
| Hardware | Mil-Spec / PIA-Spec |
The Harness / Container system is assembled out of mil-spec and/or PIA spec materials including type 7, 8, 13 and / or 17, as well as Cordura. The container is closed by 2 metal pins for manual deployment of the main and reserve parachutes. The harness has a 3-point closure disc system with an adjustable chest strap, MLW, Laterals and leg straps, four attachment points for hooking the passenger. The attachment of the reserve parachute is via "L-Bar" links and integrated reserve risers in our one piece continuous harness. The main parachute is connected via connector links and the 3-ring riser release system.
The EVOtd new tandem disc system
- Simplified procedures with fewer steps reduce the potential for errors when closing the main container compared to traditional 3-Ring systems.
- Our system offers training and operations similar to the proven world-leading disc system.
- It minimizes the risk of out-of-sequence deployments.
- The centered drogue attachment point, paired with our articulated harness, provides the most comfortable experience for both instructor and student.
- Drogue release handles automatically retract after use, preventing accidental snag situations.
- The bungee-assisted drogue release handles retract into place, reducing snag hazards and ensuring consistent locations.
- The EVOtd features ambidextrous drogue release handles located at the bottom of the container.
- The main container opening pin is secured by a secondary safety pin that deactivates when the drogue is deployed, minimizing premature openings.
- Our state-of-the-art innovative student harness enhances safety and comfort for the student.
- Equipped with a SAFE - MARD - RSL system for added safety.
- Outward - facing window (Yoke or Backpack) for AAD and reserve flap window.
- Increased safety with Magnetic riser covers and main pin cover.
Source reference · page 6
Features and parts list
- Disc Release System - The disc is connected to the bridle, approximately 3 feet from the deployment bag, using a locking pin that passes through the chimney and a loop on the bridle. To close the main container and secure the drogue, follow these steps:
- 1. Place the main bag in the container and position the disc on top of the bag. Pass the closing loop, originating from the bottom flap, through the D-rings on the other three flaps and then through a grommet on the bottom flap in a circular fashion.
- 2. Draw the flaps snugly around the disc chimney, capturing the disc under the four container flaps.
- 3. The flanged chimney keeps the disc centered, allowing the drogue bridle to exit the container.
- 4. The closing loop is secured with a straight metal pin, through which two Spectra lines are looped and then secured a few inches below the final grommet to form a pulley. Each drogue release ripcord passes through its metal housing on both sides. Both ripcords are attached to a spherical ripcord handle using a lark's head connection, facilitating quick and tool-free ripcord replacement in the field. This system is durable and fail-safe; the total failure of one ripcord would not affect the function of the other.
- The Safety Pin - This special “curved pin” on the drogue bridle, locks the main container pin in place until the drogue is deployed.
- The Bungee Ripcord - A single bungee cord runs through both housings, connecting the handles elastically. This setup securely holds the handles against the ends of the housings, ensuring they snap back into place after being pulled or accidentally caught. This eliminates the need to stow the handles after deployment and avoids the hassle of searching for handles during packing. To enhance security, each ripcord handle has a snap in attachment, enabling it to be secured. Additionally, every ripcord includes approx. 2 inches of slack, necessitating a 5-inch pull on either handle to release the drogue.
- The Drogue System - The outer bridle extends from beyond the disc to the main deployment bag, while the kill line, constructed of min. 1000 lbs. Spectra, terminates at the bag. Both the lower ends of the bridle and the kill line converge at the same point, preventing independent twisting. This clever design eliminates the need for untwisting the kill line, reducing wear. If needed, the kill line can be easily replaced in the field.
Furthermore, since both the bridle and the kill line bear the bag lift-off forces, if either the bridle or the kill line breaks, the deployment sequence will still proceed more or less normally. This ensures that the valuable drogue is not lost.
- Main Deployment Bag - design to protect the main canopy's lifespan & for easy packing.
- Reserve Handles Options - Pillow or Loop.
- Cutaway Handles Options - Pillow or Loop.
- SAFE / Mard RSL System - While a standard RSL automatically pulls the reserve ripcord pin after a cutaway, Our SAFE SYSTEM goes a step further by automatically releasing the non-RSL riser if the RSL riser is released prematurely. This ensures that the reserve will not deploy with half of your main still attached. The SAFE SYSTEM utilizes the malfunctioned canopy as a large pilot chute to rapidly deploy the reserve canopy faster than a pilot chute alone. The rapid deployment also reduces the likelihood of entanglement between the reserve & main canopies in the case of a spinning malfunction.
- Magnetic Riser Covers - An innovative design ensures consistent force to open each riser cover during deployment, facilitating smooth and uniform openings while safeguarding the riser covers from the possibility of opening due to tumbling during exit.
- The Student Harness - Designed with comfort as a top priority, our passenger harness features padding and a specific architecture for maximum comfort, enabling passengers to position their legs forward and upward under the canopy. This innovative design significantly enhances safety by reducing landing injuries. Additionally, the harness includes a rear 'Y Strap' system, effectively preventing passengers from falling out if improperly adjusted.
- Reserve Flap with Pin Check Window - Made from clear vinyl, with a slick design for safety & appearance.
- AAD Check Window - Separate clear vinyl window, located on the yoke of the container, making for an easy visual check while you are wearing the rig.
Parts list
| No. | Sub P/N | Part | Batch | Remarks |
|---|---|---|---|---|
| 01 | 104 | TD400 freebag | ||
| 02 | 031 | Reserve pilot chute | ||
| 03 | 111/112 | Reserve handle: loop / pillow | ||
| 04 | 113/114 | TD400 RSL / RSL & MARD | ||
| 05 | 124 | TD400 passenger harness | ||
| 06 | 125 | Disc | ||
| 07 | 121/122 | Drogue chute 52" / 60" | ||
| 08 | 123 | Drogue bridle | ||
| 09 | 126 | TD400 bungee system | ||
| 10 | 103 | TD400 main deployment bag | ||
| 11 | 151 | TD400 main risers |
| No. | Sub P/N | Part | Batch | Remarks |
|---|---|---|---|---|
| 01 | P/N-163 | Slider | ||
| 02 | P/N-199 | L-bar links / rapid links |
Source reference · pages 7–8
Training and rating
Criteria to be met before certification:
- Be at least 18 years of age.
- (3) years of skydiving experience in accordance with FAR 104.45.
- Hold a current USPA D license.
- Currently possess, or at one time been issued, a USPA Coach rating
- Have logged at least 500 ram-air jumps and accumulated at least 6 hours freefall time.
- Have logged at least 100 ram-air jumps in past 12 months.
- Hold min. a current FAA Class III medical certificate or an equivalent standard accepted by a recognized US parachuting governing body.

Symbol denotes foreign equivalent acceptable when all documents are from the same country.
NOTE: Each candidate has the responsibility to inspect the credentials of the Tandem Examiner. Certification paperwork filed by any Tandem Examiner who isn't a current Tandem Instructor will be considered invalid.
Be sure your tandem examiner is holding a valid - current Firebird tandem examiner license.
Each candidate is required to bring the following items to a tandem certification course:
- USPA Expert D license or foreign valid equivalent.
- Jump-Master / Instructor ratings.
- Valid FAA Medical certificate.
- Logbooks.
- A jump outfit with adequate drag
- Visual and Audible altimeter.
- Helmet & goggles.
- Firebird Tandem Instructor Course (FTIC) paperwork with completed written test, Notepad and pen.
Source reference · page 9
Course outline
- 1. Paperwork - Fill out the paperwork and Logbook with the required information.
- 2. Course Fee payment includes - instruction: theory; ground-training; jump costs & rental gear to be used during the certification. The course fee does not include the candidate’s personal jumps or the cost of the experienced student who rides with the candidate during certification.
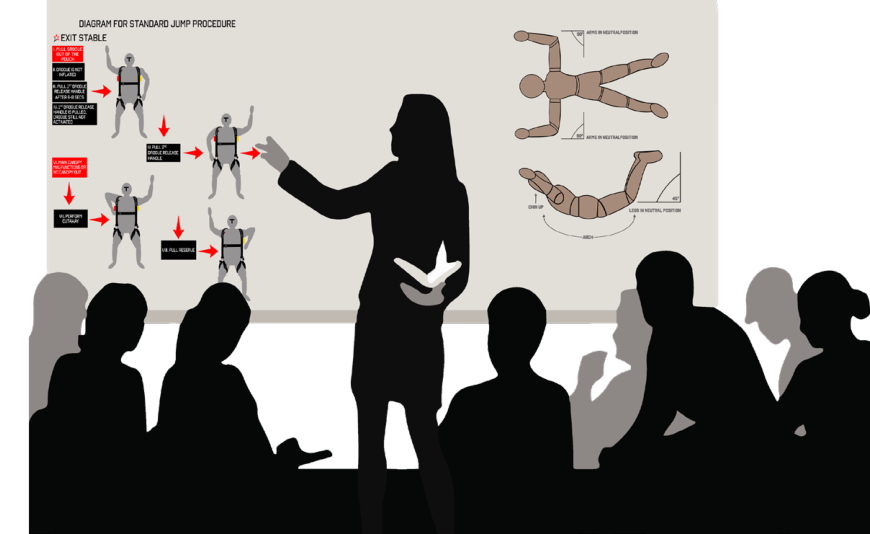
- 3. Classroom / Theory - the ground school runs approximately for four hours. The course will be taught chapter by chapter with continued discussion after each chapter to include Standard Operating Procedures
- 4. Ground Training - To include standard operating procedures, Student harness fitting; gear check and gearing up the Tandem system; hooking up the student; practice climb-outs; controlling the student’s movements; exits; throwing the drogue; drogue-freefall maneuvers; main canopy deployment, Emergency Procedures, canopy’s toggle system; student canopy control training techniques; landing procedures and packing.
- 5.Training and Certification jumps - 10 Jumps minimum. This section is divided in (2) categories: Section 1-FreeFall & Section 2-Canopy Training.
Section 1 - freefall
- Jump 1 - front ride: Minimum of one jump in the student position.
- Jump 2 - solo: Minimum of one jump with the EVO Tandem system or as many as necessary to become comfortable operating the system without passenger.
- Jump 3 - turns: Minimum of one jump in the instructor position with either the Tandem Examiner or appointed tandem evaluator. set drogue, check drogue, handles check, 3 practice drogue release touches, 360 degree turns in both directions, wave and pull by 6k feet.
- Jump 4 - Heading control: Minimum of one jump in the instructor position with the Tandem Examiner or appointed Tandem evaluator. set drogue, check drogue, handles check. maintain heading with 90 degree tolerance while evaluator attempts to take the candidate off heading, wave and pull by 6k feet.
- JUMP 5 - DROGUE DELAY: Minimum of one training jump in the instructor position with the Tandem Examiner or appointed Tandem evaluator. Stable exit with drogue delay of 2k feet. Set drogue, check drogue, handles checks, maintain heading with 90 degree tolerance while evaluator attempts to take the candidate off heading, wave and pull by 6k feet.
- JUMP 6 - Instability: Minimum of one training jump in the instructor position with the Tandem Examiner or appointed Tandem evaluator. Unstable exit from above 10,500 feet to include a back to belly transition, candidate must regain control within 10 seconds and perform 2 opposing 360 degree turns and set drogue 3k feet from exit, set drogue, check drogue, and one practice ripcord handle touch, maintain heading, wave and pull by 6k feet.
- JUMP 7 - CHECK OUT DIVE:Minimum of one training jump in the instructor position with the Tandem Examiner or appointed Tandem evaluator. Unstable exit from above 10,500 feet, regain stability, set drogue, check drogue, handles checks, maintain heading with 90 degree tolerance while evaluator attempts to take the candidate off heading, wave and pull by 6K feet.
- JUMPS 8/9/10 - Proficiency jumps: Minimum of 3 jumps with an experienced jumper in the student position. passenger must act as a student and give reasonable problems on exit and freefall. Passenger must have completed a waiver and has been briefed in training protocols.
Section 2 - canopy training -
- Dual Passenger Canopy Flight Dynamics - The following dive flows have been established based on the training technique that were identified as priorities. Your experience implementing these drills with a live candidate will be extremely useful.
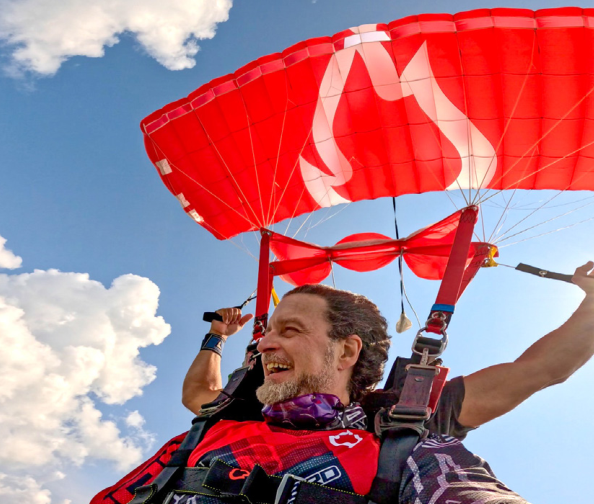
- JUMP 3 - SWEET SPOT DRILL & proper flare technique
- JUMP 4 - Flight cycle & 1/2 braked flares
- JUMP 5 - LOW TURN recovery, REVERSE TURN TO FLARES
- JUMP 6 - stall, sink / surge
- JUMP 7 - Sashay in 3/4 & 1/2 brakes ST
- Jump 8 - stacking & in flight communication
- Jump 9 - high wind landings, penetration checks & crabbing
- JUMP 10 - repeat any of the above for practice
Important -
- The record of each certification jump will be logged on the official form & logbook.
- The Tandem Examiner will observe/critique the packing of the main canopy & issue the candidate instructions for the next jump.
- The Tandem Examiner must be present, on the DZ or in the air, during training jumps 2-7. The number of training certification jumps that must be made by each candidate during the course will depend entirely on the performance level during the first seven jumps. It is up to the Tandem Examiner’s discretion as to whether the candidate should make additional jumps to qualify.
- The tandem instructor must send the license fee to Firebird USA in order to get an official certification issued.
- The Tandem Examiner holds the authority to determine whether a candidate should withdraw from the course due to poor performance, lacking skills, or making questionable judgments. The candidate might receive instructions to complete additional training jumps with their solo equipment to acquire the necessary experience and skills required for the rating.
- Upon successful completion of the training certification course, if the candidate meets the requirements, the Examiner will submit the essential paperwork to Firebird USA, LLC. The candidate will retain the Firebird Tandem Instructor Training Logbook and continue to log the next 3 jumps until they have completed a minimum of 10 logbook jumps within a 2-month period. Subsequently, the candidate will log the remaining probationary jumps (11-35) in their personal logbook.
- The Tandem Examiner will inform Firebird of any candidate who fails to complete the course & the reason(s) for the failure.
Probation period
The probation period will be in effect for a minimum of 35 jumps, To include the minimum of ten training certification jumps at a minimum exit altitude of 9,500 ft. The logbook, when complete, must be verified by the Tandem Examiner. If the applicant is a EVOtd system owner, then they must submit to Firebird a video of at least 5 of the final 20 probationary jumps along with the training logbook properly logged information signed by the examiner/ owner or by a safety training advisor.
Currency requirements
Tandem Instructors are expected to maintain currency during the yearly recertification period.
- If any Tandem Instructor during probation has not made a Tandem jump within the last 30 days, he must make one Tandem jump with an experienced student who has been briefed on how to respond to Tandem emergencies.
- If any currently rated Tandem Instructor has not made a Tandem jump in the preceding 90 days, he must make one Tandem jump with an experienced jumper acting as a student before taking a student. The experienced jumper must first sign a waiver and be briefed on how to respond to Tandem emergencies.
Foreign ratings
Foreign tandem ratings alone are not valid in the United States of America. A Foreign National wishing to perform tandem jumps in the USA must possess the Firebird Tandem rating, conversions certifications transfer courses will be evaluated and determined case by case. USPA also offers tandem ratings in conjunction with the USA tandem manufacturers.

Source reference · pages 10–12
Harness and container
| Property | Source specification |
|---|---|
| Container type | Main and reserve canopy container EVOtd |
| Number of reserve container flaps | (6) Six |
| Reserve pilot chute | Spring loaded, inside |
| Manufacturer | Firebird USA LLC |
| Reserve automatic activation | Reserve AAD ready |
| Harness material | Type 7, Type 8, Type 17, Type 13 |
| Hardware | Mil-Spec / PIA-Spec |
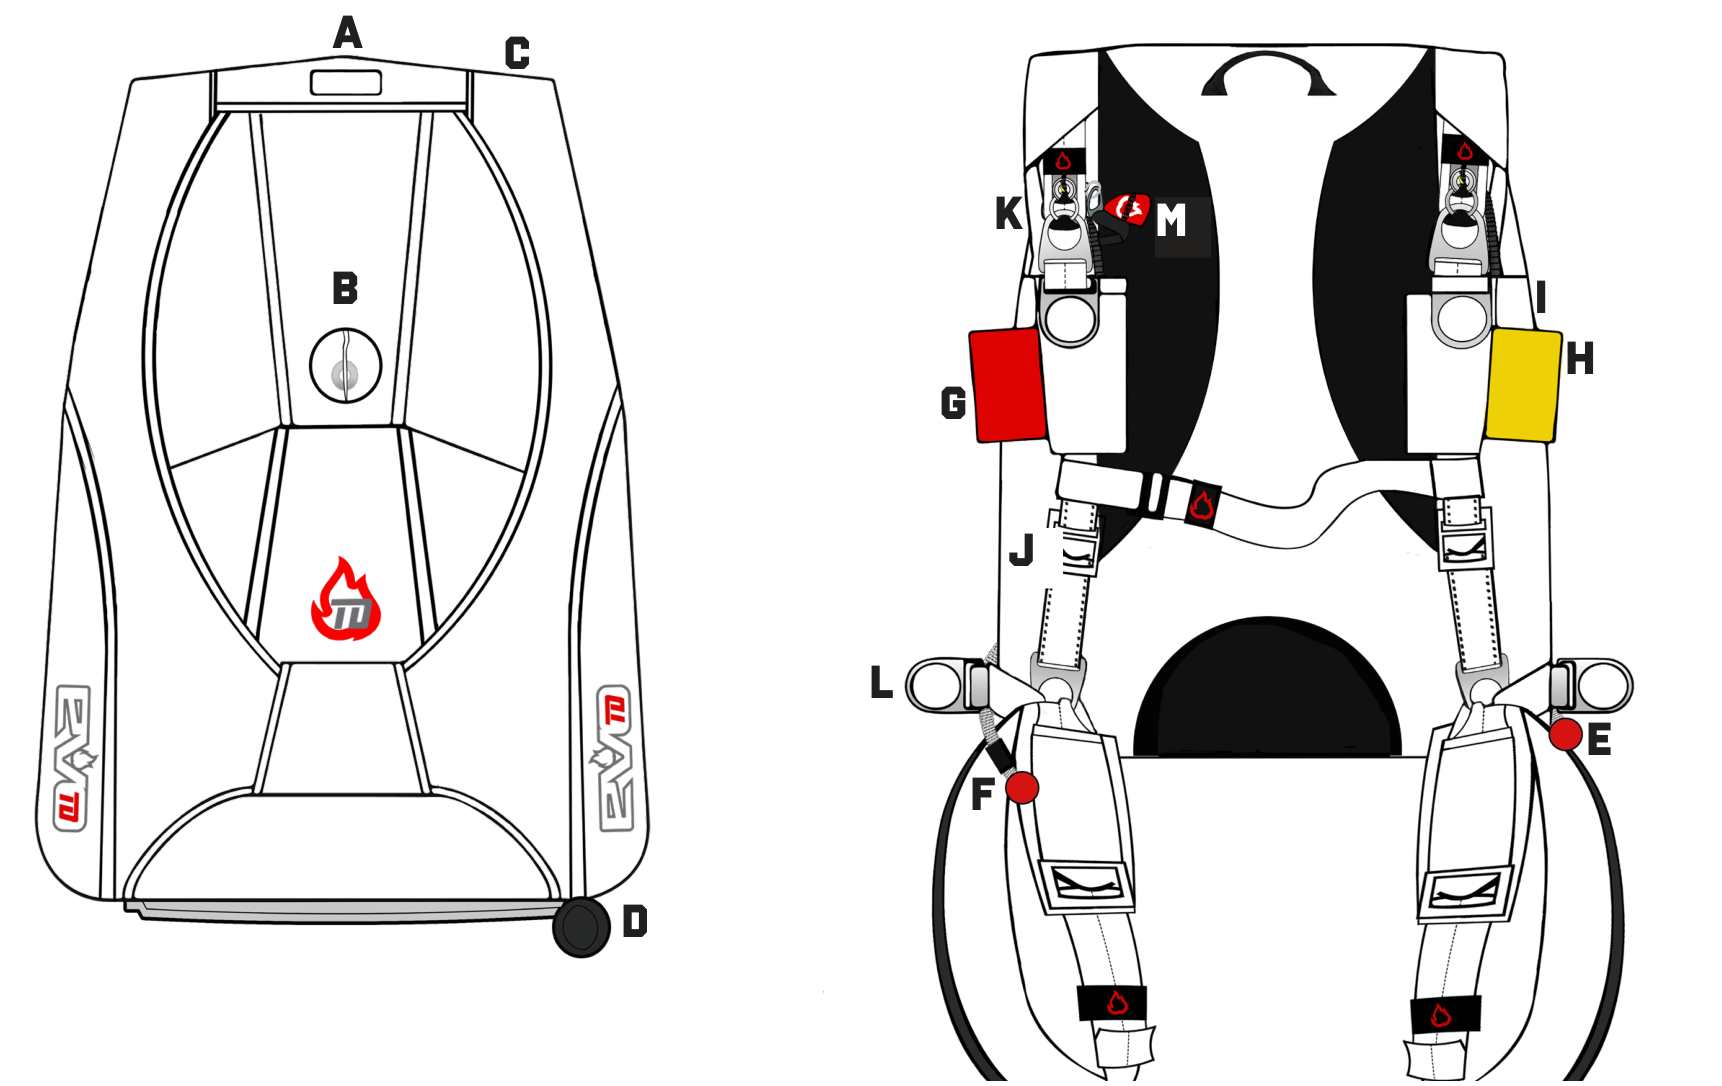
Description:
- A. AAD inspection window - clear window located on the backpack.
- B. Reserve pin inspection - window for reserve pin check.
- C. Magnetic riser covers - design to improve security.
- D. Drogue chute - plastic ball located at the top of the drogue chute.
- E. Primary drogue release - wearing the rig, plastic ball located left side BOC. Pull to activate drogue release for deployment.
- F. Secondary drogue release - plastic ball located right leg pad. Pull to activate drogue release for deployment.
- G. CUTAWAY PILLOW OR LOOP HANDLE - Handle attached firmly in an outboard position on right MLW.
- H. RESERVE RIPCORD HANDLE - Handle IN THE left SIDE OF MLW, IN outboard position.
- I. Stainless steel upper passenger rings - mounted under the main canopy 3-ring release system on both sides
- J. Stainless steel adjuster - pulley style harness is adjusted using the adapter with locking spring.
- K. Main Canopy - 3 ring release system.
- L. stainless steel lateral passenger rings - mounted on both sides of the lateral.
- M. RSL (reserve static line) - wearing the rig, on the right riser is located the shackle, attached to lanyard for reserve activation.
Source reference · pages 13–14
Student harness
The Student Harness prioritizes safety and comfort by containing the human body without compromising blood flow. This is crucial to prevent discomfort, nausea, or fainting in students. The design features a hip horizontal back & belt strap combination, strategically placing the main lift web toward the front of the upper body. This prevents 'squeezing' effect on the upper body & inside of the upper legs, which could otherwise impede blood flow. Additionally, upon opening, the harness automatically lifts the legs up & forward, ensuring a safer position for landing. With 14 points of adjustment, the harness accommodates a wide range of body sizes and types, providing a comfortable experience for any tandem student during their skydive. However, it's crucial to securely adjust the harness to the student's body to prevent any risk of falling out in extreme situations or unusual body positions.
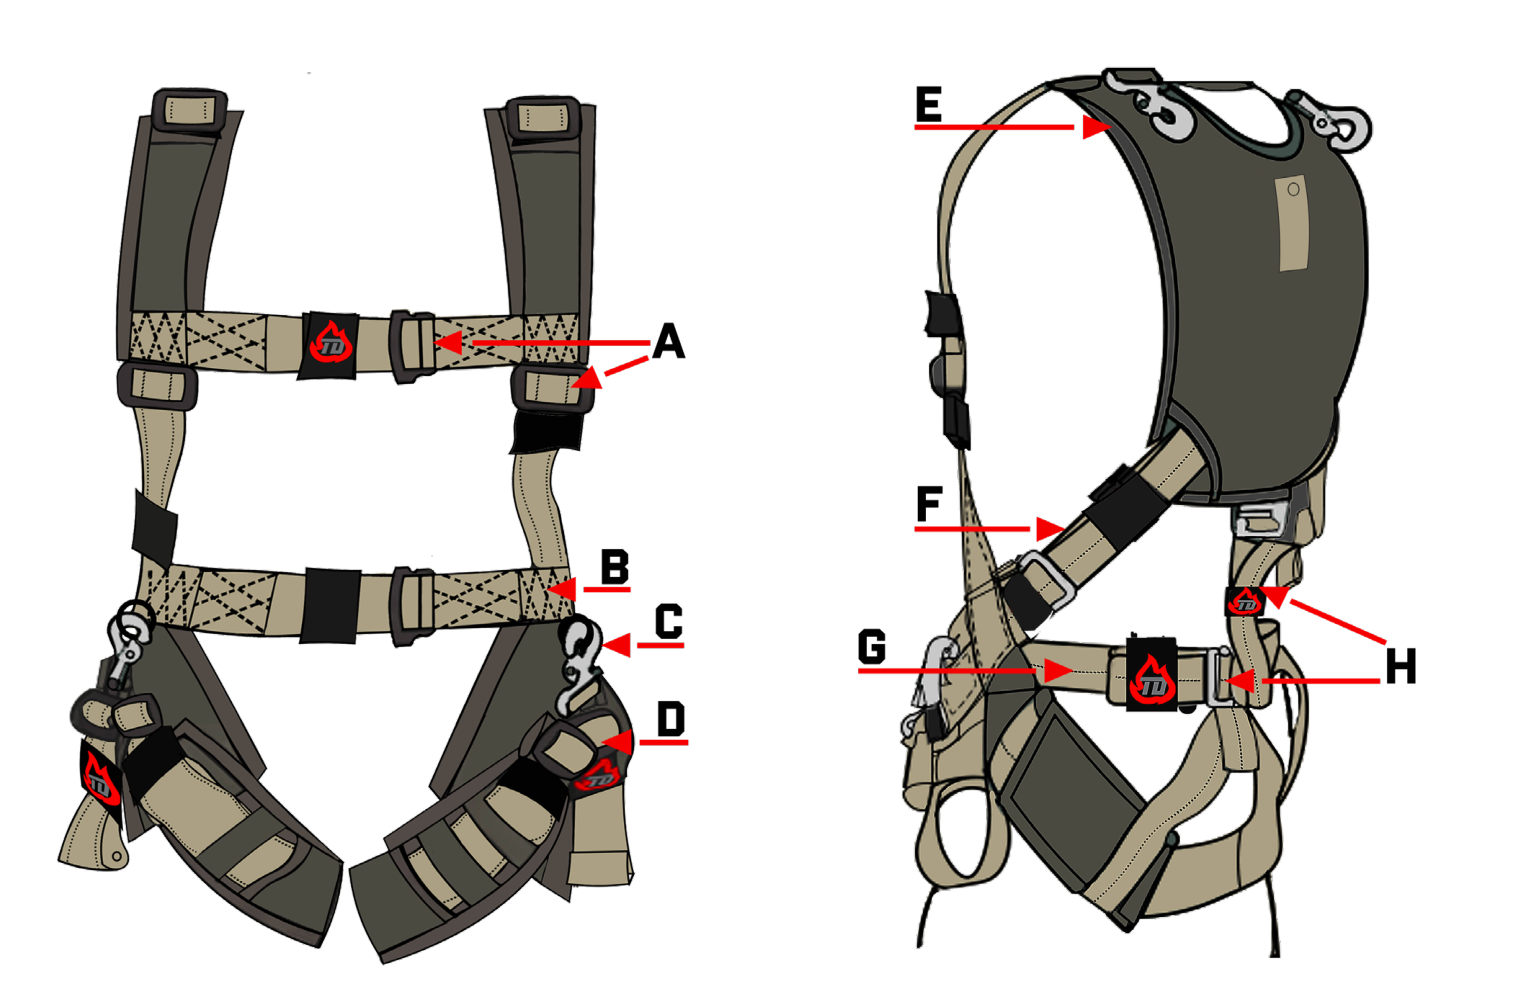
- A. Fully adjustable chest strap.
- B. Waist band.
- C. Side attachment points - Quick ejectors. Tensile strength 2,500 lbs
- D. Adjustable leg straps.
- E. Top attachment points - Butterfly snap. Tensile strength 5,000 lbs
- F. Diagonal Back strap.
- G. Horizontal Back strap.
- H. "y" – strap.
The student harness must be adjusted in ready-to jump configuration before boarding aircraft!
Source reference · page 15
The drogue system
The drogue bridle and kill line end at the same point, typically connected to the top of the deployment bag with either a Rapidè link or soft link. During the packing sequence, when the drogue is set or cocked, the drogue bridle below the disc becomes "scrunched up," effectively becoming shorter than the kill line. Upon drogue deployment, it can inflate due to the longer kill line. However, when the ripcord is pulled to end drogue fall, releasing the disc, the "scrunched up" section of the bridle below the disc extends to its full length, making the bridle longer than the kill line. This inversion of the drogue apex results in the collapse of the drogue.
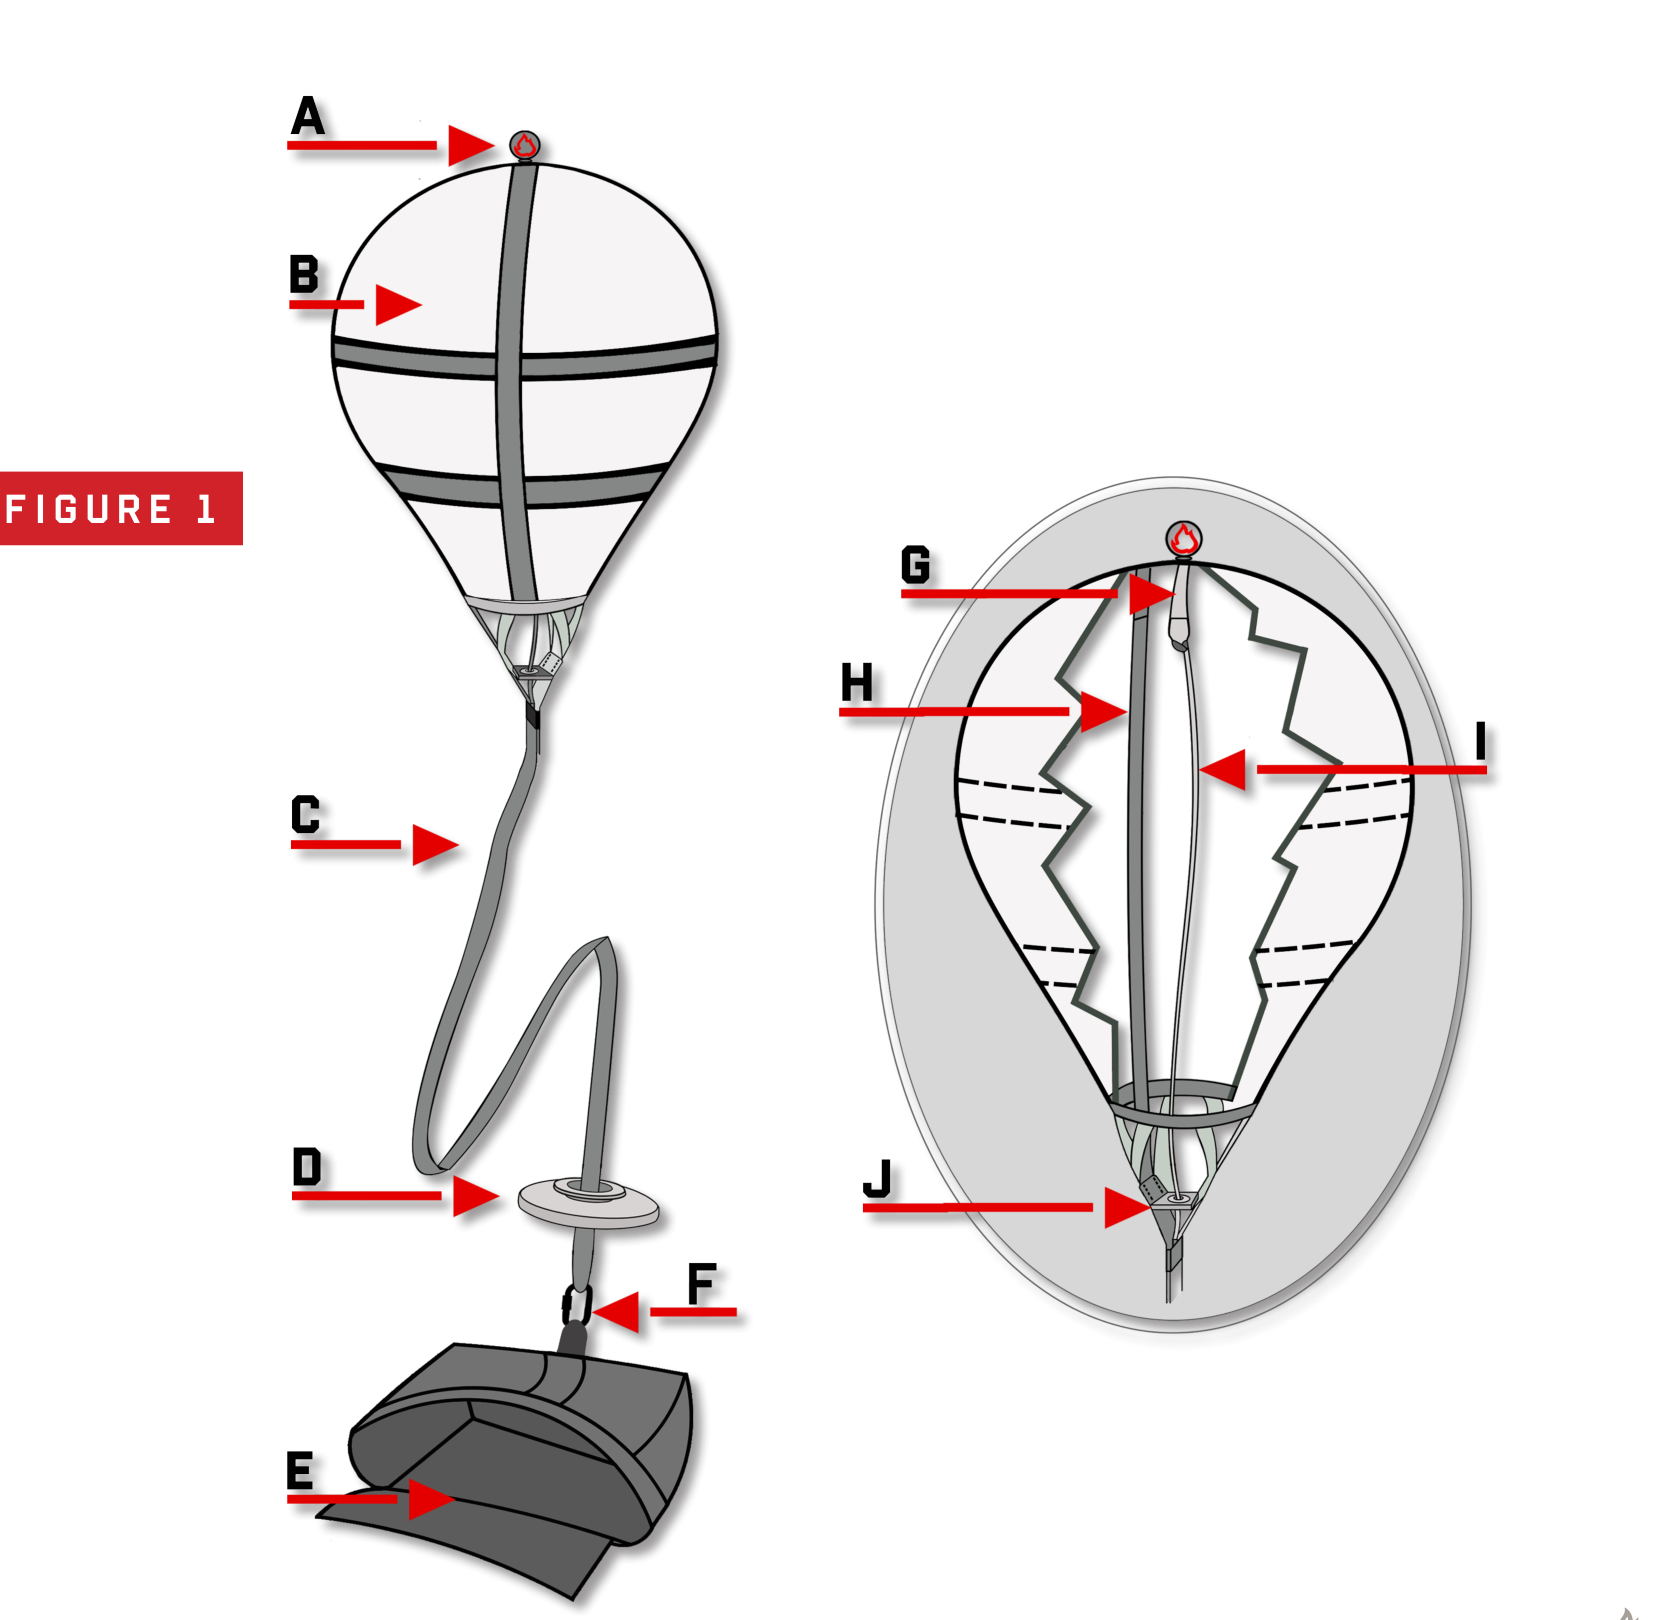
Figure 1
- A. Handle – The ball connected to the apex of the drogue envelope, used for deploying the drogue.
- B. drogue chute envelope - The fabric and mesh portion of the 52" or 58" drogue. The top is called "the apex” & bottom Is called “the base".
- C. Bridle - A doubled 1-3/4”, 1200 lb. Type 12 Nylon or 1500 lb. Type 6 Kevlar section leading from the envelope to the deployment bag connection loop.
- D. Disc System - a 5” aluminum disc with a 11/2” flanged channel.
- E. Bag Attachment Loop - a loop of tubular Nylon on the inside of the main deployment bag where the main canopy attaches using a #5 stainless steel Rapid or soft link.
- F. Drogue Bridle Loop - the loop at the end of the Nylon or Kevlar drogue bridle to which the deployment bag is attached to the loop at the top of the deployment bag using a #5 stainless steel rapid or soft link.
- G. Kill Line Attachment Bridle - a 1” Nylon tape or soft link serving as an attachment point for the kill line, limiting collapse if the kill line is incidentally too short.
- H. Drogue Set Limiter Tapes - a Two 1” Nylon tapes from the drogue apex to the drogue skirt, preventing excessive sliding between the drogue bridle and the kill line during drogue collapse.
- I. Kill Line - min 1,000 lb. Spectra line with a loop at the top end and an open end at the bottom, running inside the drogue bridle from the kill line attachment bridle to the Rapid or softlink link at the bag attachment loop. the open loop has to be fingertrapped in order to calibrate the drogue. see page XX
- J. Kill Line Guide Grommet - a size zero stainless steel grommet at the base of the drogue envelope directing the kill line into the drogue bridle, preventing wear, and serving as an emergency stop for the kill line attachment bridle if too short.
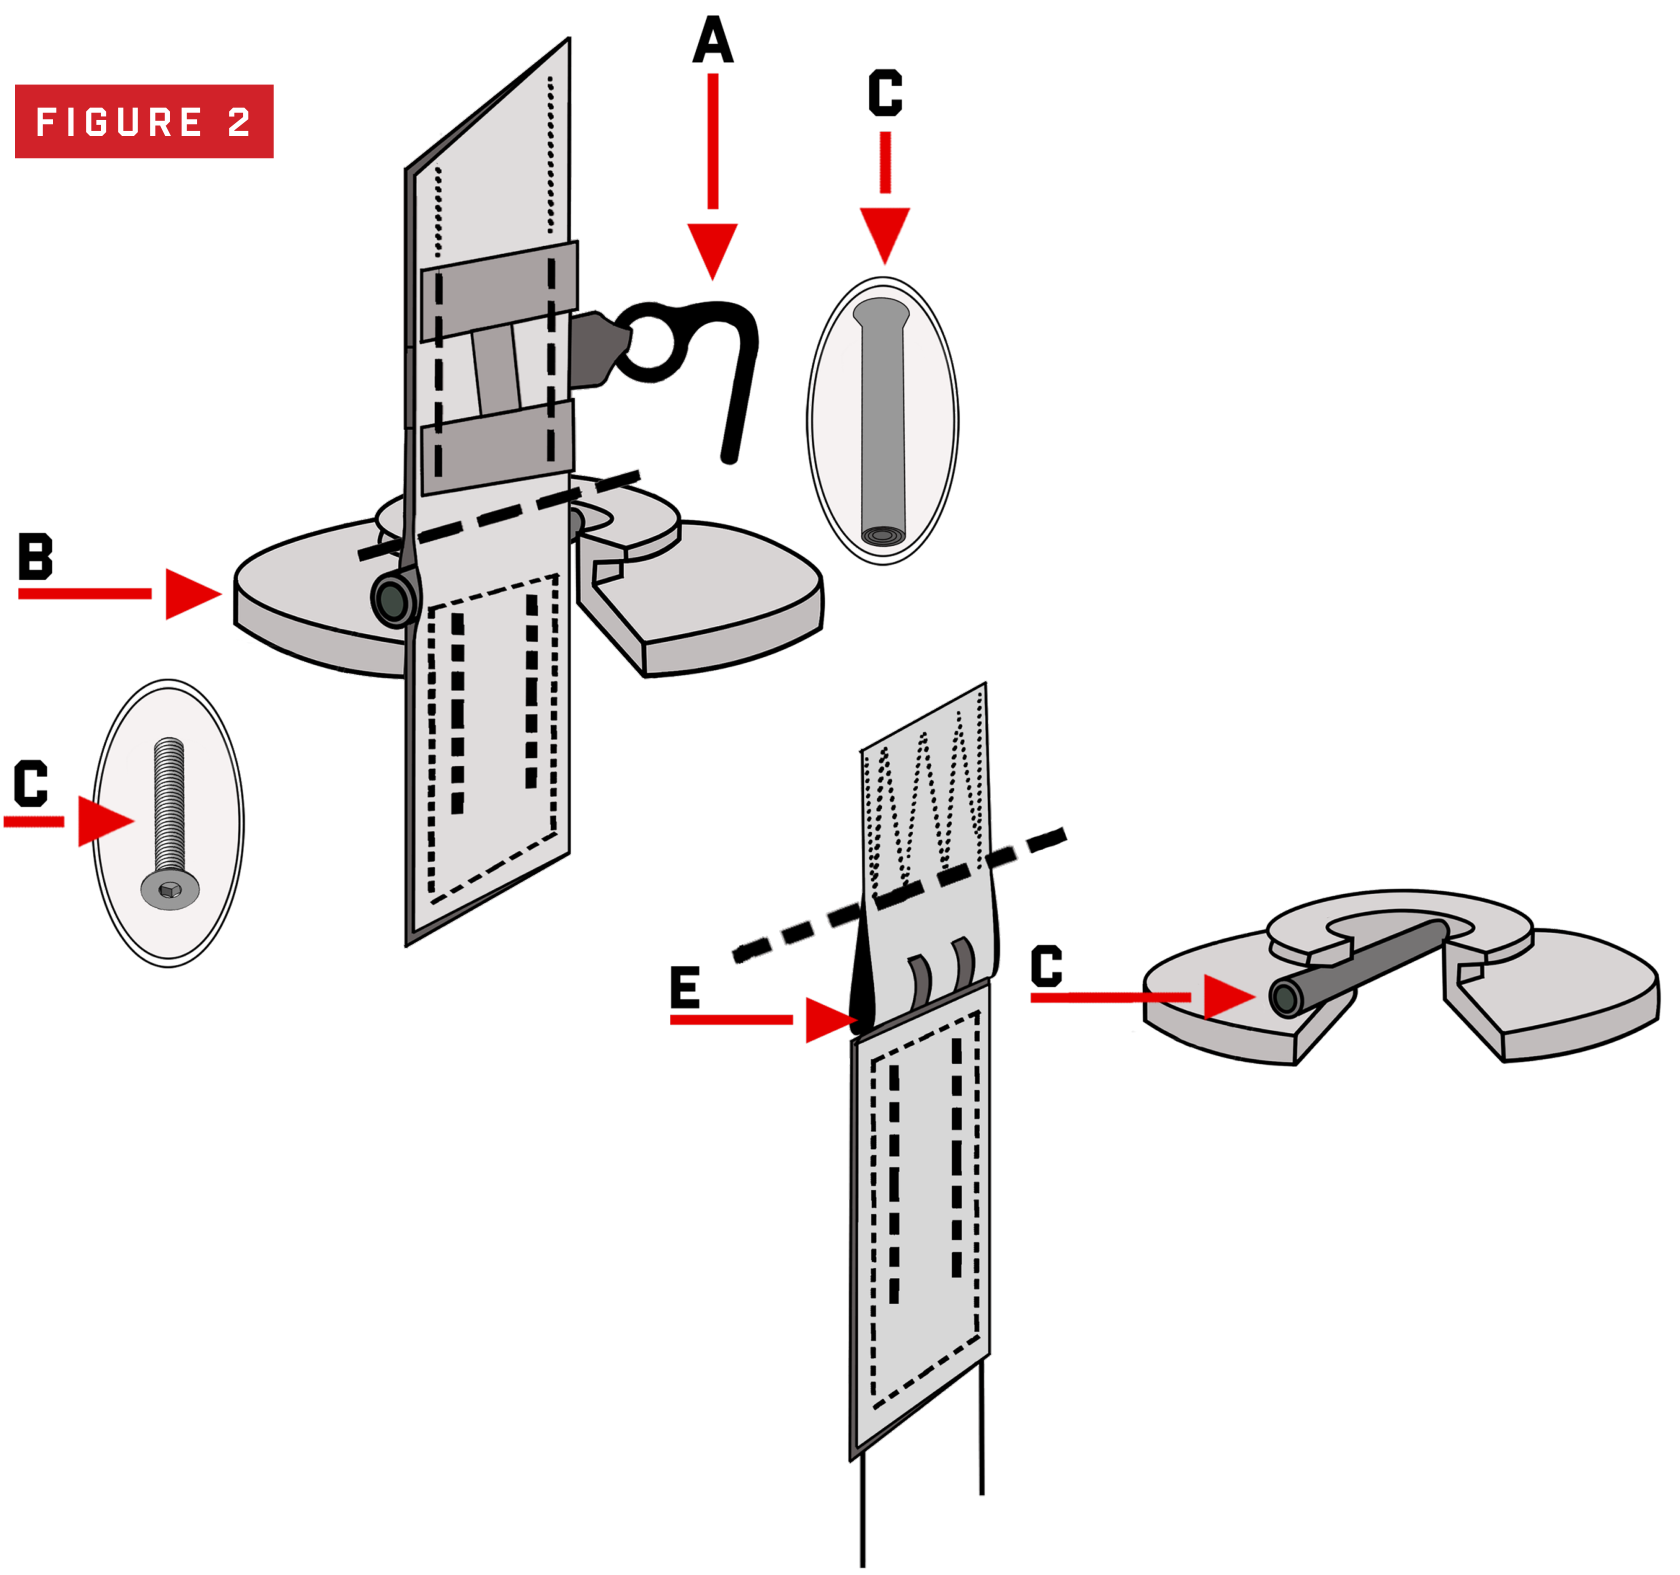
- A. Safety Pin - a specially-curved pin connected to the bridle, designed to prevent accidental main container openings.
- B. Disc - a 5” aluminum RED disc with a 1/2” flanged channel & disc protector.
- C. Disc Attachment Pin - a SCREW threaded stainless-steel rod used to attach the disc to the bridle.
- D. Screw Disc Attachment Pin - screw locking the rod (routed through the bridle) to the disc. Loose screw can damage or snag the main closing loop.
- E. Disc Attachment Loop - a loop on the drogue bridle to which the disc is attached with a stainless-steel pin.
Source reference · pages 16–18
The bungee system
The ripcord handles (drogue release balls) are strategically positioned for the tandem instructor to release the drogue with either hand. The right handle is specifically placed on the Tandem instructor’s harness to simulate a Bottom of Container (BOC) position for the student. After releasing the drogue, simply letting go of the handle will cause it to automatically return to its position on the end of the ripcord housing. The spherical shape and attachment method of the ripcord handles make snagging highly unlikely. Even if dislodged, they automatically return to their position. With the unique Safety Pin connected to the drogue bridle, the system is virtually snag-proof, minimizing the risk of accidental container openings due to snagged ripcord handles.
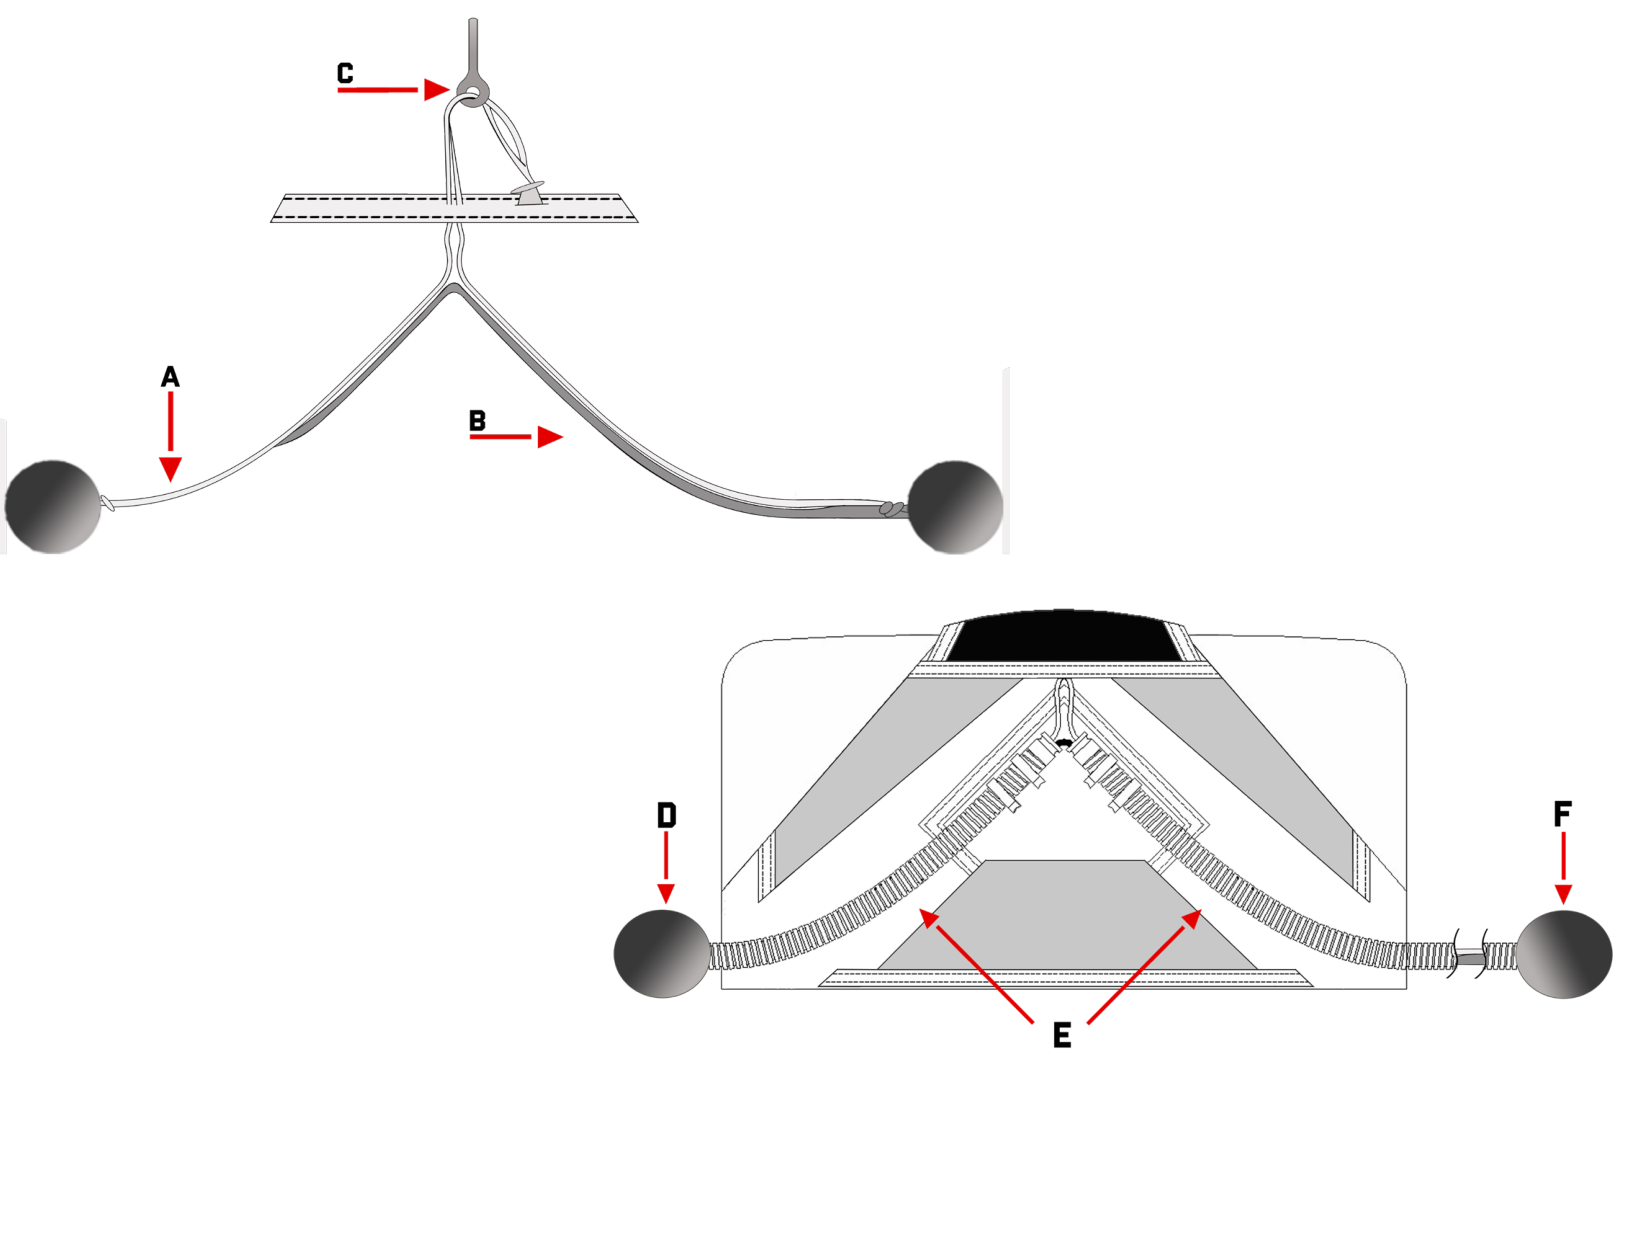
- B. Bungee Cord - 3mm bungee cord, finger locked between the loops at each end of the Spectra line.
- C. Main Pin - One stainless steel, eyeleted, ripcord pin.
- D. Primary Main Deployment Ripcord Handle - ball handle.
- E. Ripcord Housings - Two stainless steel ripcord housings.
- F. Secondary Main Deployment Ripcord handle - ball handle.
Source reference · page 19
SAFE / MARD system
MARD stands for - Main Assisted Reserve Deployment, a type of reserve static line (RSL) that leverages the cutaway main canopy to aid in the extraction of the reserve parachute.
In a standard reserve deployment without a SAFE/MARD system, the reserve pilot chute is responsible for pulling the reserve from the container. However, with a SAFE/MARD system, the main canopy serves as the reserve pilot chute, resulting in a rapid extraction.
The use of firebird SAFE/Mard system prevents terminal velocity from being reached, as the main canopy is present. This avoids a hard opening, as would occur with a massive pilot chute on a main canopy. Instead, MARD facilitates a quicker extraction of the reserve canopy to line stretch, significantly faster than if the reserve pilot chute were acting alone.
SAFE/MARD Installation - Step by Step Materials, parts & tools needed
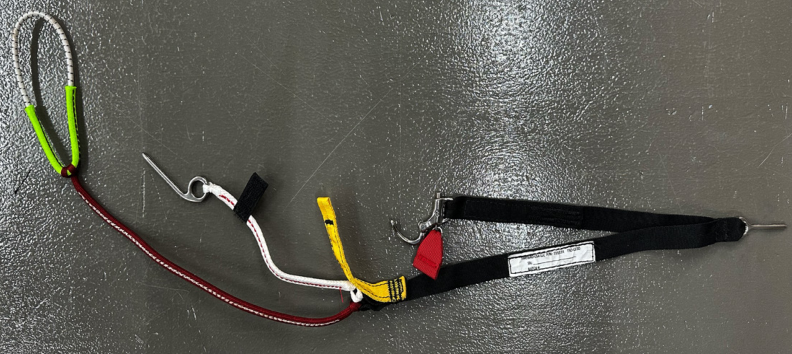
- Hemostat
- Safety Seal thread
- RSL MARD lanyard
- MARD Bungee loop
Assembly & packing
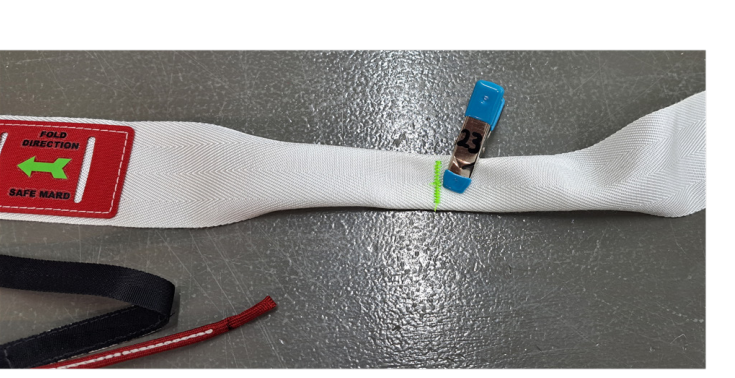
- 1. Fold Bridle at GREEN marking (bartack) & insert 10” (25cm) of safety thread.
- 2. Insert MARD Bungee through the grommet from the bottom
- 3. Insert Hemostat through all 2 channels and MARD bungee into the opposite direction of the arrows.
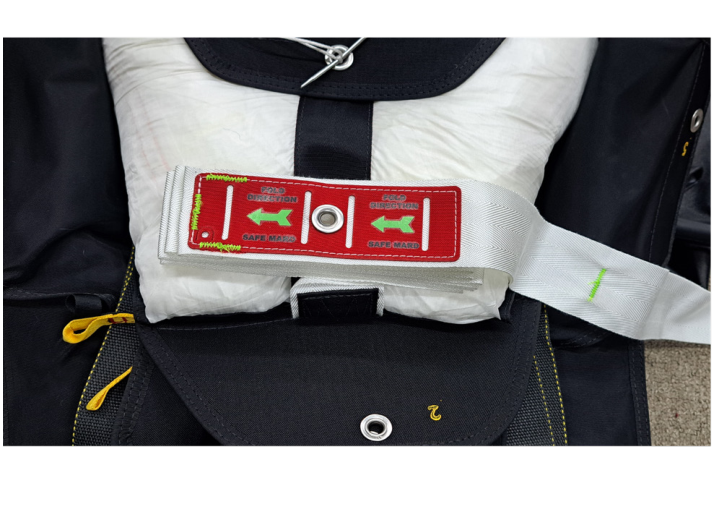
- 4. Triple fold the bridle into a tip at the green marking
- 5. Grab triple folded Bridle tip with hemostat and pull trough all channels and MARD bungee.
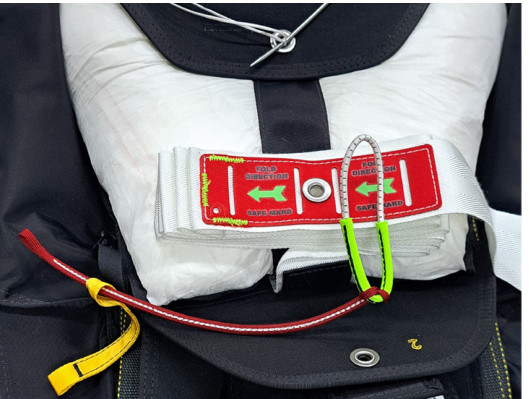
- 7. Align green tip with green marking on the sides of the SAFE / MARD.
- 8. Insert Hemostat through Spectra loop to ease the insertion of the safety thread.
- 9. Insert safety thread though spectra loop and secure with a surgeon & lock knot.
- 10. FYI: This will ensure that the tip will not be disengaged
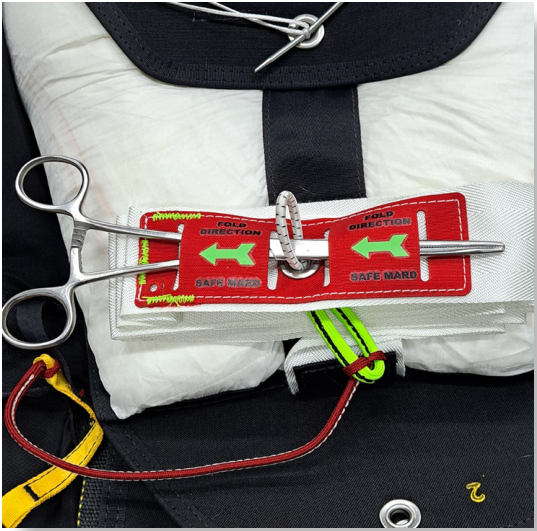
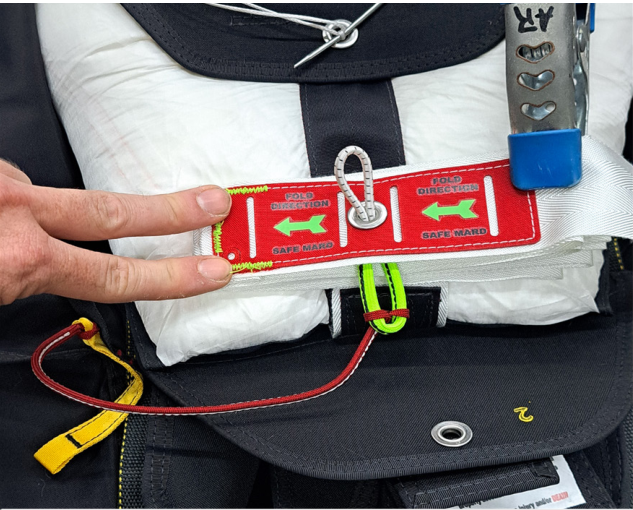
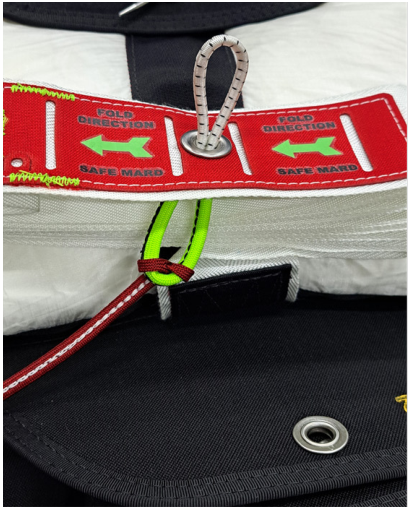
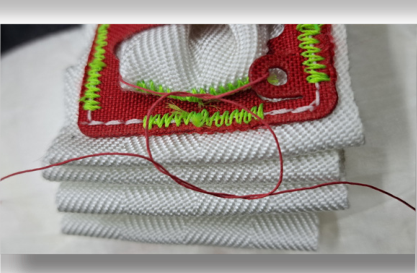
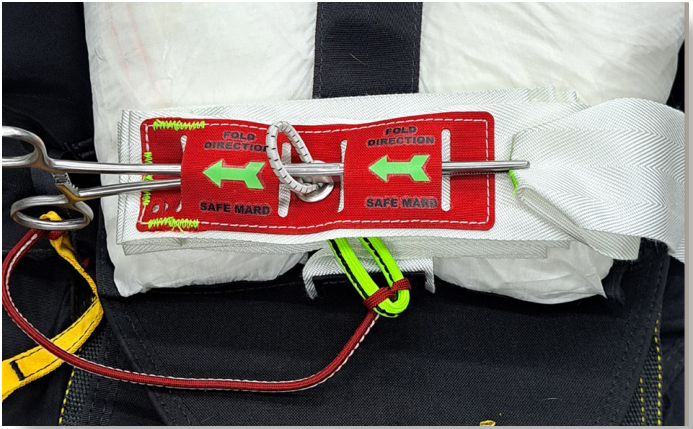
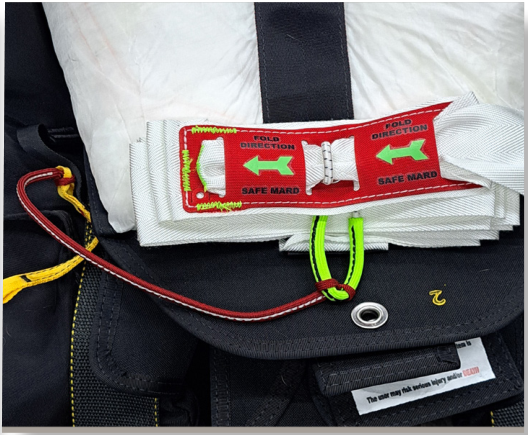
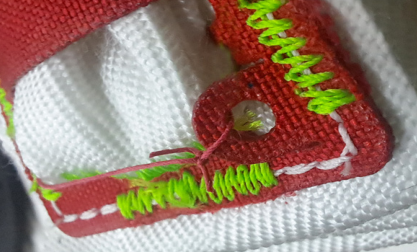
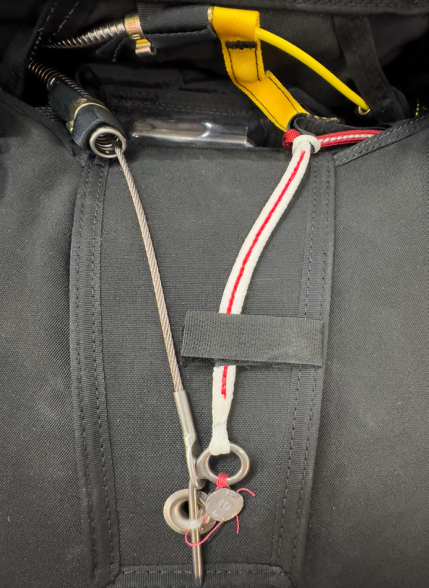
- 11. SAFE MARD ready to install (Yellow RSL lanyard only to show difference between SAFE MARD Lanyard)
- 12. Close flap #1 Fold bridle until SAFE / MARD is in position under flap # 2
- 13. Then close flap #2
- 14. After Flap #2 is closed, make sure SAFE MARD and folds are in place.
Source reference · pages 20–21
Operating your EVOtd
Important information
The Tandem system differs significantly from a solo sport skydiving system, as it includes additional handles positioned in various locations. Notably, the reserve and cutaway handles are mounted outboard to prevent obstruction by the student. As a result, experiences with solo sport gear do not adequately prepare a jumper for the EVOtd. Tandem Instructors are required to consistently practice reaching for these handles, both on the ground and in the air.
Furthermore, Tandem Instructors must reach & touch the drogue release handles, cutaway handle, reserve ripcord handle, & RSL shackle during drogue fall on every jump. This practice helps in memorizing the exact locations of these handles & assists in identifying any problems while there is still time to address them. we strongly recommended to grasp each handle as if intending to pull it.
Vertical suspended drill
Due to the differences between the Tandem system and a solo system, we highly recommend regular practice of vertical suspended harness drills. Repetition of emergency procedures is crucial to ensure that movements become natural and instinctive. Pay close attention to the positions of the handles while in a suspended position. important not to underestimate the importance of this drill! In the event of a malfunction, this practice will equip you with the skills needed to effectively address the problem. For further information, please feel free to contact Firebird.
QUICK reserve activation drills
The cutaway and reserve handles on Tandem rigs are positioned differently and are more securely held in place compared to solo rigs. Due to this, it is mandatory for each Tandem Instructor to practice several handle disengagements on the ground. It's crucial to note that the handles peel away easily in certain directions but are much harder to pull in others.
For a smooth pull, the cutaway and reserve handles must be peeled upward and outward first, and THEN pulled down. This specific technique must be practiced on the ground to avoid surprises in the event of an actual emergency. It's important to conduct a thorough emergency procedure drill, including locating the cutaway and reserve handles, peeling the cutaway, and then pulling the reserve handle. This drill should be repeated enough times to ensure that the movements become natural reactions. It is recommended to practice this drill with the passenger attached and also solo until it becomes natural in both configurations.

Tip: substitute the emergency handles with “mock-up handles” to be used during practice.
Source reference · page 22
Main deployment activation
Introduction to the drogue
Before discussing the drogue usage procedures, it is crucial to understand its function. The primary purpose of the drogue is to reduce Tandem freefall velocity, rather than aiding in stability. When fully inflated, it provides enough drag to give a Tandem pair the terminal velocity of an average solo jumper (120 mph). In the absence of a drogue, a Tandem pair risks accelerating to 170 mph in just 18 seconds. This acceleration can lead to hard opening shocks, potential canopy damage, and difficulties in capturing freefall photography. remember:

No drogue - no main!!!
Deploying the drogue
- Reach for the handle with palm forward & the thumb out.
- Take a strong grip on the handle.
- Deploy the drogue with one smooth motion, releasing it at 90 degrees of the arch in relation to your torso after extracting the drogue chute. Do not hold onto the drogue as the bridle is long and can become entangled.
- Turn your head and watch the drogue inflate (takes about 2-3 seconds).
- Familiarization with Drogue Release Handles
- Practice locating and pulling the drogue release handles, as they may shift during drogue fall. It is recommended to practice in both standing and prone positions, alternating between the left and right drogue release handles.
Canopy brakes & steering system
Main canopy deployment & brake release
- At main canopy opening, grab the right and left primary toggles only.
- To release, pull straight back followed by pulling downwards.
Double brake system
- The Double Brake System is an innovation in risers, providing reduced toggle pressure & faster turns.
- After opening, only primary toggles are required.
- Both primary and secondary toggles are needed for landing.
Main canopy flight & landing
- For normal flight, use primary toggles only.
- In preparation for landing, have both sets in hand ( primary and secondary) toggles, no lower than 1000 ft (300m).
Toggles familiarization
- Practice releasing and restowing toggles and brake lines with the rig on the floor and in a suspended harness.
Source reference · page 23
Adjusting and inspecting your EVOtd
Adjusting Container - The EVOtd Harness System, designed for secure & comfortable fit when properly adjusted.
1. Threading the chest strap.
- Enter the chest strap into the adjuster from the inside (closest to the jumper's chest).
- Route it around the sliding bar and back through, between the bar and the adjuster
- Adjust to ensure main lift webs are parallel when the chest strap is tight.
- Stow the end through the black elastic keeper to prevent major slippage.
Improper threading of the chest strap may result in death. Instances have occurred where skydivers fell out of the harness due to improperly fastened chest straps. Ensure correct & secure threading for your safety.
2. Check for twists before threading through hardware.
- Route the webbing correctly and tighten until snug.
- Slide excess strap through black elastic keepers.
- Stow remaining strap in leg pad pockets to prevent flapping during freefall.
3. MLW adjuster with "locking spring."
- Adjust by pulling down the webbing until snug.
- Store excess webbing under the MLW bungee retainers preventing from flapping during freefall.
Gearing up
1. Gear inspection -
- Always thoroughly inspect/check your gear before putting it on "Pre-Flight Gear Check". It is the tandem instructors duty to do a complete equipment check before each use.
2. Gear up -
- Place the packed rig over your jumpsuit or clothing. Ensure to have done a gear check within 2 mins of gearing up.
3. Leg straps -
- Thread the leg straps through the adapter.
- Ensure they are untwisted and position the comfort padding.
- Tighten the leg straps until snug.
4. Chest strap -
- Stand up straight and secure the chest strap, avoiding over -tightening.
Source reference · page 24
Adjusting the student harness
Fitting this harness on a tandem student is not difficult, but the utmost consideration is the student's security. Ensure all straps are securely tightened against the student's body for their safety and comfort by following this guide.
Steps:
- Loosen the harness before starting.
- Rotate the harness on the student’s shoulders to position the Top Attachment Snaps correctly for easy hook-up.
- Adjust the Horizontal Back Strap so the Main Lift Web & Leg Straps are positioned over the students hips.
- Make sure the MLW & Diagonals are adjusted so the harness’s Hip Junctions rest squarely on the front portion of the student’s hips.
- Firmly tighten the Horizontal Waist Strap and Horizontal Back Strap around the hips creating a belt around the waist.
- Adjust and tight the Leg Straps - routing the excess through a minimum of one of the permanent keepers aka dead stops.
- Adjust the Chest Strap - sliding it vertically three to five inches below the sternum and tighten.
- Adjust the Y- strap - Place the strap low enough along the leg straps to ensure minor adjustments, allowing the student to sit back in the passenger harness. In no situation should the "Y" strap be more than 2 - 3 inches seperated from the student.
MLW adjusting recommendations:
- Proper fitting for larger passengers: For a bigger person it is critical that the Horizontal Waist Strap, Horizontal Back Strap, Leg Straps and Y-strap remain snug. This is necessary to avoid shifting during exit, freefall and especially during the opening shock of deployment. Six straps extend in every direction, fully containing the pelvic area.
Harness adjusting recommendations -
- Hook up and suspend your student to allow the harness to conform to their body.
- Release the student and check all adjustment points, check for tightness between harness and student ensuring adjusted fitting to the students body.
- Tighten the harness if necessary.
- Position and securely tighten the Horizontal Back Strap low on the back.
- For larger body frames, position the Main Lift Webs further apart.
- Utilize the 14 points of adjustments to surround and contain the student's body.
- Left Lateral Connection - Ensure lateral strap is untwisted & quick ejector is secured all the way down on the detent.
- Hooking up the passenger harness to the container
- Prior to start hooking up the student always do a handle check to ensure they are in place, check the 3-Ring system and harness straps for proper routing.
- Left Lateral Connection - Ensure lateral strap is untwisted & quick ejector is secured all the way down on the detent.
- Right Lateral Connection - Ensure that the lateral strap is untwisted & the quick ejector is secured all the way down on the detent.
- Tighten both Laterals, stow excess webbing.
- Right top connection - Ensure the Snap Hook is securely fastened around the attachment ring.
- Left top connection - Ensure the Snap Hook is securely fastened around the attachment ring.
- Check and verify that all four connections are secured After completing the hook-up procedure, it is crucial to perform another handle check to ensure they are in place. Additionally, check the 3-Ring system and harness straps for proper routing. Ensure the student's harness is correctly routed and there is no excess stowage. Finally, check the four connection points in the same order to ensure everything is secure and ready for the jump.
Source reference · pages 25–26
Inspecting the main canopy and components
We recommend to inspect the main canopy & components after 25 jumps, including but not limited to:
- Drogue envelope.
- Drogue bridle and centerline (Check calibration and general wear).
- Check Drogue Disc, attachment pin and screws.
- Main Deployment bag and grommets.
- Bridle attachment point on top of and inside of canopy.
- Canopy fabric, tapes, seams, suspension lines and attachment points
- Control lines, brake loops & toggleS. Slider & grommet condition
- Connector links & slider bumpers
- Inspect the disc release system
- Main closing loop
- Main container D-rings
- Recoil ripcord system
- The modern ram-air parachutes produced today are very reliable canopies. If IT is packed with straight & untangled lines, it will usually open properly.
- Nevertheless, we recommend following the packing instructions of your preferred technique,in accordance with FAR 65.111.
- The parachute should be packed carefully and in the same manner after each jump or according to the periodic re-pack cycle. Part of this careful procedure is to ensure that the packing area is clean and not in direct sunlight. Ultraviolet light can cause irreversible damage to the canopy fabric.
- Reserve parachutes should only be packed in a closed area on carpet or a similar surface, only by CERTIFIED RIGGERS using their preferred method.
Source reference · page 26
AAD: mandatory use
Approved Automatic Activation Devices:
- Vigil
- Cypres
- Mars
- See individual AAD manuals for the arming, activation and de-arming altitudes of the system you are jumping
Mandatory use of AAD is required in the EVOtd system
- Ensure AAD is in TANDEM mode or set to TANDEM if using a multi-mode AAD.
- Insert the AAD unit into the pocket.
- Route AAD cutter cable through the channel and loop any excess into the AAD pouch.
- Place AAD cutter into the elastic keeper.
- Route control unit cable through the white sleeve and loop any excess into the sleeve and/or AAD pocket.
- Pass the control unit through the slit inside the top of the sleeve.
- AAD pocket:
- Place the control unit into the AAD window pocket.
- Avoid tension or excessive slack on the cable.
Source reference · page 27
Reserve and main canopy: packing and closing
Description of the QUICK reserve parachute
| Property | Source specification |
|---|---|
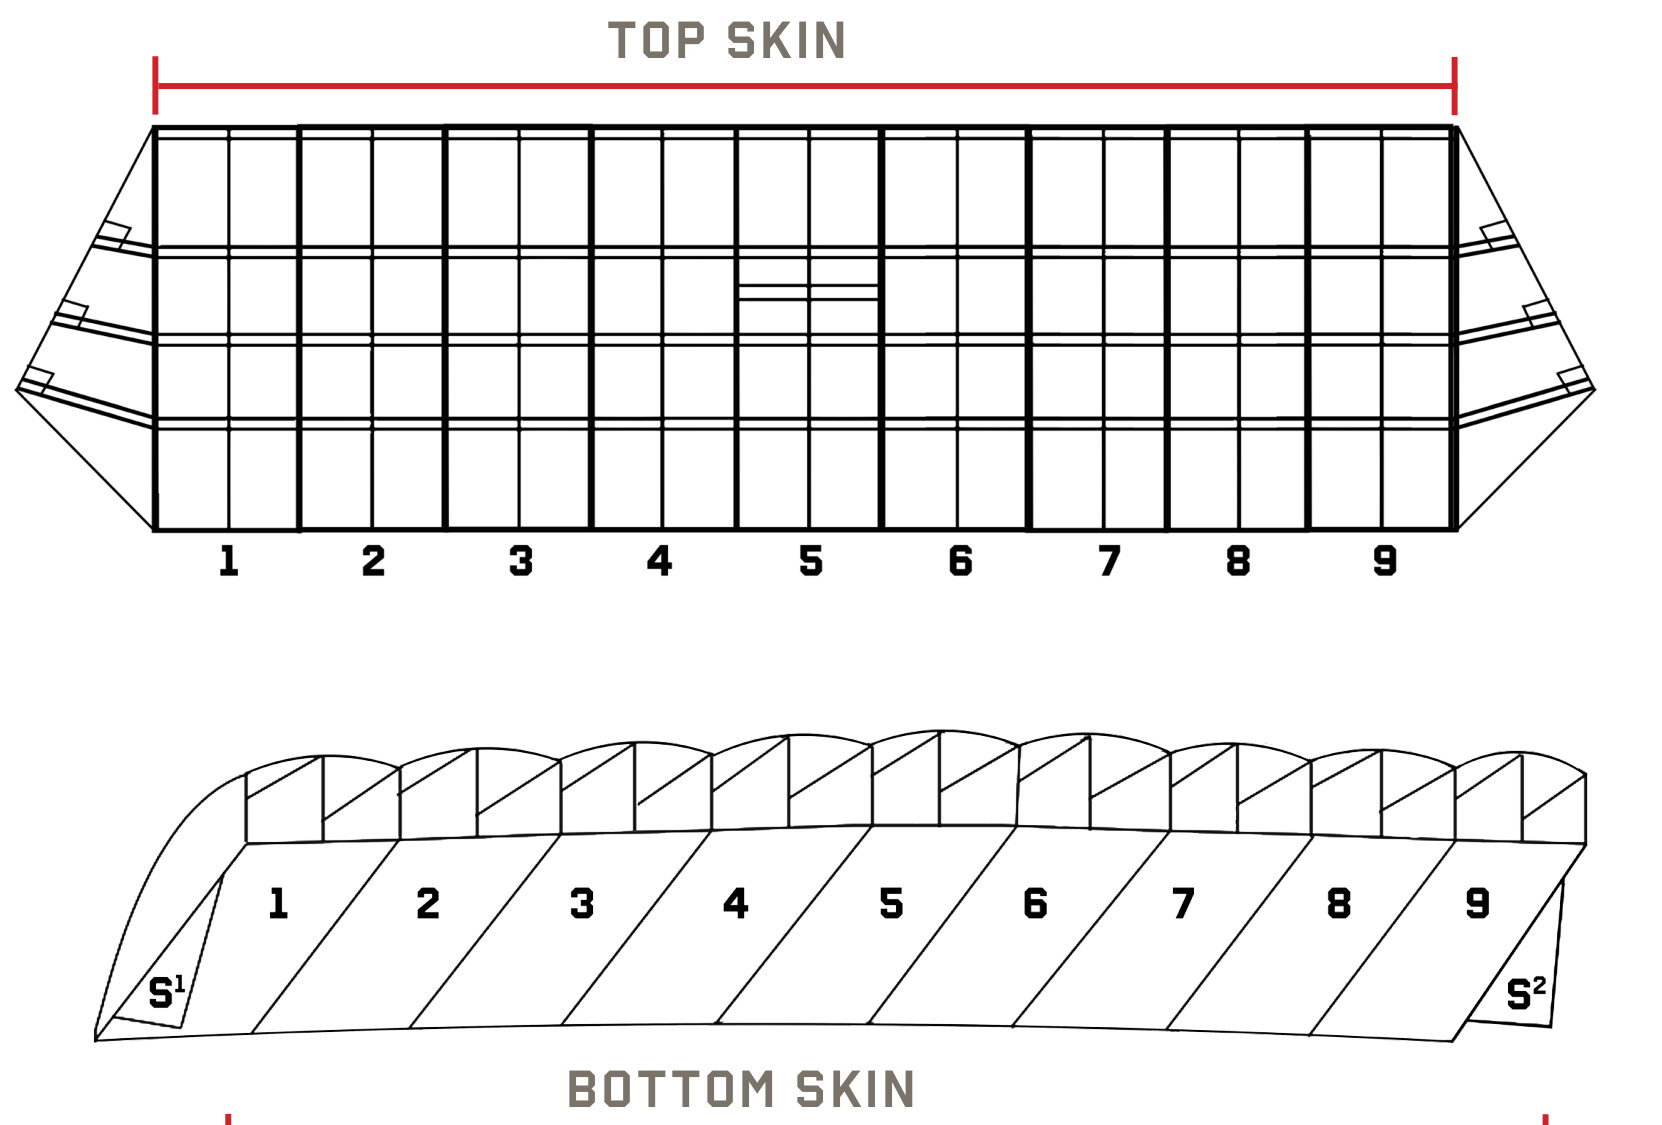
| Parachute type | Ram-air square reserve |
| Number of cells | 9 |
| Construction technique | I-beam chord-wise |
| Manufacturer | Firebird USA LLC |
| Suspension line connectors | #6 stainless-steel rapid links, L-bars |
| Canopy fabric | Nylon F-111 type fabric |
| Suspension lines | EDELRID Dyneema et al. |
QUICK - reserve parachute
- 9-Cell Ram Air rectangular Parachute. F-111 type Fabric in I-Beam
Cord-wise construction
- Max Deployment Speed: 175 KEAS, 324,1 Km/h
- Max Exit Weight: Quick 400: 225 Kg (500lbs)
- Max Exit Weight: Quick 350: 215 kg(475lbs)
The QUICK reserve canopy - parachute. TSO-c23d.
The reserve canopy is an F111 canopy with direct or cascaded Vectran lines. Thorough inspection is essential before its initial packing and at each subsequent repack. Special attention is required during the initial assembly and after any deployment.
- Reserve parachutes must be opened, aired, inspected, and repacked at the latest every 180 days or according to the requirements of the national competent authority. In extremely hot and humid climates, a significantly shorter pack cycle is recommended.
- The main parachute must be inspected after 120 days or 50 jumps, whichever comes first. After 120 days or 50 jumps MAX, you should replace all rubber stows.
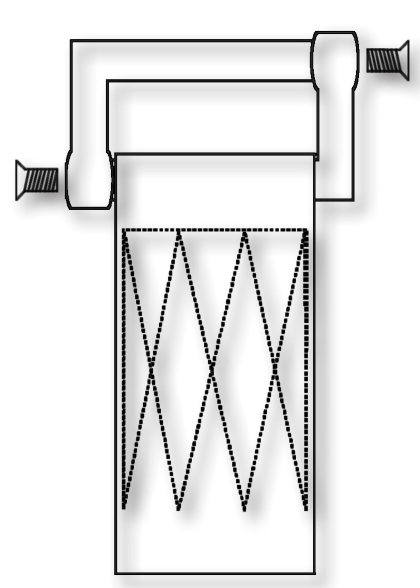
- Fabric testing should be done annually (at the appropriate repack cycle). Testing the canopy within one year after the date of manufacture is not required. However, when testing the canopy, use commercially available 1-inch (2.54 cm) fabric testing clamps with rubber-faced jaws and an appropriate scale. It's essential to ensure the scale is calibrated once per year and is accurate within 1 lb. (0.4535 kg). Record the fabric test results on the packing data card for the reserve parachute.
- Three fabric pull tests should be performed on a canopy -
- One on the left end cell top surface
- One on the center cell top surface near the trailing edge.
- One on the right end cell top surface.
Notes -
- The test should be at least 3 inches (7.62 cm) away from any seam or data panel.
- The test should be done chord-wise. An additional test must be performed on any stained or discolored areas. Lock the clamps securely to avoid slippage. Mark the tested area with parachute ink. Note the passed or failed fabric test in the packing data card.
Recommended tools for Inspecting & packing your Quick reserve The following is a list of recommended tools you may need:
- Adjustable crescent wrench for number 6 stainless steel links
- Scissors & snips
- Pull-up cord
- Velcro fastener strips with flags (2 short or 1 long pile)
- Locking soft bodkin
- Metal bodkin / T-bar
- Temporary pin with flag
- Seal, seal press & seal thread
- Link Separator
- (2) packing Paddles
- Weight bags
- (4) clamps (ensure smooth tips and no sharp edges, remember account for all tools at the end of your pack job)
- Cranking / positive leverage devices and knee plate
Attaching the QUICK reserve to the reserve risers.
- When assembling the canopy onto risers with reserve links, it is crucial to follow the directions precisely.
- The connector links supplied by FIREBIRD for use with their reserve canopies are of the highest quality & carefully inspected and tested. It is important that no substitute links be used. Although other links may appear similar or even identical to those supplied by FIREBIRD, any substitute could be considerably weaker than the originals.
- Remove all grease and dirt from the links using a solvent that leaves no residue—Tri-chloreothlane or any electrical contact cleaner is recommended.
- Inspect the link carefully. Check for nicks, burrs, or any signs of bending or stress.
- Save the screws; do not drop them. Slide one half of the L-link onto the riser.
- Slide on the second half of the riser without rotating them! Check for line- twists!
- Perform a thorough line check, ensuring the canopy is straight. After tightening the links with locking compound (Loctite, Permanex, or True-lock), correcting errors becomes difficult.
- When sure the canopy is straight, unscrew the screws, apply ONE drop of locking compound on the threads, and gently tighten them. Clean off any excess thread lock with a dry rag.
- Create a small match mark along the screw and the link for easy tightness verification. If the match mark remains intact, it indicates that the screw is secure. However, if the match marks are misaligned, it suggests that the screw has shifted. In such a case, immediately disassemble the link, clean it, and inspect for any damage. If the link is undamaged, reattach the riser/ link/line assembly according to the previous steps.
- Make sure the steering line goes through the grommet of the slider.
- Route the steering line through the guide ring on the riser. Next, thread it through the grommet in the toggle, from the Velcro side. Pull the toggle through the finger-trap loop & tighten.

Reserve parachute may only be packed by an FAA-certified parachute rigger & must be inspected and repacked every 180 days.
The QUICK Reserve Canopy should be packed by a certified FAA Parachute Rigger with the appropriate training & certification. Since the reserve may only be repacked by qualified personnel with the appropriate specialized knowledge, we prefer not to explain the packing procedure with step-by-step individual illustrations, but instead to merely illustrate the most outstanding points of the packing method preferred by FIREBIRD. However, we will cover the key elements. starting once the Reserve canopy is flaked, detailed steps on how to pack it into the FREE BAG, followed by the steps on how to close your EVOtd.
Steps -
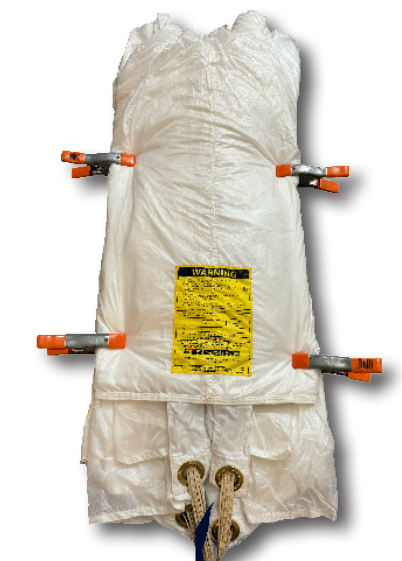
- Stack the canopy in neat S-folds, starting with the first Nose S-fold while controlling the slider grommets and line tension. Packing paddles can greatly assist in this step. Tip: Recommended to pack the width of the freebag.
- Prepare the FreeBag for the Reserve Canopy.
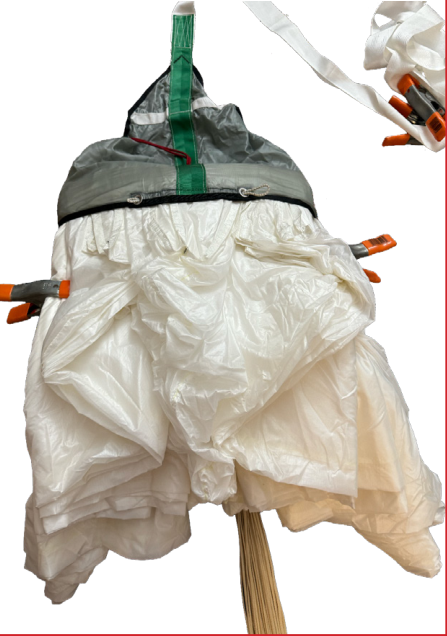
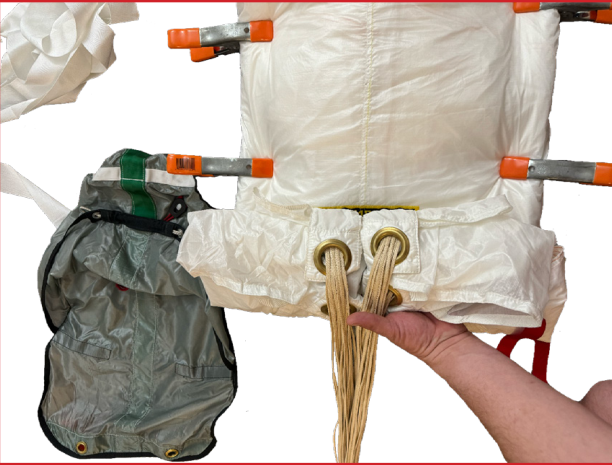
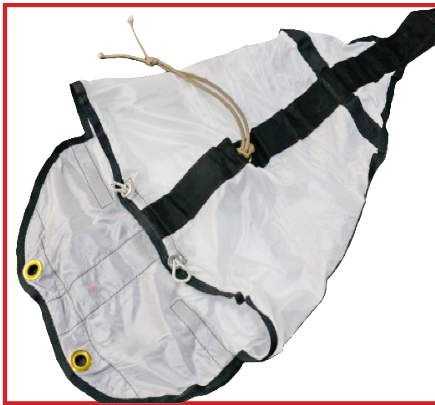
- Form two "horns" or "ears" and stow them in the freebag. Insert the first "ear" into the reserve bag, repeating the steps for the opposite side of the canopy. Gradually move the entire canopy into the freebag, switching from side to side.
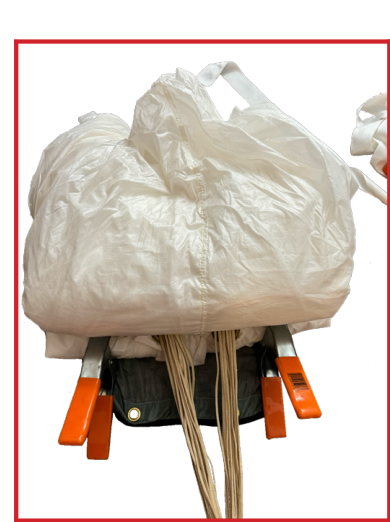
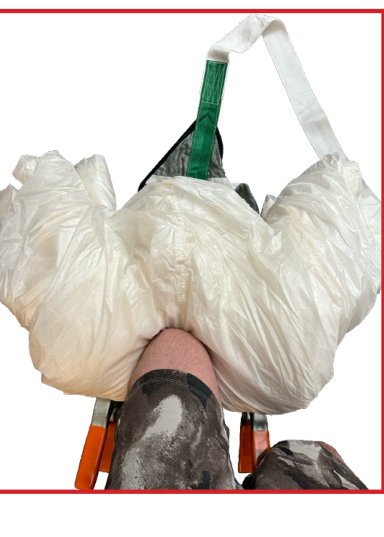
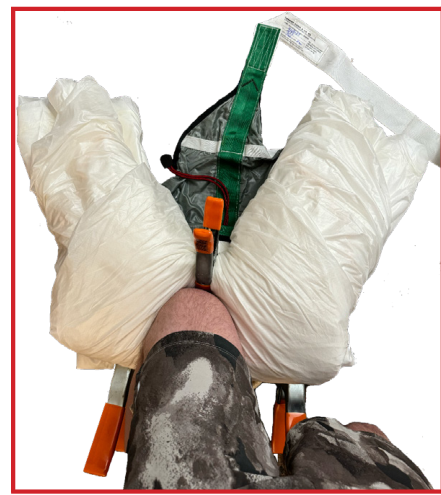
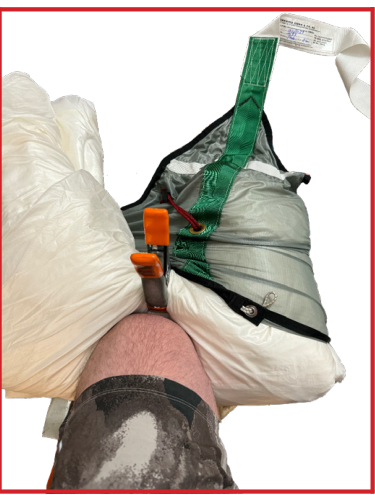
- Close the freebag with the shock-cord safety stow.
- Stow the suspension lines in S-folds in the line bag compartment of the freebag.
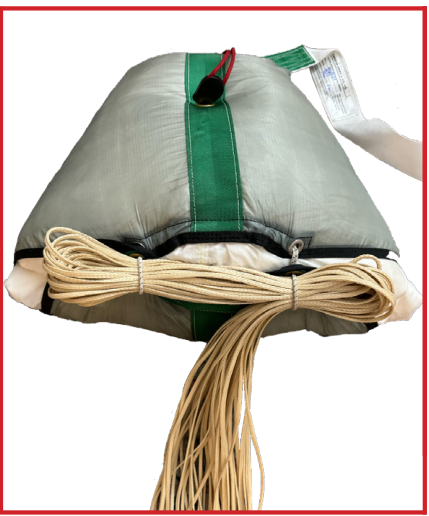
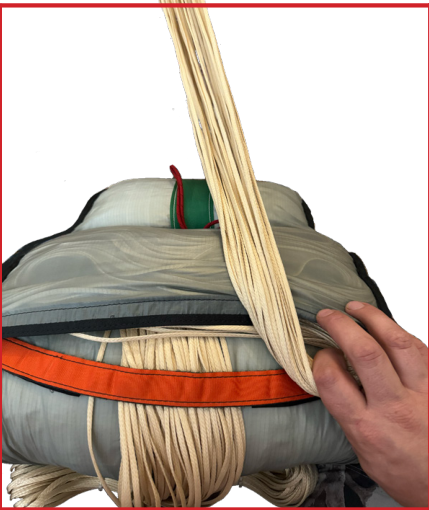
- CHECK that the L-bar connector links are side-by-side at the bottom of the reserve tray.
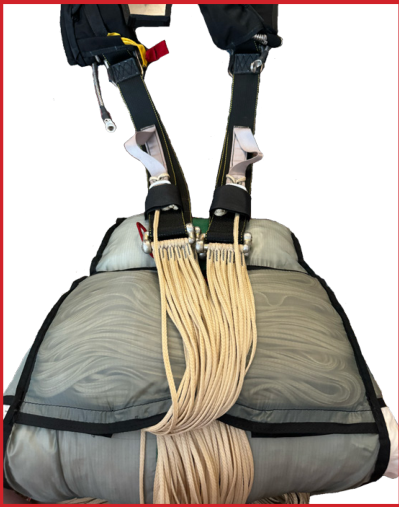
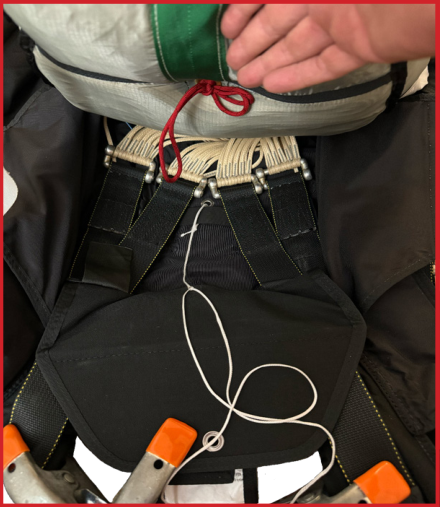
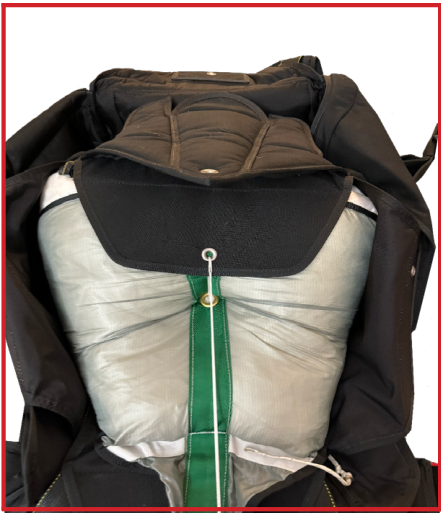
- Place the freebag in the reserve tray with the lines at the bottom. Bring the loop through the grommet, then close the first, bottom flap. Note: that the AAD cutter is located on this flap.
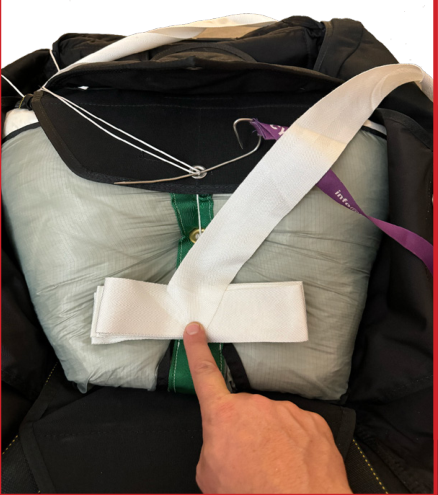
- Place the pilot chute bridle of the freebag on top of the free bag, creating 5-6” medium-size S-folds. Each subsequent S-fold should be slightly shorter than the previous one. Leave at least 2m (61/2 ft.) of bridle remaining un-stowed. for safe mard instructions refer to safe/mard section of this manual
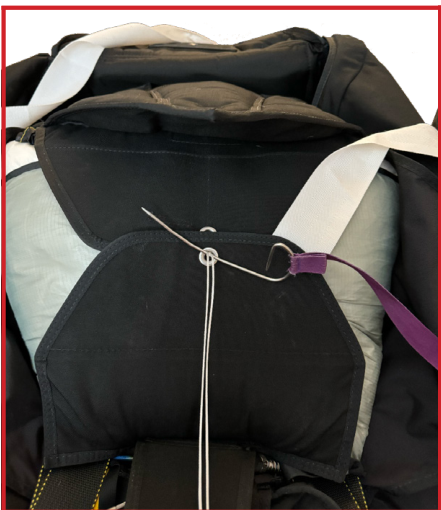
- Lay the second (top) flap carefully on top of the S-folds & close the flap with a temporary pin.
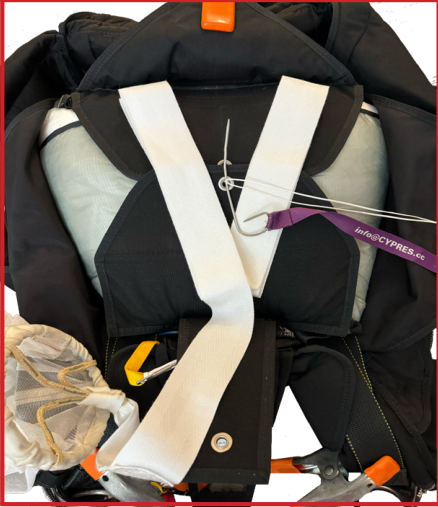
- S-fold the remaining bridle in a "V" shape on top of the first two flaps.
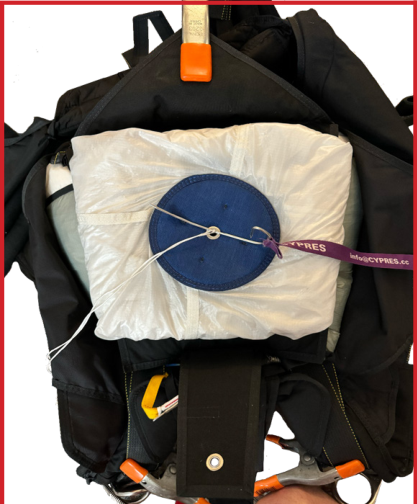
- Center and secure the pilot chute using the temporary closing pin. Ensure no fabric is caught in the spring of the pilot chute.
- Carefully tuck the pilot-chute fabric together under the edge of the cap. Close the center flap first, followed by both side flaps. The sequence of the side flaps is not critical.
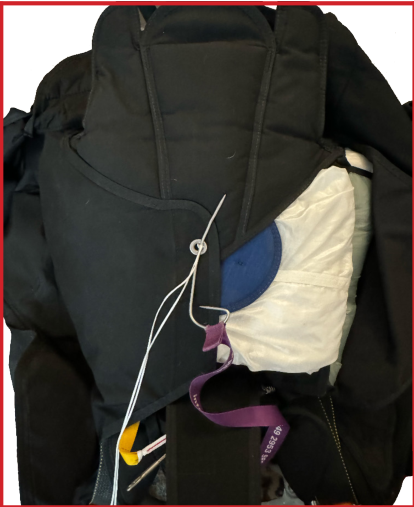
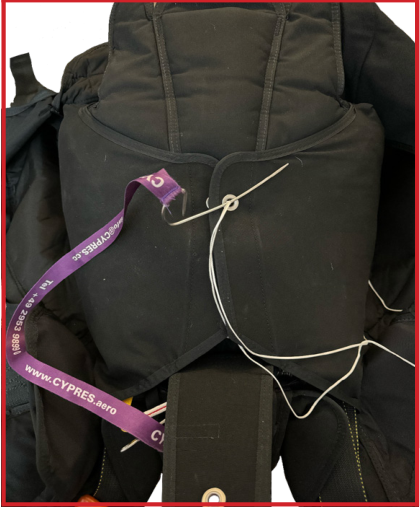
- The reserve Closing Loop Measurement may vary depending on location, weather conditions, and pack job. In a more humid environment, the closing loop should be 7” with a tolerance of +/- 0.5”; in a drier location, it should be 6.5” with a tolerance of +/- 0.5”.
- While closing the top flap, ensure that the RSL line cleanly attached to the reserve cable.
- After the rigger has sealed the reserve with the red safety thread tie, close the top-flap (Flap#3 - reserve pin protector flap with a see-through panel). The see-through panel allows a visual reserve pin-check at any time without opening the pin protector flap.
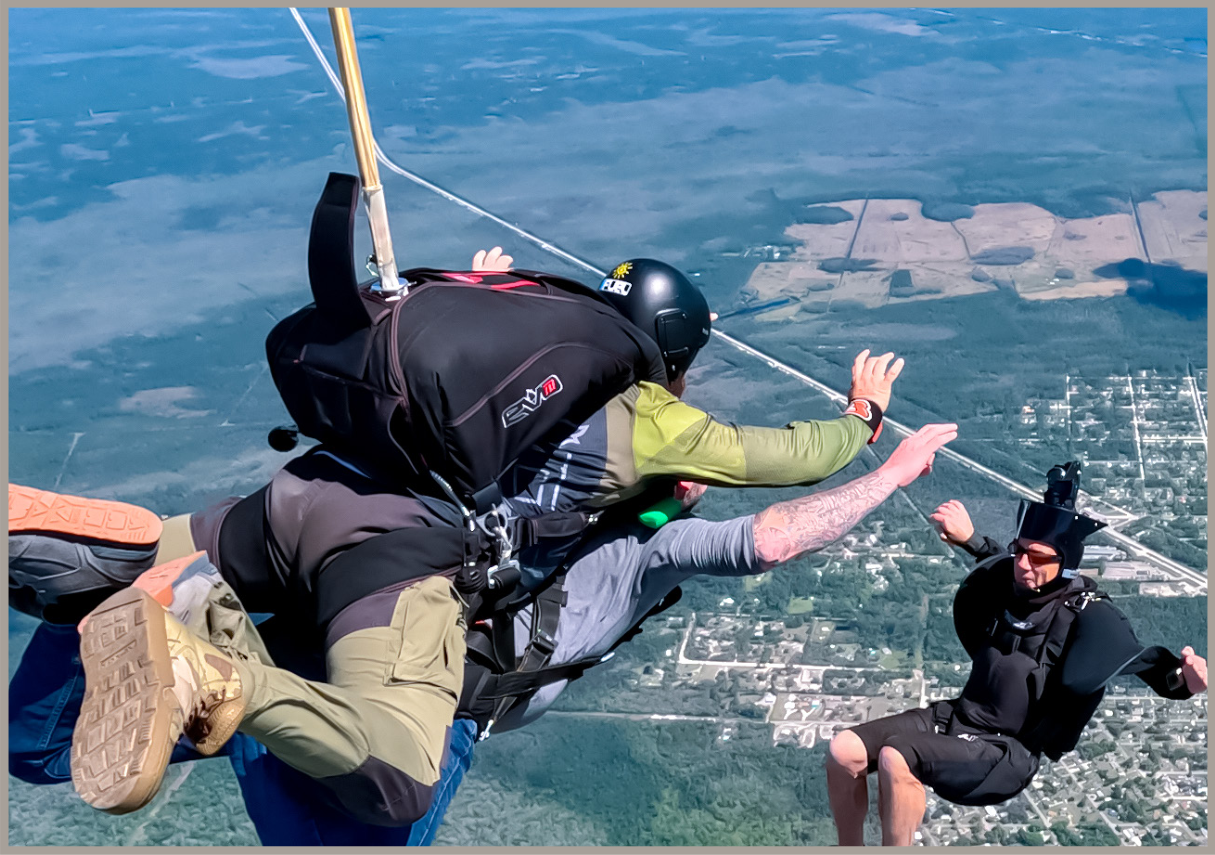
PACKING MAIN CANOPY and closing your evotd Main Canopies should be packed by qualified personnel only, with the appropriate specialized knowledge, we won’t explain the main canopy packing procedure (use your preferred packing technique), but instead the most outstanding points of packing the main canopy into the container once is inside the main deployment bag. Please refer to the canopy manufacturer’s manual for the packing instructions of the main canopy. Even if you follow all instructions and you packed all parachutes well it is possible that parachutes will not open properly! If you follow all instructions you minimize the risk for a malfunction! Training and experience is required to use this equipment! You should follow the inspection instructions in this manual for inspections of the parachute system. The parachute should be packed only in shady areas on a clean,flat, dry ground. Use a packing mat to protect your equipment while packing. The complete system must be inspected after 120 days or 50 jumps.
Once the main canopy is inside the main deployment bag:
- Secure the canopy in the D-bag with one hand so it doesn‘t slip out.
- Stow the suspension lines using attached rubber bands. Making the loops uniform in length; pay attention that there are no exceptionally long loops, they should be about the width of 3 fingers. Stow the suspension lines until 50cm (20") of line remains un-stowed.
- Place D-bag in main tray with line stows facing bottom of container.
- Stow the risers alongside the reserve container so that the toggles face towards the reserve.
- Stow the main risers under the yoke flap and close the magnetic riser covers.
- Neatly run the excess lines along the right and left wall of the main deployment pack tray and S-fold the remainder of lines in bottom of the main pack tray. Do not allow excess lines to wedge under the reserve pack tray.
- Place disc on top of D-bag with the flame pointing up towards the reserve.
- Set the drogue before closing the container, and make sure the limiter tapes are completely taut. If the drogue has not been set during the packing process the tandem pair’s terminal velocity will increase. The drogue should inflate within 6-8 seconds in this configuration if there is no other drogue entanglements upon deployment. Drogue centerline should be inspected and calibrated as needed, every 25 jumps. The bridle on the left side of the container is scrunched up after you set your drogue. Position and keep the scrunched bridle on the left side and on top between the D-bag and reserve container.

Note: using a packing tool or a pull-up cord, thread through d-rings and around the disk to close container as indicated in the following diagram.
Diagram (CS1) - closing sequence
- 1. pass the pull-up cord through the closing loop located on bottom flap.
- 2. Route the closing loop UNDER (through) the D-Ring located in FLAP 1.
- 3. Route the closing loop OVER (through) the D-Ring located in FLAP 2.
- 4. Route the closing loop UNDER (through) the D-Ring located in FLAP 3.
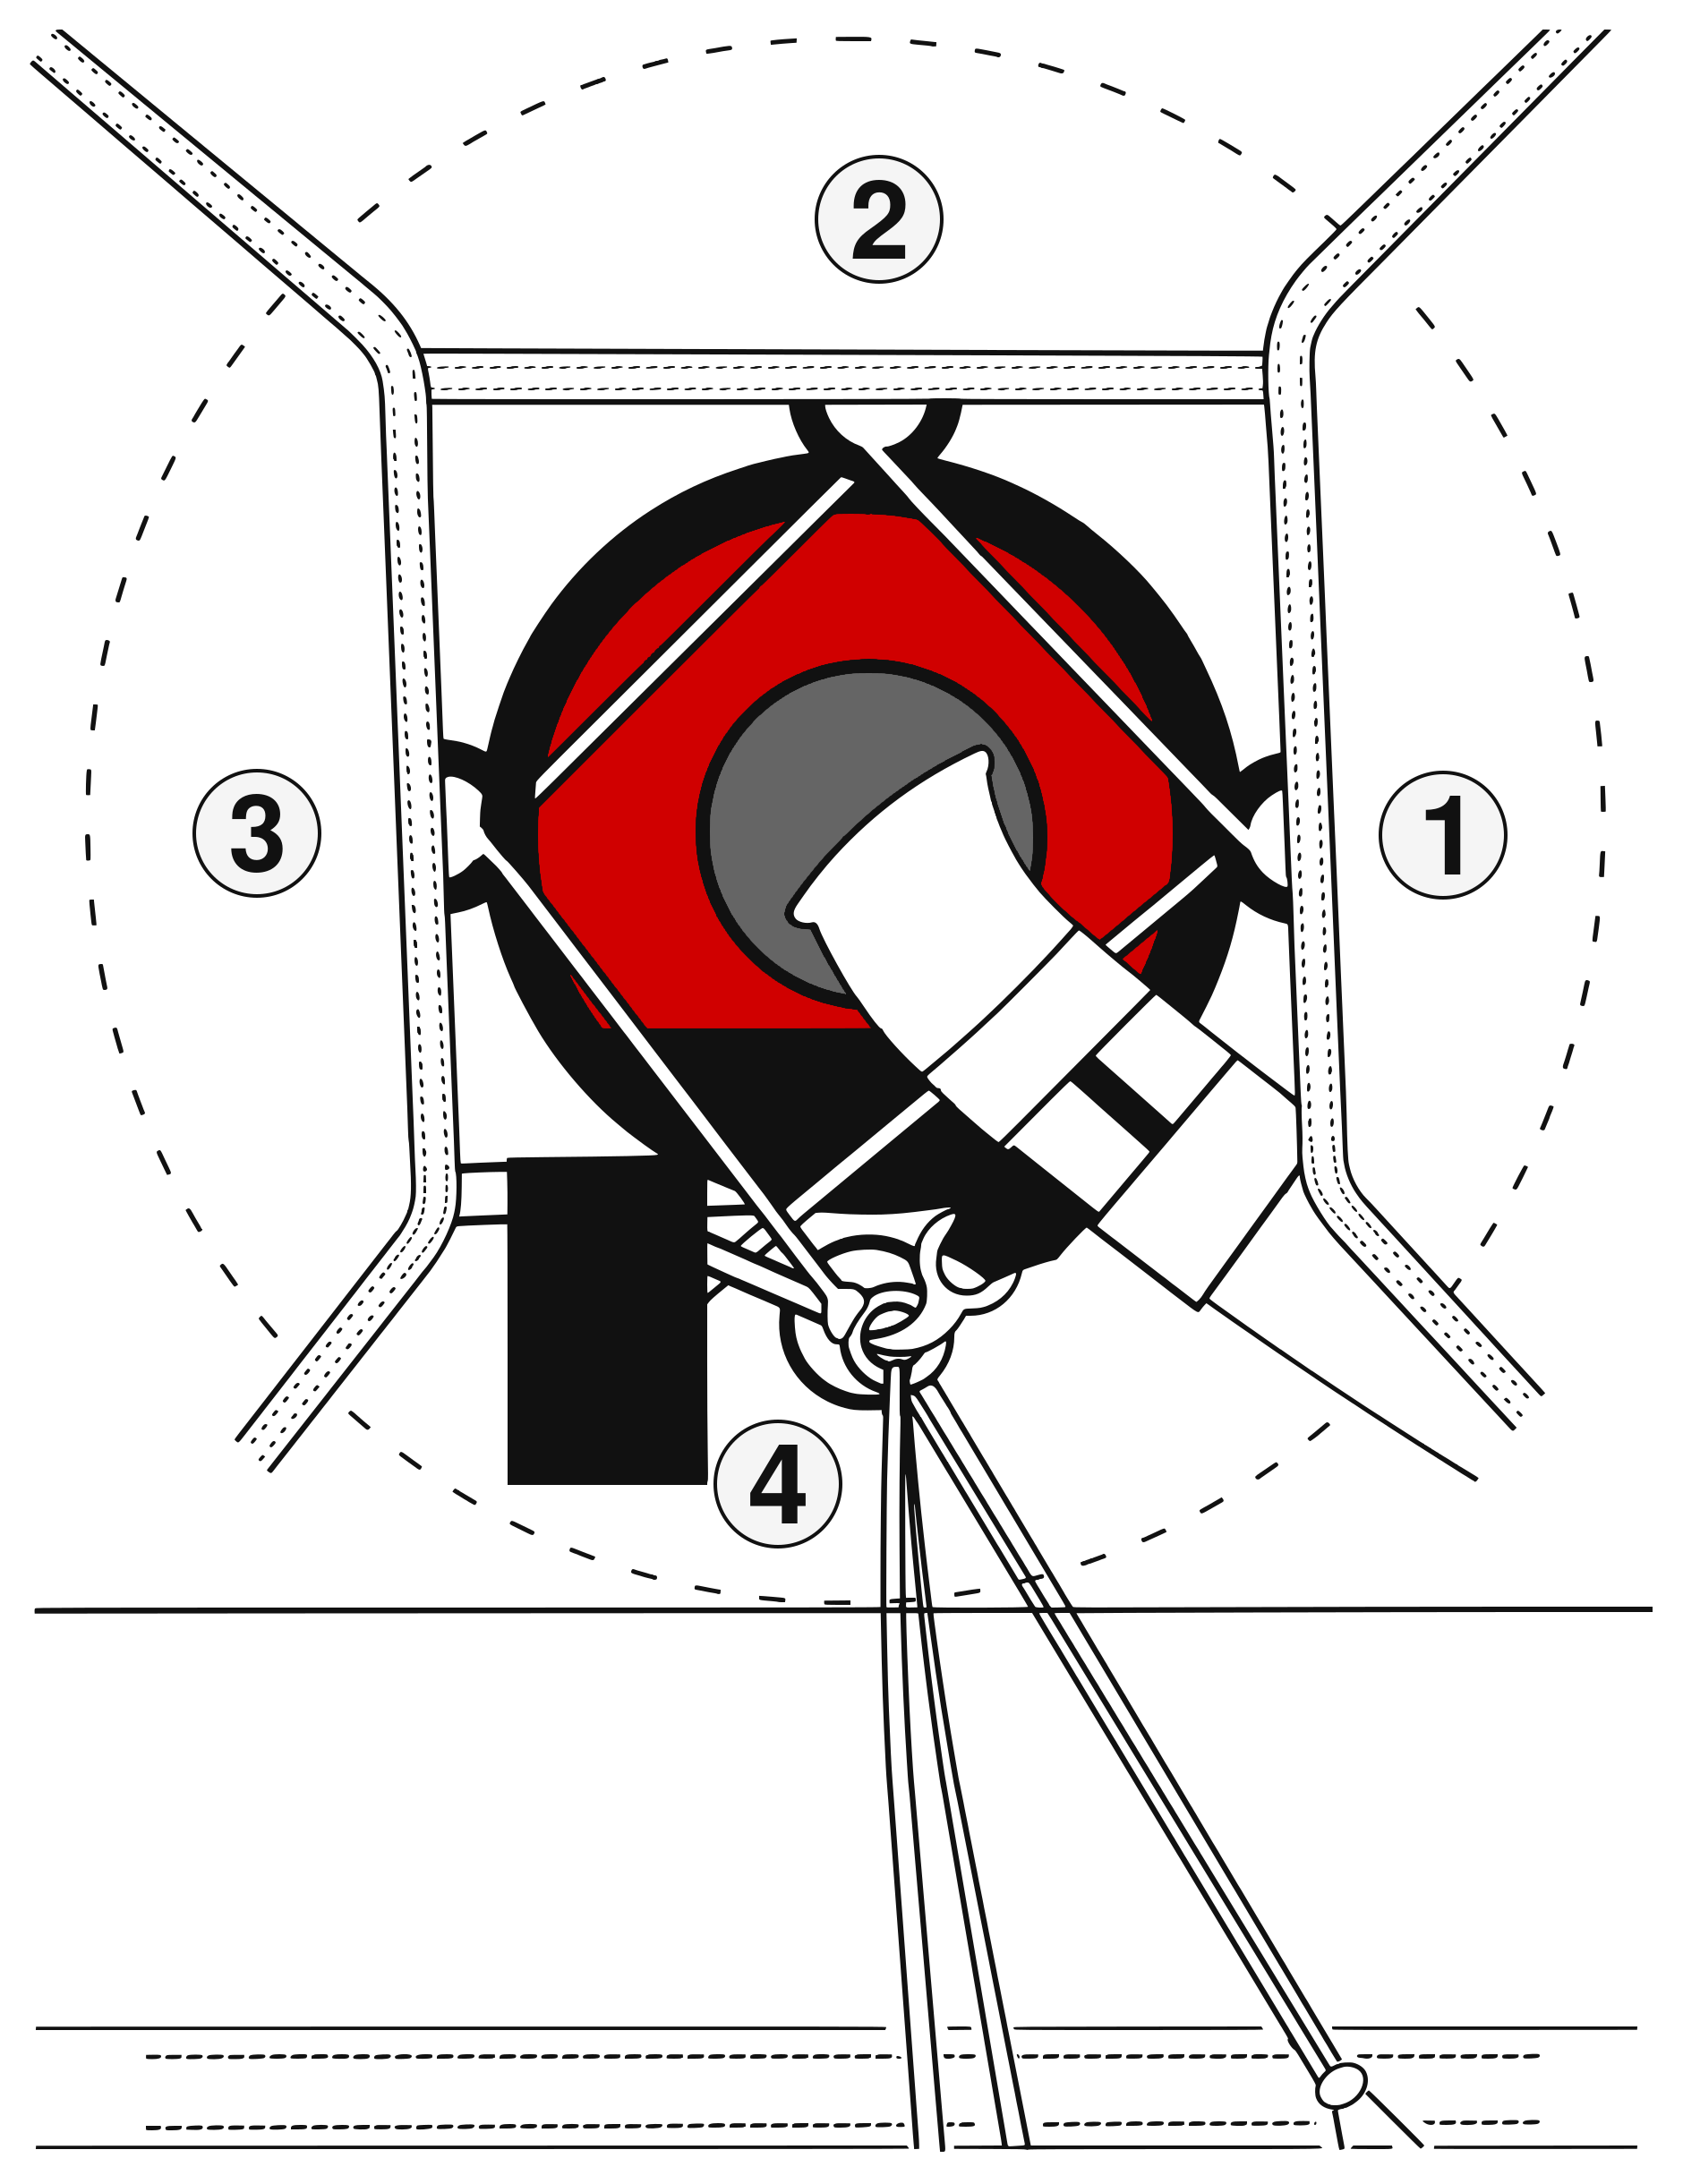
- 5. Route the closing loop OVER (through) the GROMMET in FLAP 4 (bottom flap).
- As the four (4) flaps are drawn together, check that the disc has remained centered with flame pointing up toward the reserve tray, with D-rings evenly spaced. Secure with main pin, making sure the D-rings, bottom stiffener, & main closing loop are all below the top flange on the disc.
- Place the main pin between 10 & 11 o’clock position. ensure that both bungee ripcords are clear and not twisted. Twists in the bungee ripcord can cause hard pulls.
- Once secure, carefully remove the pull- up cord routing underneath the closing loop.
- Insert safety pin (attached to drogue bridle) through main pin eyelet into grommet.
- NOTE: Main pin should be inserted from the bottom of the container upwards. If it is inserted incorrectly it can cause a hard pull – drogue in tow. diagram (CS1) - closing sequence
- The curved part of the safety pin must be fully inserted to function correctly.
- Place drogue bridle underneath right main side flap without excessive tension on safety pin.
- Secure the 2 small tuck tabs on the pin flap cover, underneath bottom main stiffener.
- Close the main disk cover securing it on the main top flap under the bottom of the center flap.
Packing the drogue -
- 1. Layout drogue in a nice flat, circular fashion.
- 2. Fold drogue in half down towards the bridle.
- 3. Fold drogue in half towards the handle.
- 4. S-fold remainder of bridle on top of each with the excess coming out of the opposite side of the handle leaving approximately 15” of loose bridle.
- 5. Fold across once more making the folded drogue approximately 15 x 6 inches.
- 6. Insert drogue in its pouch and tuck bridle away so it is not visible. Ensure that the opening fold of the drogue is facing the back of the container when inserting it into the pocket.
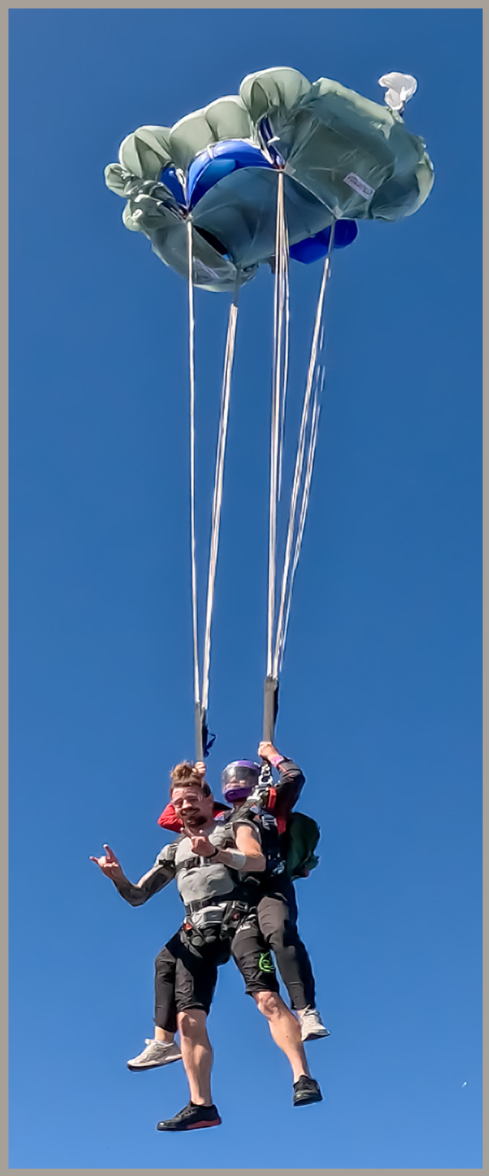
This completes the packing process.
Source reference · pages 28–37
Instructor certification: requirements and preparation
- 1. Personal requirements Before any Tandem jump - it is important to determine that the student meets a few basic criteria. There are very few restrictions on who may jump, but the guidelines put forth here must be followed carefully in order to protect yourself, the student, and the entire Tandem program. The four personal student requirements are:
- Age - Warning: It is the responsibility of the drop zone and the Tandem Instructor to ensure the student is of legal age and has provided legal documentation stating this, based on state and/or national law.
- Physical condition - The student should be in good health, with no heart conditions or any other debilitating ailment.
- Weight & Size - There are many factors to be considered when evaluating student weight & size.
- WEIGHT: The total combined exit weight of the Tandem Instructor, student, and equipment must not exceed 500lbs.
- SIZE: The Tandem Instructor must have the experience & skill to control the student they are jumping with, regardless of their difference in size.
- Flare - Tandem Instructor should be able to steer & flare the main or reserve canopy without the help of the student.
- Combined Size vs Exit Doors - Consideration If a large Tandem Instructor is taking a large student, it may not be possible for them to safely exit from a Cessna-182 or similar aircraft. However, the same pair could easily exit from a tail gate aircraft, Twin Otter, or similar aircraft with more accessible doors. Aircraft availability must be taken into consideration when deciding if a student may jump.
- USPA assumption of risk Video waiver - Must be shown to every student prior to making a tandem skydive. Additionally, the Firebird Tandem parachutist waiver and assumption if risk Agreement must be completed by the student before making a tandem skydive.
2. Geographical requirements the following factors may play a part in how you decide whom to take on a given day or at a specific location.
- Weather assessment - For Tandem jumping, the optimum range for winds is 5 - 20 mph. All jumpers should realize that very high winds are unsafe for jumping. In Tandem jumping, it may be equally unwise to jump in extremely low winds. Heavy students with any physical malady preventing them from running or supporting their weight should avoid jumping in no-wind conditions.
- Temperatures - As the seasons change, the canopy’s performance will vary with cooler or warmer air. Cooler air, being more dense and stable, results in better and more stable canopy descent and flare performance. Warmer air is thinner, potentially making landings harder.
This difference can even be noticeable within a day as temperatures rise. The warmer air creates an effect known as "density altitude," where the field elevation is considered barometrically higher than its geographical elevation. On a hot day, the canopy may behave as if the field is at 6,000 ft (1800m) rather than sea level - a significant difference! On a very hot day with a heavy student, density altitude becomes a crucial factor. Common sense, good judgment, and caution are often necessary.
- Terrain assessment - Selecting the landing area is crucial. When planning a Tandem jump at an unfamiliar spot, check the landing area beforehand. Identify obstacles and note other large open alternate landing areas. Turbulence can affect canopy flight up to 1/4 mile away from tall obstacles. Keep these considerations in mind when noting wind direction and spotting. Think ahead and plan carefully.
- Altitude - When jumping at locations above sea level, higher ground elevation makes the flare less effective. Familiarize yourself with different canopy characteristics by selecting lighter students to jump with.
Jump overview
- Synopsis of the jump - Before the first jump it is important that the student understand what the jump will be like and what is expected of him or her. Before their first jump the student should have the Tandem concept explained by video, still photos or direct observation. Inform them of the entire sequence and what to expect at each stage of the jump. Information such as exit altitude, length of free-fall delay and length of canopy ride are all motivating points of interest.
- Video and assumption of risk agreement - The student MUST view the waiver video and sign the waiver. Be careful to abide by all Firebird USA LLC & USPA provisions. If the video machine is out-of-order or the recording is lost, it is considered the same as if the aircraft was inoperative. NO ONE may make a Tandem jump without watching the waiver video & signing the waiver.
First jump - student briefing
A significant advantage of Tandem first jumps is that the student does not need to know nearly as much as when making their first solo jump. The passenger can, therefore, relax and enjoy the jump without the burden of remembering the magnitude of information necessary for a solo jump. With the student more relaxed, their mind will be more capable of enjoying the experience. it is possible to overtrain a student before their first Tandem jump if we share too much information. Emphasis should be on safety and awareness.
- Skills practice
- Checklist practice
On subsequent Tandem jumps, more time can be spent preparing for the jump, and the student may receive more technical training under the canopy.

Remember: A student is more likely to experience sensory overload if they have too much to remember and do, compared to a student focused on one or two simple tasks.
Preparing the student makes a significant difference in the success of the jump. A well-conducted practice will help the student understand, eliminate confusion, increase confidence in the equipment & the instructor, all of which will make the experience enjoyable. Tips will ensure that the practice is effective:
- Clearly explain what will happen.
- Practice with realism.
- Repetition of skills results in instinctive performance of skills.
- Obtain feedback from your student. This will let you know if further explanation is needed and whether they are actually learning.
- Practice until perfect, always remember: What is performed on the ground will most certainly be performed in the air.
Checklist practice: Make sure far 105.45 passenger briefing is perfomed. this is the minimum Information the student must know the following information before their first jump.
Aircraft procedures
- Moving to the aircraft.
- Seating arrangement in the aircraft.
- Aircraft emergencies.
Freefall body position drill
- Have student lie prone to realistically simulate freefall.
- Instruct the student grasp the harness with the elbows - back position.
- Ensure the student's feet are together with knees bent at 90 degrees.
- Practice arm extension, prone, if you intend your student to do it.
- Practice the signal (tap on the shoulder) along with the arm extension drill.
- NEVER REACH AROUND IN FRONT OF THE STUDENT FOR ANY REASON as this will give the student a chance to grab your arms.
Exit practice and hookup procedures
- Perform drill at the aircraft or aircraft mock-up.
- Practice proper hand and foot placement for the exit launch setup.
- Have the student practice solo and hooked up for realism.
- Practice the entire sequence from exit.
- Sit-back drill (for student comfort) must be practiced on the ground.
- Practice with the student's harness attached to your own to simulate tension.
- Exitave the student sit in the harness.
Steering and flaring the canopy
- Display steering toggles to your student before the jump to ensure understanding.
- Explain how the canopy is steered, how turns are initiated & stopped, what position is full flight, & how flaring is performed. This explanation may be done during the canopy flight.
- Never let the student reach back behind them.
- Never let the student grab onto anything except their harness or the toggles if briefed to do so.
Landing practice
- If the student is to assist with the landing flare, in-air practice is a must. At least three good repetitions.
- Extra landing training may be required if: ◊The student is heavy (over 200 lbs). ◊The tandem pair is landing at high altitude. ◊Landing in light wind.
◊In general, for a new tandem master.
Gear checks
Pre-flight gear check
Student Equipment - Start by checking to ensure that your student has the appropriate gear, including a proper, tightly fitting jumpsuit and any additional items they may need, such as a leather helmet, goggles, altimeter, and/or gloves. Goggles should fit snugly over the bridge of the nose. The use of any open-toe and/or open-heel sandals and/or "flip-flop" footwear is prohibited. Students wearing contact lenses should use goggles with as few air vents as possible. Again, check the fitting of the student’s harness to make sure nothing has loosened, and that all webbing running ends are tucked in. Perform the following checks in the following order:
- Upper snap position
- Chest strap position and tension
- Hip strap & back strap position and tension
- Leg strap tension and dead-stops secured
- Proper staging of side quick ejectors
- Y-Strap
Tandem Instructor equipment - Prior to checking the system, select your jumpsuit, helmet, altimeter, goggles, and any other accessory items you may need. As with students, the use of any open-toe and/or open-heel sandal and/or “flip- flop” footwear is forbidden. When selecting a jumpsuit, pick one that is looser in the arms and legs to help give you extra drag. This will enhance stability with light students and help to eliminate rocking in drogue fall. It is recommended that you use a wrist-mount altimeter, as chest-mount altimeters positioned between you and the student will probably not give an accurate reading. Before putting on the Evo Tandem - perform a thorough and systematic gear check. Always start your gear check at the same point and systematically move from item to item until completed. An example of this would be: start at the drogue pouch, working up the back of the rig, then down the front. When performing the check, you should cover the following points:
- Drogue handles - Check to see that the drogue deployment and drogue release handles are easily accessible and secured in place. Each time the handle is checked, grasp it as if you intend to pull it.
- Main Pin Closing and Bridle Routing - Ensure that the main pin is oriented correctly according to the closing sequence diagram CS1. Make sure that the bridle is correctly routed &secured under the right side main container flap.
- Disc and Safety Pin on Bridle - Ensure that the safety pin is securely seated in the main closing pin.
- Reserve Pin, Closing Loop & RSL Routing - Open the reserve pin cover and make sure the pin is properly seated and that the condition of the closing loop is good. Don’t push the reserve pin too far down into the loop (this will cause it to twist, making the eyelet of the pin stick up instead of lying flat). Check the RSL routing.
- 3-Ring Assembly - Make sure the rings are connected in the proper sequence and that the loops are not frayed. The loop should pass through only the small ring, then through the riser grommet, and finally through the housing grommet. This loop is then secured with the yellow cable. Due to the size of the tandem 3 ring system it is possible to have various problematic routing issues. It is the tandem instructors responsibility to do a thorough check of the 3 rings configuration before each and every jump.
- RSL - Shackle - Make sure that the SAFE-RSL shackle is secured and connected.
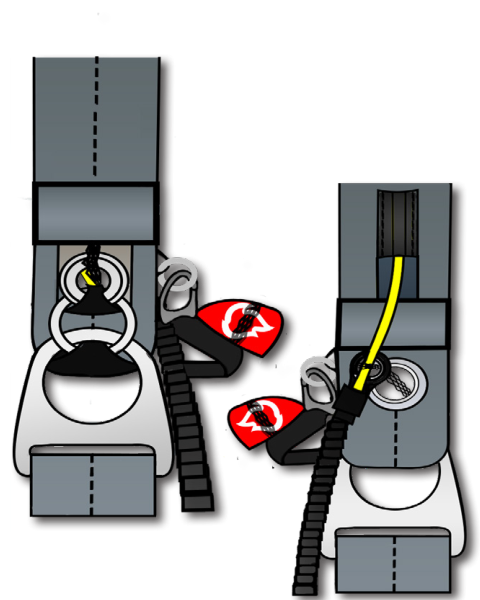
- Cutaway and Reserve Handles - Check that the handles are securely placed. The Velcro attaching the handle should be fully mated, and the handle should be positioned as close to the housings as possible to prevent excess exposed cable.
- Main Lift Web (MLW) - Adjust the MLW to the length that provides a proper fit and check both sides for symmetry.
- Main Riser Covers & Container Flaps - Check for the proper closure of the following:
- Reserve Pin Cover, Main Disc Cover & Riser covers
Note: Ensure that main risers have not been left exposed by an untidy pack job. They should be tucked down the side of the reserve and under the bottom of the riser covers toward the main container. Unprotected risers can be a danger when moving around the cabin of a small aircraft.
- Automatic Activation Device (AAD) - The AAD must be turned on before boarding the aircraft and remain on during the jump. The AAD must be either a dedicated TANDEM unit or in TANDEM mode if using a multi-mode AAD. (Please refer to the documentation supplied by your manufacturer).
In-aircraft gear check
PASSENGER Equipment - Start This section is split into areas of safety checks:
- Pre-exit preparation
- Pre-exit gear check
- Handles check
Pre-exit preparation
While in the aircraft (before reaching jump altitude), verbally acknowledge the hookup of each top snap as it is clicked into place. Ensure the side attachment quick ejector snaps are secure and comfortably tight. Check that the student’s chest strap is not overly tight and that all loose straps and webbing are securely stowed.
Pre-exit gear check
Plan ahead and brief someone on your load to do the final pin checks for the main and reserve. Before exit, the Tandem Instructor should physically check:
- All snaps
- All handles in order of use
- Reserve static line
- Handles Check
Handles check
All handles can become dislodged by movement in the aircraft or during exit as you pass through the door. It is required that the Tandem Instructor checks the security of all handles and drogue placement just before exit and then again just after drogue deployment on every jump. Always follow this process:
- Check security of all handles
- Move to exit position
- Re-check security of the drogue and drogue release hand l e s
Source reference · pages 38–43
Exits, freefall and canopy control
Exits - procedures vary with different aircraft, but the basics remain the same. You must maintain total control of the student during exit and freefall. Tandem exits are a bit challenging to master and take some time to develop in skill. It is important that new tandem instructors focus on having stable consistent exits before taking larger or more complex body types. bad exit technique is one of the leading causes of tandem incidents.
- 1. Poised Exit - With a poised exit, the student assumes the correct freefall body position. This allows the instructor more control over the exit while the student remains passive.
- 2. Diving exit - This exit can be done from kneeling, sitting, or standing positions. limiting the time the Tandem pair spends at the open doorway.
- 3. Gainer exit - This exit can be done from sitting or standing positions, 3/4 of a 3600 rotation. limiting the time the Tandem pair spends at the open doorway.
Exit tips
- Proper set up in the door is key for a succesfull exit, but Spend the minimum time possible hanging onto the outside of the aircraft or near the door. The longer you spend there, higher the chance of something going wrong.
- The student must have a good grip on either side of their main lift web. A common procedure is to have the student place their thumbs under the MLW on each side of the harness with elbows down and lightly grip the MLW. Students should not cross their arms across the harness, this promotes de-arching on exit.
- The student’s head should be back, body arched at the hips, feet together, and weight supported by you before exit.
- The actual exit should be smooth, making the transition from hanging under you to freefall barely noticeable.
- The fall away from the aircraft should be facing into the relative wind and stable. The more unstable your exit and fall away, the more likely the student is to move which could cause problems.
Exits from different aircrafts
Do not assume that all aircraft are the same. When jumping from an unfamiliar aircraft, practice the exit position and procedures to ensure a controlled exit. The use of a hand camera (HandCam) should not influence or effect proper exit technique.
The 3 leading causes of unstable exits are:
- POOR presentation into the relative wind.
- Improper harnessing of the student.
- Lack of drag of the instructors jumpsuit,
- Poor exit technique. (Often Hand Cam induced).
- Backing out of a side door is forbidden on exit.
- Improper student training and student body positioning on exit.
- Lack of understanding of the relative wind by the instructor.
Altitude recommendations and requirements
- Exiting the aircraft - It is important to exit with sufficient altitude to respond to a variety of situations. The speed and altitude lost during unstable free- fall without the drogue is hard to imagine for the uninitiated Tandem Instructor candidate. Unusual situations, such as an un-inflated drogue or drogue in tow, will eat up your altitude faster than you can imagine. Refer to Emergencies and Malfunctions section for details on the possible problems you may encounter.
The minimum exit altitude is 7500 ft (2286 m) AGL.
- Deploying the Drogue after Exit - It is recommended to deploy the drogue in a stable position within 5 seconds after exit. It is critical that the drogue not be used to gain stability, and the instructor must make every effort to stay in control after exit. After 10 seconds, the drogue must be deployed to avoid reaching tandem terminal speed, which can exceed 170 mph. Maintaining altitude awareness at tandem terminal speed is challenging.
- Main Deployment - Due to the complexity of the tandem system, a higher opening altitude is required compared to solo sport jumping. The minimum deployment altitude for a main canopy is 5,000 ft
- Reserve Deployment - Due to the complexity of the tandem system, a higher opening altitude is required compared to solo sport jumping. The minimum decision altitude for a reserve canopy deployment is 3000 ft (914 m) AGL.
Stability control
- Arch - The body position of the Tandem Instructor is more crucial than that of the student. The Tandem Instructor should focus on providing proper training to the student for maintaining the correct body position & equally important, should pay attention to their own body position during the exit, emphasizing the use of relative wind for stability. If the Tandem Instructor achieves a good arch right out of the door, chances are the pair will easily maintain stability. Many instability issues arise from poor Tandem Instructor body positions. Specifically, problems often start when the Tandem Instructor fails to maintain a strong arch on exit & disregards the influence of the relative wind. While a poorly executed exit leading to instability is not inherently dangerous (except when it results in unstable drogue deployment), it is both unnecessary & unacceptable. A poor exit is defined as any exit that results in uncontrolled loops or rolls immediately after leaving the aircraft.
- Anticipation - The key to maintaining control is the ability to identify potential issues before they escalate into real problems. Students may exhibit unpredictable behavior in the first few seconds after exit. Typically, after the initial shock of freefall, their eyes will reopen, and they will assume the proper body position to assist in stability. Immediately after the exit launch, assess the student’s body position while maintaining a stable arch. If the student remains in the folded de-arch position of the diving exit or assumes a de-arched position after the exit launch, additional control techniques may be necessary to maintain heading and stability.
- Manipulation - One such control technique involves briefly applying a small amount of pressure on the students forehead, reminding them to bring their chin up and arch, or physically adjusting the student’s body into an arch. To do this, reach around with your arms and/or legs and pull the student back into the correct position. Grab the arms only between the elbow and the wrist to make it difficult for the student to grab you. Maintain this interlocked or body- locked position until stability is ensured or regained. Manipulation should only be used as a last resort if the Tandem Instructor’s hard arch proves ineffective. Exercise caution with this technique, as it increases the possibility of the student grabbing your arms and preventing the necessary adjustment. There is no telling how a student might react when faced with an 'earth-sky-earth-sky' situation on their first jump.
Deploy drogue
- Ensure stability prior to deployment - Adequate student training is crucial for achieving stable body positions before drogue deployment, as is executing a powerful exit from the tandem instructor.
- DO NOT USE THE DROGUE TO GAIN STABILITY - Attain stability or regain stability before deploying the drogue. Deploying the drogue while unstable should only be considered as a last resort to prevent reaching tandem terminal speed.
Drogue deployment:
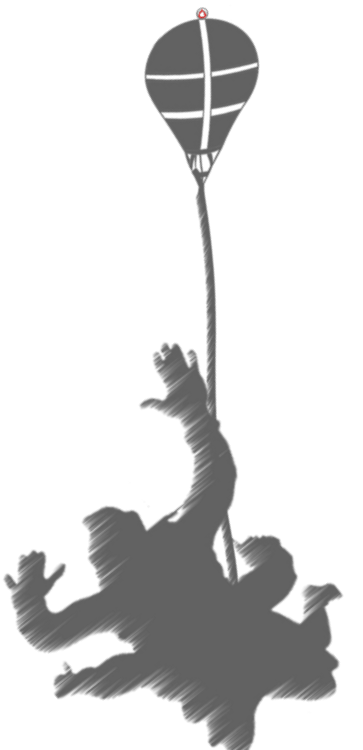
- Locate drogue handle and grasp firmly.
- Pull drogue from pouch and throw aggressively to your side at full arm extension.
- Release once it is forward of the line of your shoulders.
- Watch drogue inflate over your right shoulder (you may or may not feel the drogue inflate).
- Once drogue has inflated immediately perform all handle checks:
- Primary drogue release
- Secondary drogue release
- Cutaway handle
- Reserve handle
- RSL
- Altimeter Check
Drogue fall techniques
- The drag of the drogue on the container system will establish a specific attitude for the tandem pair during drogue fall. Efforts to alter this attitude will be met with resistance from the drogue, potentially causing rocking motions. To minimize rocking, consider the following:
- Tandem Instructor corrects body position - The most effective way to stop rocking is for the Tandem Instructor to relax and maintain a still position in free-fall without unnecessary leg movements.
- Teach the student correct body position on the ground - Ensure the student understands the correct posture—head back, hands on harness, back arched from shoulders to knees, and feet tucked up.
- Wear appropriate jumpsuits - Utilize a big, baggy jumpsuit for the instructor and a tight suit for the student to help control body position during exit or drogue fall. Over time, the jumpsuit size becomes less critical with increased instructor experience.
- Snug down and adjust lateral attachment points to be comfortably tight, as loose straps can contribute to a rocking motion.
Arm extension (recommended)
- Once the drogue is deployed, signal to the student to extend their arms into a normal freefall position by tapping their head or shoulder. Avoid reaching around to pull their arms, as this could lead to the student grabbing your arms. Alternatively, grabbing the student's elbows or pushing them up and away from their body is a recommended technique, usually prompting them to release their grip on the main lift web. Note: If the student’s legs are dropped and/or knees bent, may cause drogue-fall instability. This can usually be corrected by capturing students legs with instructors legs, repositioning & releasing student’s legs.
Drogue release
- The drogue may be released at any time during 'drogue fall.' To release the drogue and deploy the main canopy, pull either the drogue release handle located at the bottom left-hand corner of the main container or on the right front leg strap. A pull of approximately 5 inches will release the drogue. Upon releasing the drogue, you may experience a 'trap door' effect, a momentary acceleration before the main canopy inflates. If you pull the release handle completely and do not feel this sensation, your drogue may have failed to release. Refer to Section 4 for emergency procedures. note: Immediately after drogue release as the “trap door effect” develops, the tandem instructor should immediately return to a neutral box-man position and fly the tandem pair through the deployment and trap door effect.
- The now partially collapsed drogue acts as a pilot chute and pulls your canopy to line stretch in about half a second. The canopy will then open slowly. Note: The drogue centerline should be inspected and recalibrated as needed, every 25 jumps.
If the student is trained to deploy the main drogue release additional training must be provided -
- Be given an altimeter and trained how to use it. 3 PRCPs, with full gear on.
- Relative Work (RW) is not permitted if the student is trained to deploy the main canopy.
- Student training guideline can be seen in Section 30 (Student Skills) NOTE: option to remove section 30 and bring some of that language here as much of it is duplicated Note: Avoid showing to your student your altimeter during drogue-fall & during the and/or deployment sequence. Students may grab the instructor’s arm as a result.
The opening sequence begins as a slight streamer with the slider high. The fall rate of the Tandem pair decreases steadily for several seconds in this configuration. Then the slider descends, and the canopy opens with the end cells open and the slider almost down to the links.
UPON OPENING Perform canopy check and release toggles - Check canopy condition while locating the toggles. Release brakes using the yellow outboard primary toggles. Perform a controllability check:
- Flare the canopy and turn the canopy in both directions. Pick up black inboard flare toggles and repeat the same sequence. Once you are satisfied that the canopy can be controlled in both toggle configurations, you may release the black inboard toggles until it is time to pick them back up again for landing. The black inboard toggles must be picked backed up again no lower than 1000ft AGL. After completing your canopy control check, identify the flight line and other canopies then orient yourself toward the landing area. Remain vigilant while you perform the following checks:-
- Check harness & emergency handles.
- Check main links & risers.
- Check the 3-ring release system & RSL.
- Check the location & security of the cutaway and reserve handles.
- Check the top student attachment snaps.
- Check the student harness for comfort, adjusting if needed.
- Loosen the lower attachment quick ejectors - loosen the lateral webbing. Having the student stand up on the instructor’s feet will assist in this procedure. Do not tell the student the lower attachments are being released; simply inform them that harness adjustments are being performed. It is important to re-attach the quick ejectors immediately.
- If ground winds are high - release the reserve static line shackle at 1,500 ft in case you have to cutaway the main canopy to avoid a drag situation after landing.
- Instruct the student to sit back in the harness - Have the student perform the “sit back in harness drill” as described in Student Briefing. Student should lift each leg to ease the leg strap and pad forward 1-2 inches to alleviate the pressure on the inside of the thigh.
Note: The instructor has the option of handing the outboard steering toggles to the student. Hand the student the steering toggles while instructing them to grab the lower loop. After the student has placed their hands in the lower loop of the toggles, you may choose to remove your hands
STEERING THE CANOPY A Tandem system represents the ultimate suspended harness, allowing the student to gain experience in controlling a ram-air canopy. The extent of what can be accomplished depends on the student’s aptitude and prior training or experience, recognizing that not everything can be covered in the first jump. Once the student has a firm grip on the toggles, provide commands for the desired steering direction. Encourage them to pull down partially for a slow, flat turn and to pull down fully for a complete bank turn. Demonstrate forward flight with hands raised all the way up, although note that this position may be challenging for the student.
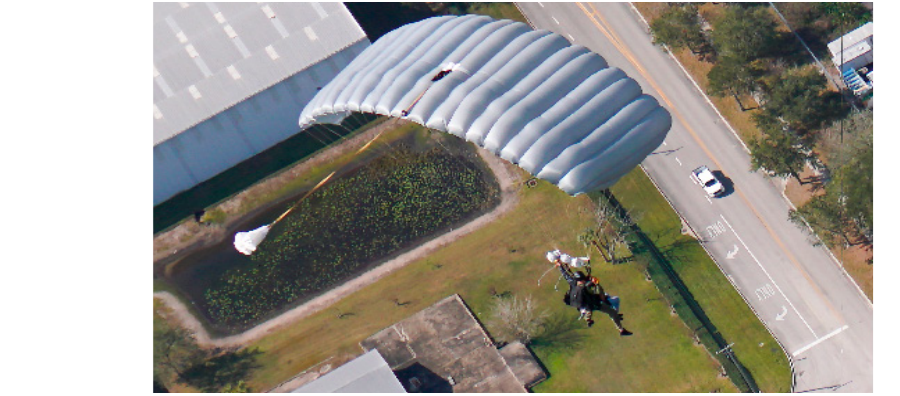
Minimum horizontal separation from other parachutes is 1000ft!!!
During the setup for the final approach, explain the procedures with reference to the target. If the student is assisting in landing, have them perform 3-5 practice flares at altitude, providing feedback on their technique and overall performance. In case the student reports nausea, minimize turns and instruct them to focus on the horizon while breathing normally. Have the student reposition the leg pads or perform the sit-back-in-harness drill again. Consider slightly loosening the chest strap if necessary. If the student's fingers begin to tingle, instruct them to release the toggles and drop both hands to their sides. An overly tight main lift web (MLW) can restrict upward arm and shoulder movement, making the full flight arm position challenging and fatiguing for the student.
Landing - prepare for landing:
- Landing position - During canopy flight, it is important to physically practice body & leg position as required for landing. It is recommended that the student be seated in the harness with feet and knees together. For landing, have the student bring their “knees up, and legs out”. This will help in keeping the feet and knees together and forward with a slight bend in the knees.
- Enter landing approach pattern - At 1000ft (300m), enter the downwind leg pattern. Assess the surface winds while flying past the target area to make final corrections to final approach. Try not to be in braked position for extended length of time as it will tire the arms out prior to the flare. Upon entering the landing pattern, if the winds are high and there is no catcher present, it is permissible to release the reserve static line (RSL), no higher than 1500ft. This is accomplished by lightly pulling on tab of the snap shackle. With the RSL detached, the main canopy can be released after landing if being dragged. This will prevent the RSL from deploying the reserve parachute.
- Flare - Ensure level flight for no less than 5 seconds prior to flare.
- With both sets of toggles in hand initiate first stage flare, progressively transitioning arms to an elbow high position and finishing the flare by pushing the wrists all the way down alongside the instructor's body.
- Ensure tandem instructors feet make contact first, then the student.
- Student assisted landing - The instructor should always have the capability to land the canopy without student assistance. DO NOT allow an untrained student to assist in the flare.
Note - If student has received ground training, is well rehearsed in the air and has proven capable they can assist the flare on the instructor’s command. The student should not be allowed to overpower the instructor during the flare.
Landings - different kinds of landings
- Stand up - When the wind exceeds 10 mph, executing a proper flare should result in a 'no forward speed' stand-up landing. The student needs only to maintain enough leg tension to support their own weight. In high winds (above 10mph), ensure that canopy catchers are positioned at the landing area. Hand the toggles to the catchers upon touchdown. They must be trained to meet the tandem pair as they land into the wind and fully collapse the canopy. If the student is assisting with the flare, they MUST release the toggle immediately after touchdown so that the catchers can perform their job.
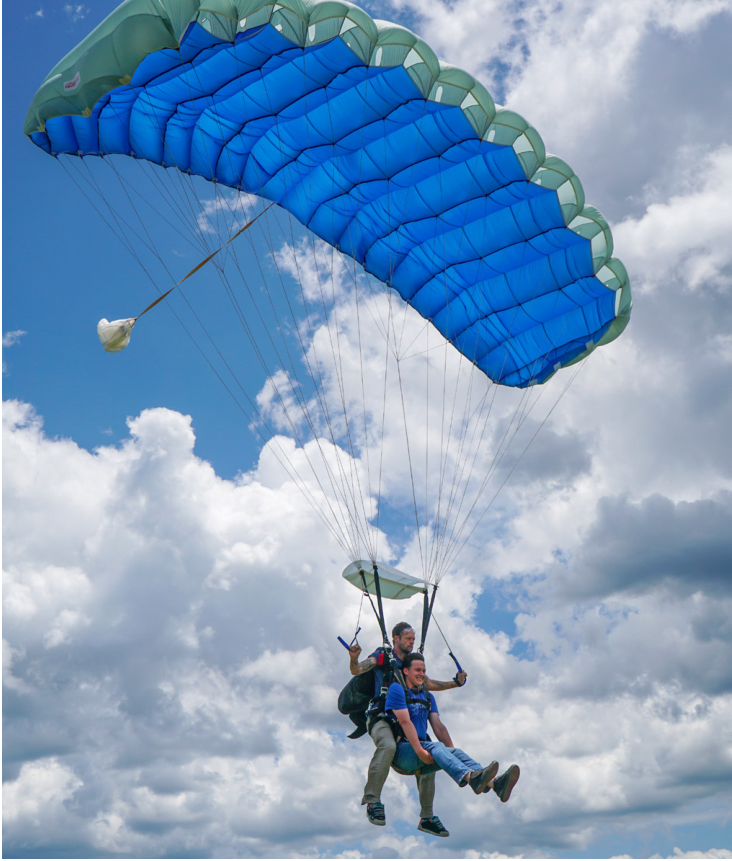
- Walking landing - For walking landings in winds between 5 and 10 mph, both the Tandem Instructor and the student must take a few steps after touchdown. Without proper leg tension or those few steps, the risk of falling increases, potentially pulling the instructor down. This type of landing requires significant student preparation. Before touchdown in light wind, the student must raise legs up and forward, keeping knees bent. The Tandem Instructor must be able to see the feet and knees when looking over the student's shoulder. The instructor can also use their own feet to guide the student’s feet into the correct position.
- Sliding landing - In the case of a sliding landing, when the wind is less than 5 mph or there's doubt about a safe stand-up landing, preparation is crucial. The student must lift their legs and position them in front before touchdown. A successful slide necessitates a good flare to almost zero rate of descent.
- Be Ready - The Tandem Instructor sits back in their harness (pulling the student back) & prepares to absorb the landing on their feet, transitioning to a slide on their butt with the student literally sitting in their lap. Sitting back on landing is vital to prevent the student from leaning forward at touchdown, which could cause the Tandem Instructor to roll over on top of the student.

Canopy turns to land: no more than 90 degrees at or below 500ft.
Speed induced turns will increase the risk of injuries and are unnecessary to have a good landing
Water landings
- A water landing is not a likely scenario for a Tandem jump, but it is a possibility. Below is a list of procedures to follow for a Tandem water landing. Since it is best to be prepared for every eventuality, practice the sequence on the ground to get familiar with the order of events. On any skydive (whether Tandem or sport) made in the vicinity of water, water gear must be worn. If a Tandem jump is made near water, BOTH the Instructor and the student must wear approved water gear. Below are the procedures on how to prepare to and land in water:
- Release RSL.
- Disconnect student lower student attachment points & reconnect to student harness.
- Have student inflate their flotation gear.
- The tandem instructor undoes their chest strap.
- landing:
- Flare and land into the wind. If there are high winds, release the main canopy. Under no circumstances should this be performed prior to landing.
- Release student top snaps.
- Push student away.
- The tandem instructor swims out of harness and inflates their floatation device.
Source reference · pages 44–51
Emergency procedure sequence
It is very important to take the time to think out and rehearse how to respond to different situations before ever being faced with them. Always read the Tandem accident and incident reports to learn from the mistakes of others. This is considered continuing education as a Tandem instructor. Unusual or emergency situations while performing Tandem jumps require quick assessment and decision-making with the proper reactions. It is important to understand the proper sequence of actions required for any situation you may encounter. The addition of the drogue system adds extra procedures, which are different than those you would perform when jumping SPORT solo equipment. Every tandem instructor is required to review EPs a minimum of one time every six months.
NOTE: The reserve static line (RSL/SAFE/MARD) is a backup system that should not be relied upon. Always perform FULL EP (emergency procedures).
Warning - intentional canopy transfers are not allowed on the tandem system.
If the instructor’s left arm is incapacitated, and unable to activate the reserve handle, the RSL may be used with the right hand to deploy the reserve. This is accomplished by:
- Disconnecting the RSL snap shackle.
- Pull the RSL upwards breaking the Velcro closure.
- Continue pulling the RSL (free of Velcro) upward over the shoulder.
QUICK reserve canopy at a glance -
Controlling and steering the reserve parachute is similar to the main parachute except in the following areas:
- Reserve toggles are set up for Tandem Instructor control only!
- There are no secondary toggles.
- Please be aware that the reserve parachute will deploy in a deep brake configuration, potentially causing rocking. To mitigate this, it is recommended to release the brakes immediately after deployment.
- In the unlikely scenario of a Reserve Canopy malfunction, the Tandem Instructor should make efforts to rectify the issue. Though such malfunctions are exceedingly rare, they are still a possibility. The corrective procedures for a Reserve Canopy malfunction mirror those for a Main Canopy Malfunction: release the brakes and conduct a controllability check to regain control.
- In the highly improbable event that a Reserve Canopy malfunction remains uncorrected, the Tandem Instructor should aim to land the Reserve Canopy as gently and slowly as possible. The decision to implement PLFs (Parachute Landing Falls) during this landing is left to the discretion of the Tandem Instructor, who assumes the role of the Pilot in Command. It is their duty to evaluate the circumstances and make the most suitable decision for the landing.
- priority #1: level wing & attempt to fix the issue
- Make attempts to level the wing to reduce the rate of descent as you try to fix the problem.
- Remember: maintaining a level wing prior to touch down is the number one priority on all canopy landings.
- priority #2: obstacle avoidance
- If possible, steer the canopy to the best alternate landing area with the best option for a soft touch down
Source reference · pages 52–53
Standard jump procedure diagrams
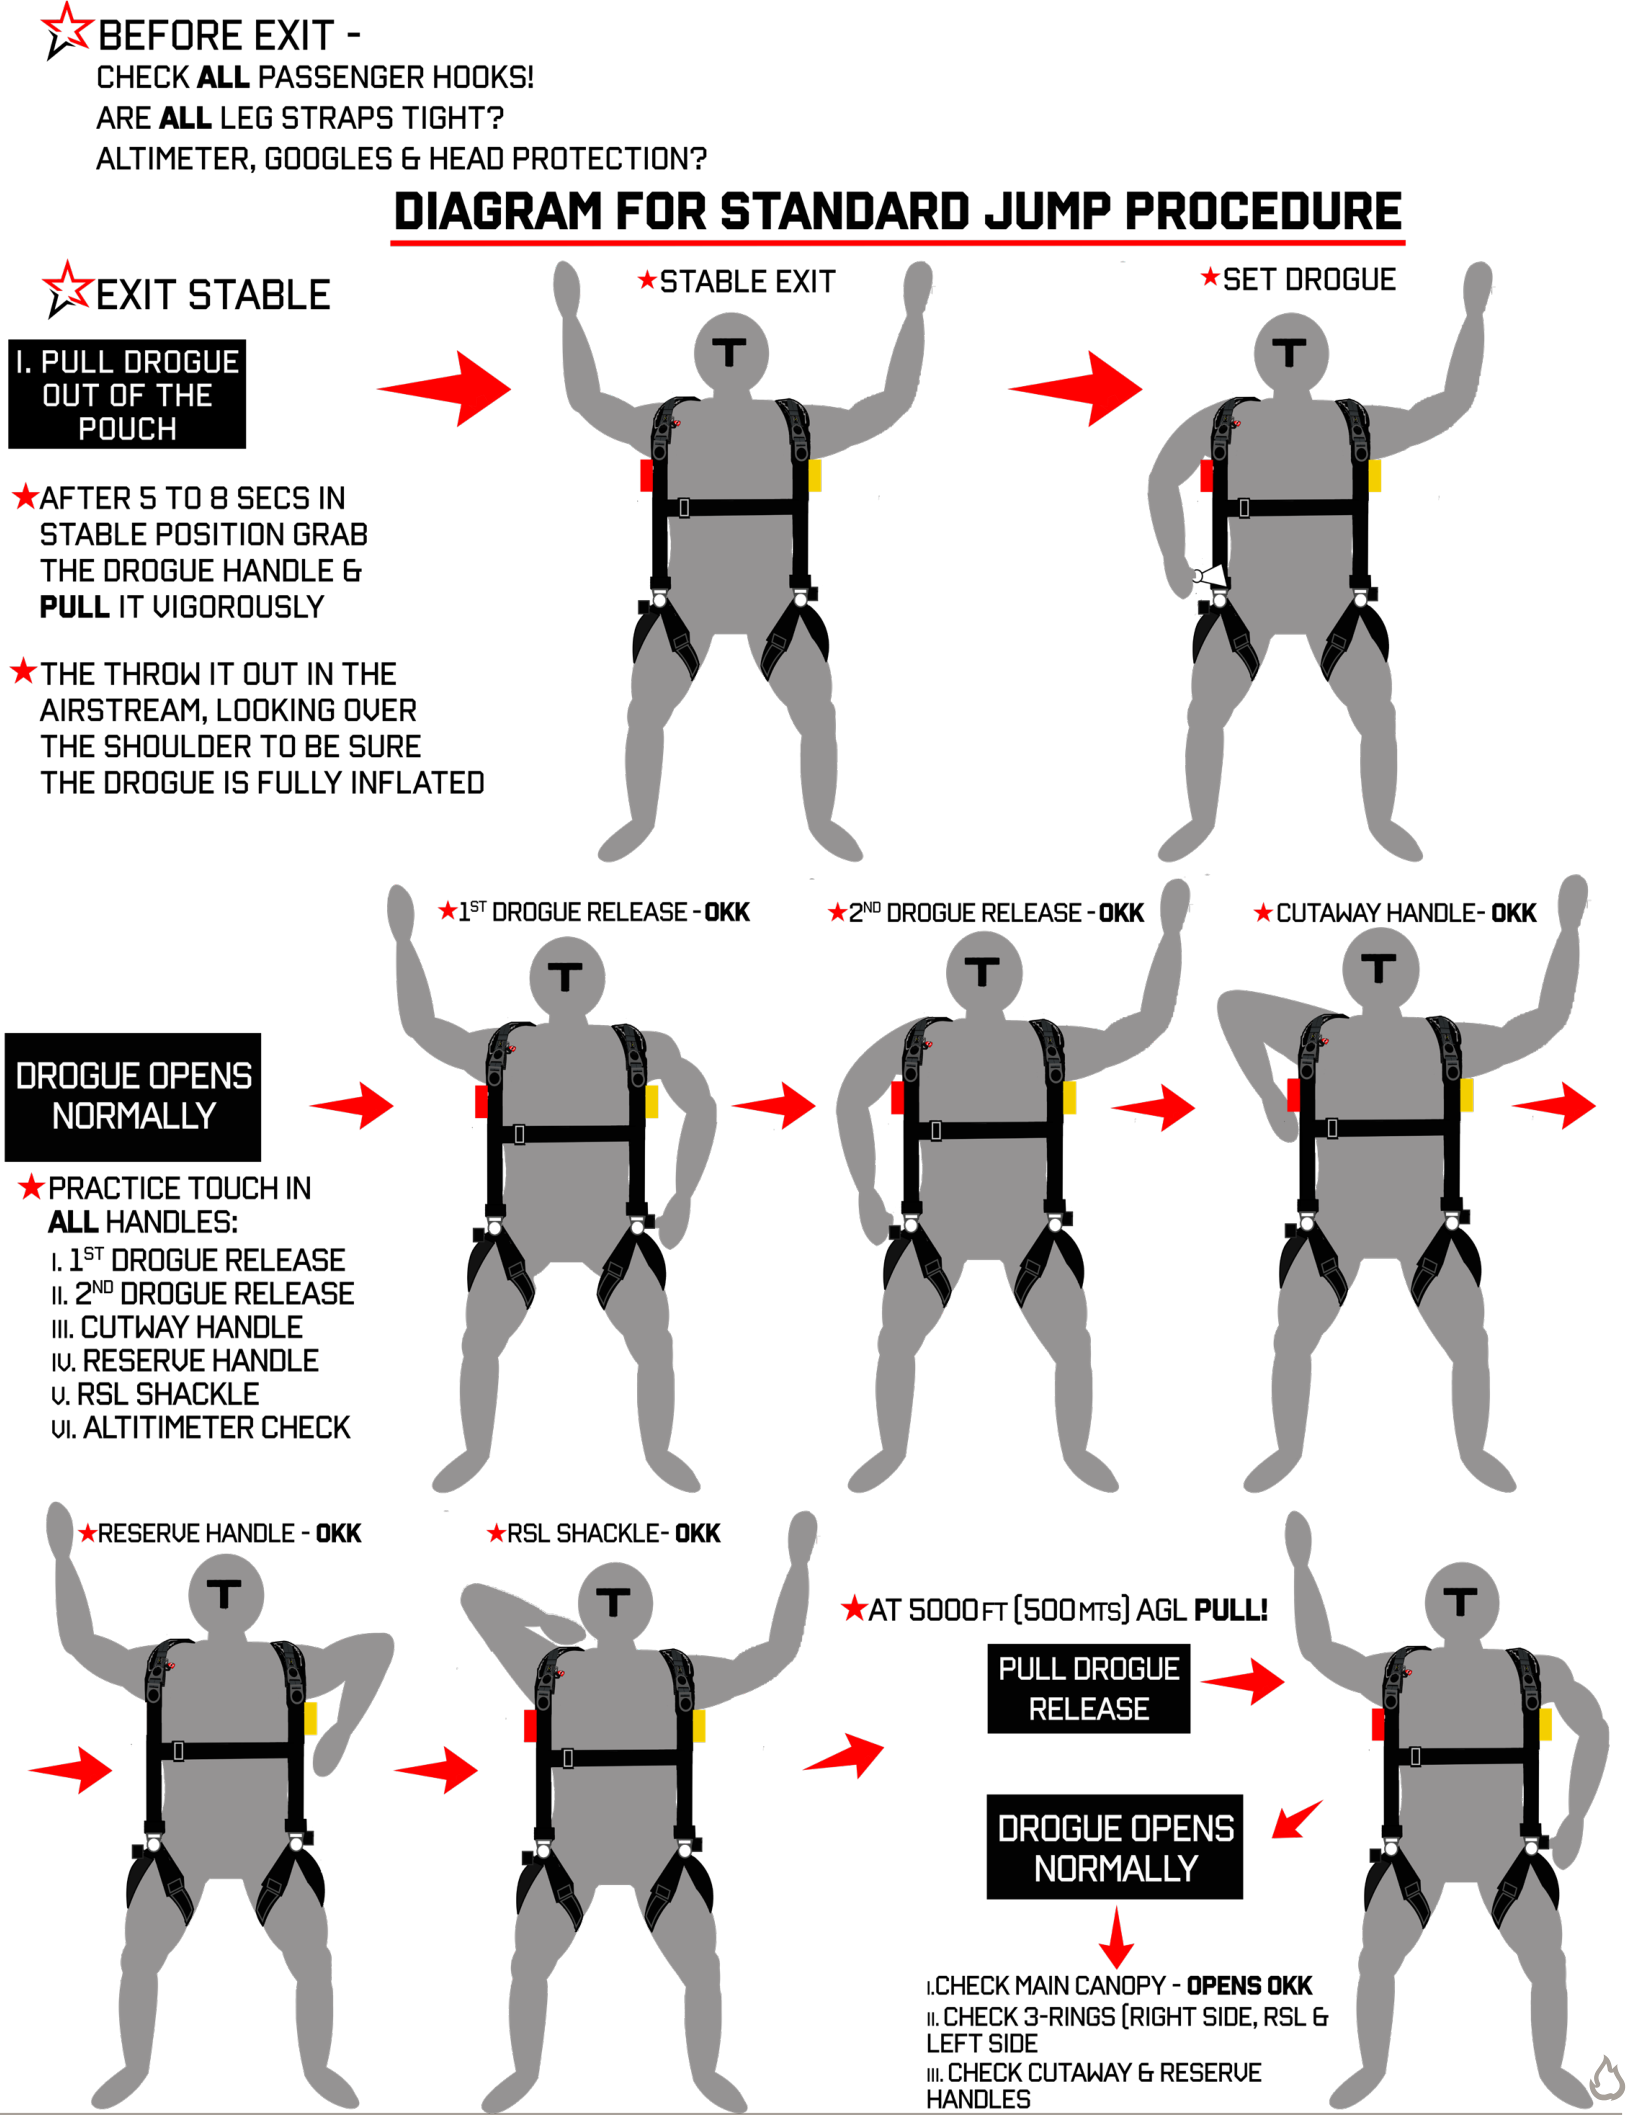
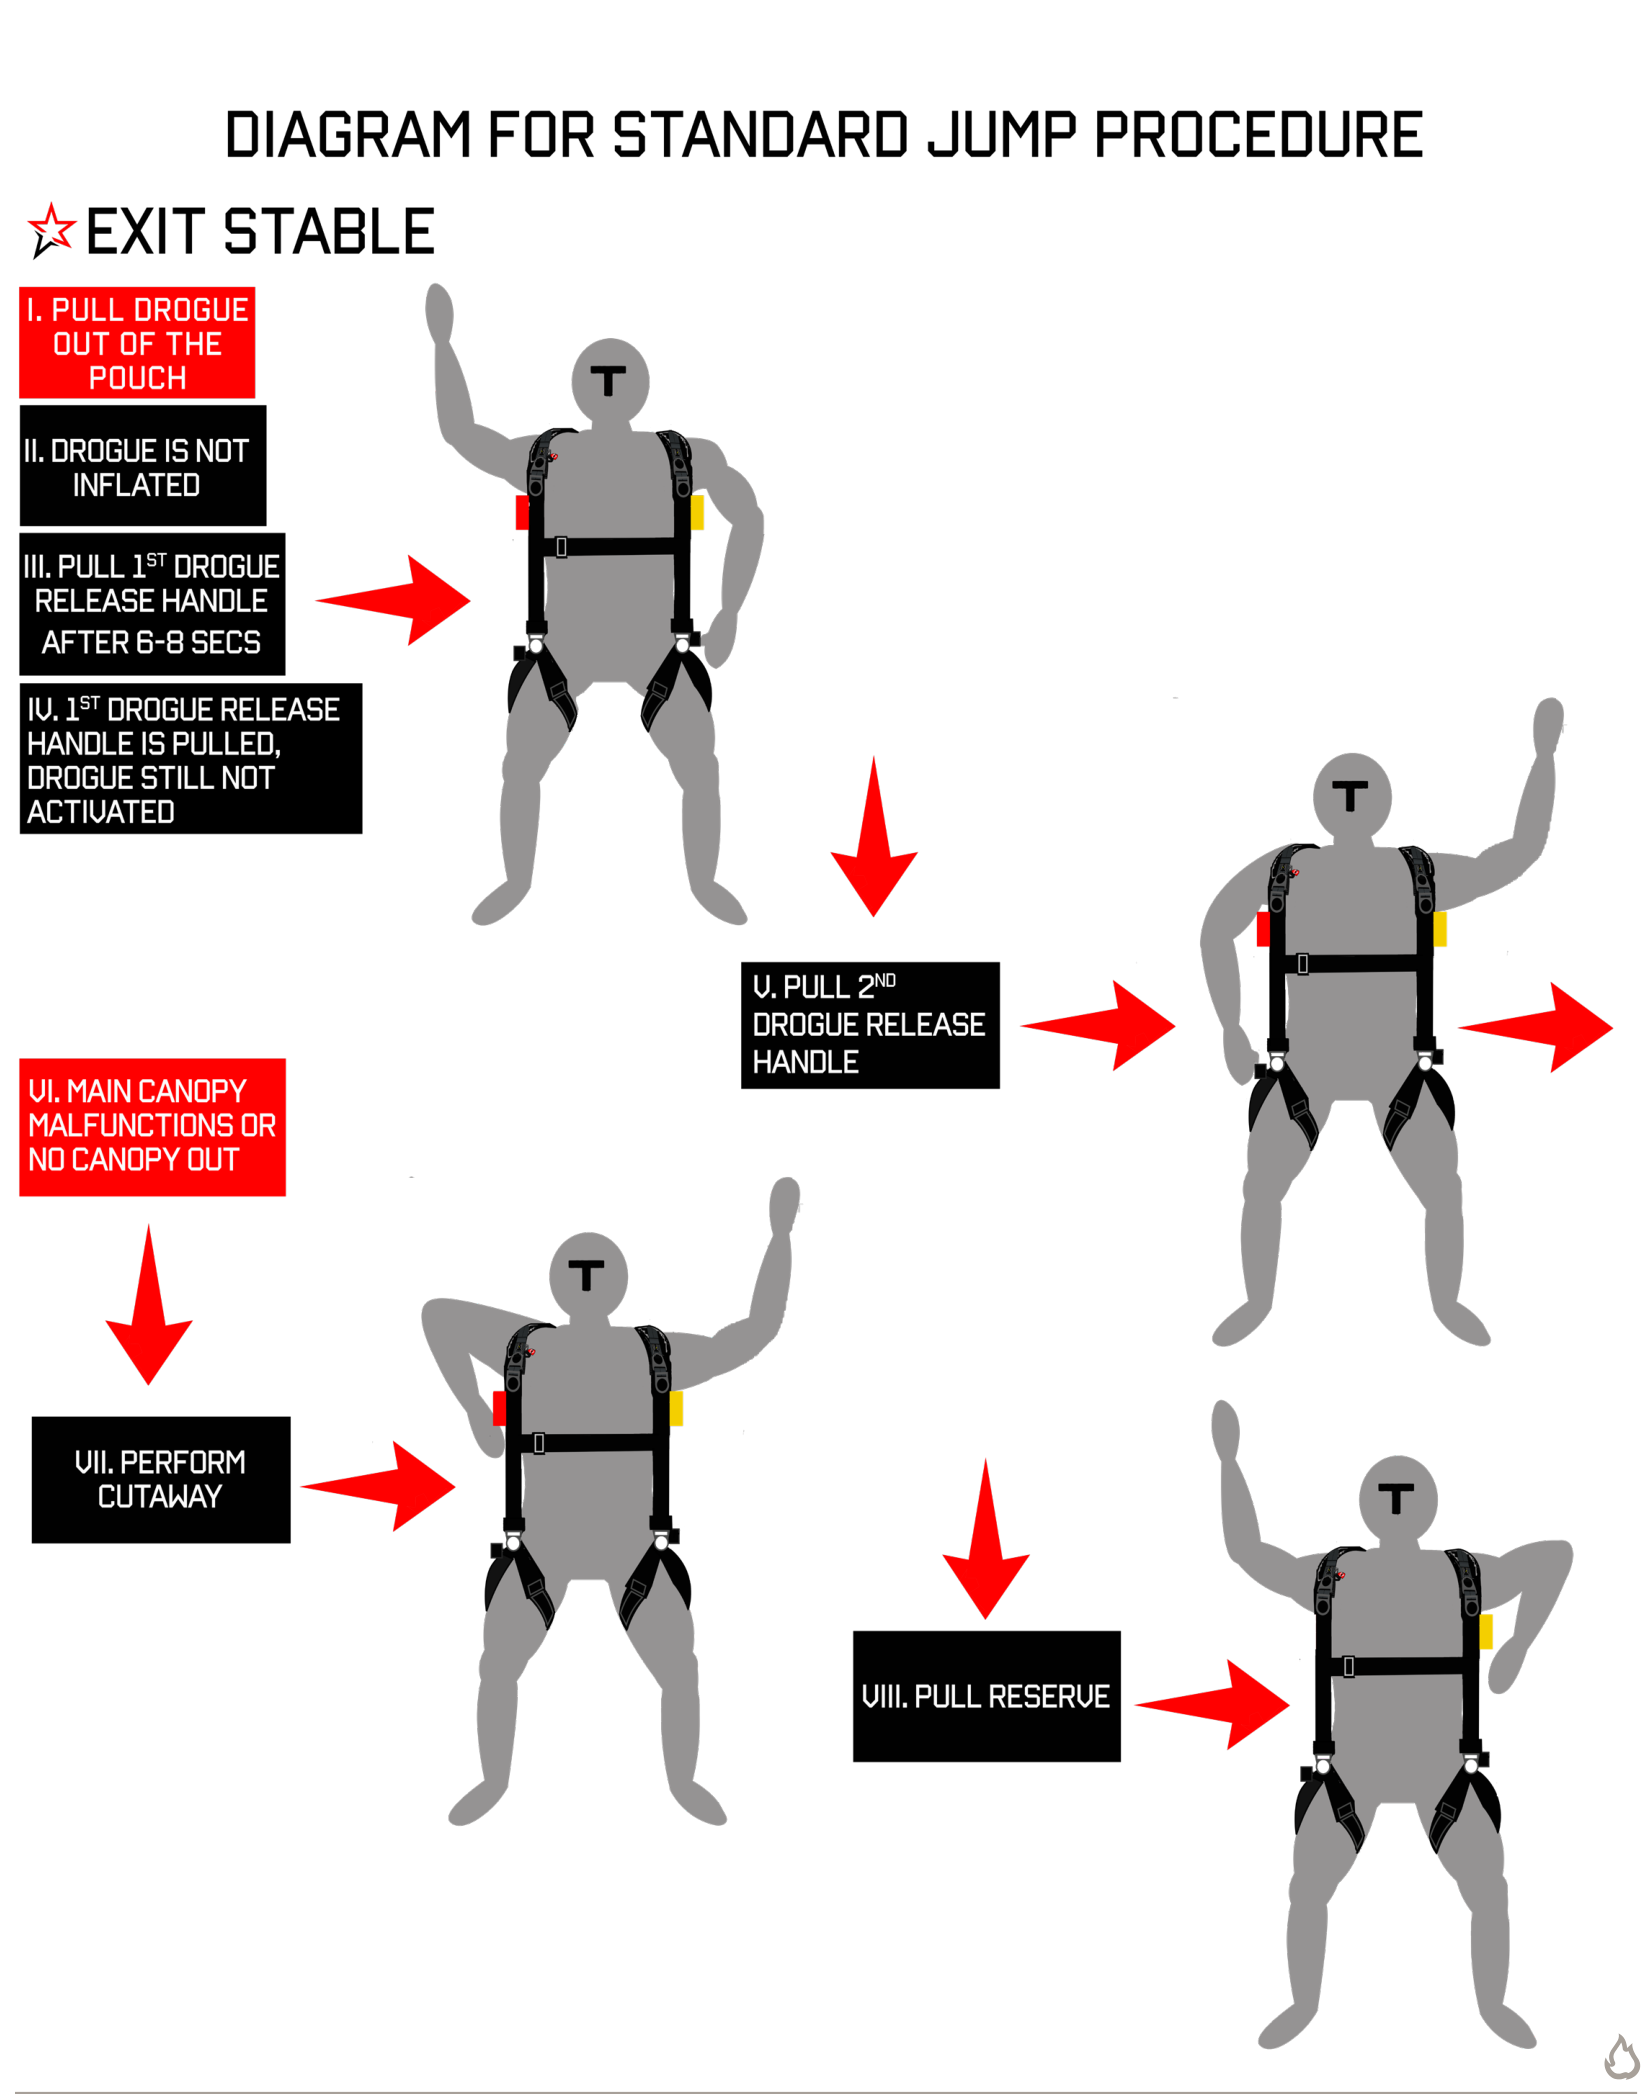
Source reference · pages 54–55
Aircraft emergencies
Due to differences between Tandem and solo systems, the following procedures are to be followed:
Below 1500ft (450m)
Stable flying aircraft, engine out - if the aircraft is stable, stay with the aircraft and follow instructions from the pilot. Ensure that the Tandem pair is seated and wearing safety belts.
Below 1500ft (450m), catastrophic airframe failure -
If the aircraft is on fire, in a spin, or a large control surface has been damaged, there is a greater chance of survival by exiting the aircraft. Connect the student with as many attachment points as the situation will allow, starting with the upper left. Hold the student with the right arm if needed, exit the aircraft, and immediately pull the reserve ripcord with the left hand.
1500ft - 4000ft (450m-1200m)
Connect the student with as many attachment points as the situation will allow, starting with the upper left, time permitting moving to the lower right. Hold the student with the right arm if needed, exit the aircraft, and immediately pull the reserve ripcord with the left hand.
4000ft (1200m) +
Attach the student with as many attachment points as the situation will allow, exit the aircraft, deploy the drogue, and ensure inflation. Continue drogue Fall and OBSERVE DISTANCE FROM DZ, initiate deployment OPENING AT THE APROPRIATE ALTITUDE FOR A SAFE CANOPY LANDING
Source reference · page 56
Student refusal
There are two (2) different situations which may arise:
- 1st - The student refuses while still in the aircraft - If the student decides at any time that they do not want to jump while still in the aircraft, descend with the aircraft, accompanying them to the ground. Once the jump door has closed and the aircraft descent has begun, disconnect the student and place individual seat belts on the instructor and the student.
NOte: IF STUDENT DECIDES TO JUMP, INSTRUCTOR MUST GET A CLEAR CONFIRMATION "ARE YOU READY TO JUMP?", with a clear confirmation for the student stating "YES! i'm ready to jump"
- 2nd - The student refuses once on the strut or outside of the aircraft - If the student verbally lets you know they do not want to jump, you must bring them back into the aircraft unless the aircraft door is restrictive in a way that would be dangerous to re-enter the aircraft (accidental deployment of either parachute system). Once inside the aircraft, follow the procedure above.
Source reference · page 56
Untimely canopy deployments
Problem:
- High pull - scenario for the most common complication that arises on Tandem jumps, where the student knows where the handle is & knows how to pull it: "The Tandem pair exits the aircraft. The student panics & pulls the drogue release handle after the Tandem Instructor deploys the drogue, & the main deploys instantly. This can endanger anyone exiting with the pair, above & in line with the relative wind, such as a cameraman, since he may inadvertently be directly over the pair as the main deploys unexpectedly".
- Low pull - This may occur when the student is assigned to pull the secondary drogue release. Following the pull signal: "student gropes & has difficulty in finding the secondary drogue release handle. Meanwhile, the Tandem Instructor reaches back for the drogue release handle. he waits, sure that the student will get it & second. causing the pair to open below the planned altitude. worst- case scenario: Tandem Instructor reaches back for the primary drogue release handle but cannot find it. He then deploys the reserve - just as the student finally finds the handle & deploys the main".
- Reaction On every jump - the Tandem Instructor should throw the drogue, check the drogue & handles check. This simple exercise will check for proper placement of all handles, develop muscle memory for proper emergency response, and is part of the Standard Operating Procedures. Instability following exit -
- If the tandem instructor does not maintain or gain stability within 10 seconds, the drogue must be deployed before reaching terminal. This must be done aggressively to avoid entanglement.
- Container open before the drogue has been deployed - Immediately deploy the drogue & expect a main canopy opening.
- Container open but the drogue cannot be deployed: Horseshoe malfunction- Release RSL shackle & pull the CUTaway handle. Ensure full release of the main risers, physically assisting if necessary. Immediately pull the reserve handle. Course of action #4 see page 63
- Student grabs Tandem Instructor’s right arm immediately after exit - try all means necessary to free the right arm. If unable to do so within 10 seconds following exit, pull the reserve ripcord using the left hand.
- Student grabs Tandem Instructor’s left arm immediately after exit - "If stable" Throw drogue. "If not stable" try all means necessary to free the left arm. If unable to do so within 10 seconds following exit, deploy the drogue & release it at proper altitude.
- Student grabs both the Tandem instructor’s arms - try all means necessary to free any arm. Depending on which arm has been freed, follow the appropriate directions above.
- Tandem Pair develops into Side Spin - Implement side spin recovery procedures - Bring student’s arms in, with Tandem Instructor grasping student wrists & placing them at their hips. Capture student’s legs using Tandem Instructor’s legs.
Straighten out both bodies removing arch of the spines. Once the Side Spin dissipates, achieve a belly-to-earth orientation, achieve stability & set drogue. If unable to recover from Side Spin and “Drogue Side Up”, deploy the drogue to achieve stability. If unable to recover from Side Spin & “Drogue Side Down”, deploy reserve. If the spin causes disorientation, deploy reserve immediately.
Side spin avoidance techniques
- 1. Dress for Success: Proper jumpsuit for both you and your student
- 2. Control: Consider the size of your student vs yourself
- 3. Harness: Ensure that the harness is adjusted properly - cage the hips
- 4. Training: Give sufficient training to the student concerning body position for exit
- 5. Exit: Utilize the best exit for you considering the aircraft being used
- 6. Relative Wind: Understand and utilize the relative wind during the exit
- 7. Fly your body: Realize that the ARCH alone will not guarantee stability
- 8. Drogue Out: Get the drogue out when possible if a side-spin is developing
- 9. Anticipate: There is no place in tandem for passive instructors

Warning: Never put the altimeter or hand-held camera in front of the student’s face!
Source reference · pages 57–58
Emergency handle reference: courses of action
| Reference | Situation | Action |
|---|---|---|
| 1 | Closed container / total malfunction | Deploy reserve. |
| 2 | Sport-similar malfunction: the tandem pair is vertical and the main risers are the only point of contact. | Same response as on a sport malfunction. |
| 3 | Unusual malfunction: container is open, high speed and the tandem pair is in a horizontal position, including a bag-lock malfunction. | Disconnect RSL, cut away, ensure riser separation, deploy reserve. |
| 4 | Entanglement with a third party | Disconnect RSL, cut away, pull a drogue release, ensure riser separation, track away for about 5 seconds, deploy reserve. |
Source reference · page 59
Drogue deployment problems
Deploy the drogue - no drogue no main!!!
- Drogue release handle pulled before deploying the drogue - Deploy the drogue immediately! expect normal droguefall
- Drogue extraction difficulty - Instructor can place the right elbow on the side of the container to gain leverage for assisting in extracting the drogue from the pouch.
- Unable to extract the drogue from the drogue pouch - Pull the reserve ripcord within 10 secs after exiting. [Emergency action reference 1.]
- Drogue has been deployed but is not visible behind the tandem pair (stuck in the burble) - After looking over the right shoulder to confirm drogue set and not seeing the drogue deployed above the tandem pair, the tandem instructor should immediately reach back to the drogue pocket with their right hand to confirm that the drogue assembly has been removed from the Spandura pocket.
- 1. If the pocket is empty, the instructor should reach back above the main container pack tray with their right hand and feel for either the drogue canopy and/or the drogue bridle.
- 2. If either the drogue canopy or fabric is found, the tandem instructor should grab whatever material presents itself and attempt to deploy it into the relative wind vigorously.
- 3. If this second drogue deployment attempt is unsuccessful or the tandem instructor cannot locate either the drogue canopy or bridle, the tandem instructor should dip their right shoulder to bring clean air across the tandem pair’s back.
- 4. If this procedure is unsuccessful, the tandem instructor should repeat the process, lowering their left shoulder to bring clean air over the back of the tandem pair.
- 5. If still unsuccessful in locating and deploying the drogue after 10 seconds, deploy the reserve. [Emergency action reference 1.]
- 6. If the drogue does deploy using these procedures and is then entangled with either the tandem instructor or tandem student, Attempt to clear the drogue canopy. If unsuccessful within 10 seconds following exit, immediately pull reserve handle.
- Un-inflated drogue immediately after drogue deployment - If after 6-8 seconds the drogue does not inflate, immediately pull one of the drogue release handles to initiate the main canopy deployment. Expect a longer trap door effect and a slower than normal main canopy opening.
- 1) If unable to open the main pack tray (now a Hard Pull On Drogue Release, deploy the reserve after 2 attempts to release the drogue), [Emergency action reference 1.]
- 2) If the main pack tray opens upon initiating main deployment but does not initiate main canopy deployment (now a Collapsed Drogue In Tow During Main Deployment), release the RSL shackle and pull the cutaway handle. Ensure full release of the main risers, physically assisting if necessary. Immediately pull the reserve handle. [Emergency action reference 3.]
- Entanglement with drogue canopy (Instructor or Student entanglement) -
- Attempt to clear the drogue canopy. If unsuccessful within 10 seconds following exit, immediately pull reserve handle. [Emergency action reference 1.]
- Entanglement with drogue bridle (Instructor or Student Entanglement) -
- Attempt to clear the drogue bridle. If unsuccessful within 10 seconds following exit, immediately pull reserve handle. [Emergency action reference 1.]
Drogue entanglement with third party -
- Observe the altitude of the situation, & if the third party has not cleared within 10 seconds (altitude permitting), proceed with the following steps
- Release the RSL shackle, Pull the cutaway handle, Pull a drogue release handle, Ensure riser separation, track 5 seconds, deploy reserve [Emergency action reference 4.]
Source reference · pages 60–61
Drogue fall problems
- Student grabs the Tandem Instructor’s right arm during drogue fall - Utilize all means necessary to free the right arm. If unable to do so, pull the left (Primary) drogue release at a proper altitude. If the drogue does not release after two attempts (now a drogue in tow), immediately pull the reserve handle. [Emergency action reference 1.]
- Student grabs the Tandem Instructor’s left arm during drogue fall - Utilize all means necessary to free the left arm. If unable to do so, pull the right (Secondary) drogue release at a proper altitude. If the drogue does not release after two attempts (now a drogue in tow), immediately disconnect RSL snap shackle with the right hand and deploy the reserve using the RSL lanyard. [Emergency action reference 1.]
- Student grabs both the Tandem Instructor’s arms during drogue fall - Utilize all means necessary to free any arm. Depending on which arm has been freed, follow the appropriate directions above. [Emergency action reference 1.]
- Drogue becomes detached during drogue fall - Locate and pull reserve ripcord handle.
- Hard pull on drogue release - Pull each Drogue release handle separately followed by pulling both simultaneously (2 attempts no more than 5 seconds). If the drogue does not release, locate and pull the reserve ripcord handle. [Emergency action reference 1.]
- Unable to release drogue (Inflated Drogue In tow) - Locate and pull reserve ripcord handle. [Emergency action reference 1.]
Source reference · page 61
Deployment problems
- Drogue/Bridle assembly detaches upon drogue release - Main canopy still in pack tray - Release the RSL shackle and pull the cutaway handle. Ensure the full release of the main risers, physically assisting if necessary. Immediately pull the reserve handle. [Emergency action reference 3.]
- Main deployment bag lock - Release the RSL shackle and pull the cutaway handle. Ensure the full release of the main risers, physically assisting if necessary. Immediately pull the reserve handle. [Emergency action reference 3.]
- Streaming Main Canopy - Locate and grab both rear risers and pull down simultaneously on both rear risers. Make two attempts to bring the slider down using this technique maintaining altitude awareness. If unsuccessful, pull cutaway handle to full extension and ensure full separation from the main canopy and risers. Pull the reserve ripcord handle to full extension. [Emergency action reference 2.]
- Collapsed drogue in - tow during main deployment - Release the RSL shackle and pull the cutaway handle. Ensure the full release of the main risers, physically assisting if necessary. Immediately pull the reserve handle. [Emergency action reference 3.]
- Non collapsed drogue during main deployment - Ascertain whether the main canopy has sustained damage from the opening shock. If it has, determine whether it is controllable and safe to land. If it is deemed unsafe to land, initiate emergency procedures by pulling the cutaway handle, ensuring full release of both main risers, and providing physical assistance if necessary. Immediately follow by pulling the reserve handle. [Emergency action reference 2.]
- Drogue entanglement with the main canopy - If the drogue entanglement hinders the main canopy opening or controllability, perform emergency procedures by pulling the cutaway handle, ensuring full release of main risers, physically assisting if necessary. Immediately pull reserve handle. [Emergency action reference 2.]
- Tension knots on main canopy - Release the brakes and counter steer any turn. Aggressively pull the affected side and quickly, attempt to allow slack in the line in order to clear the tension knots. If unsuccessful, perform emergency procedures pulling the cutaway handle, ensuring full release of the main risers, physically assisting if necessary. Immediately pull reserve handle. [Emergency action reference 2.]
- Broken suspension lines - Perform controllability check and assess if the canopy can be landed safely. If not, perform emergency procedures by pulling the cutaway handle, ensuring full release of the main risers, physically assisting if necessary. Immediately pull the reserve handle. [Emergency action reference 2.]
- Broken or nonfunctional primary control lines - Perform emergency procedures by pulling the cutaway handle, ensuring full release of main risers, physically assisting if necessary. Immediately pull reserve handle. [Emergency action reference 2.]
- Broken or nonfunctional secondary control lines - Perform controllability check and assess if the canopy can be landed safely. If not, perform emergency procedures by pulling the cutaway handle, ensuring full release of the main risers, physically assisting if necessary. Immediately pull reserve handle. [Emergency action reference 2.]
- Canopy fabric damage - Perform controllability check and assess if the canopy can be landed safely. If not, perform emergency procedures by pulling the cutaway handle, ensuring full release of the main risers, physically assisting if necessary. Immediately pull the reserve handle. [Emergency action reference 2.]
- Line twists - Attempt to kick out of the line twist, instructing the student to assist if necessary. If unsuccessful, perform emergency procedures by pulling the cutaway handle, ensuring full release of the main risers, physically assisting if necessary. Immediately pull the reserve handle. [Emergency action reference 2.]
- Line over - Release the brakes and make two attempts to clear the line over by conducting a steady, even flare movement with both primary toggles. if successful, check for canopy fabric damage or line burn. If unsuccessful in clearing the malfunction, or if the main canopy enters into an uncontrollable spin, perform emergency procedures by pulling the cutaway handle, ensuring full release of the main risers, physically assisting if necessary. Immediately pull the reserve handle. [Emergency action reference 2.]
- Two Canopy Out (Bi-Plane) - Attempt to contain the (2nd) deploying canopy, main or reserve, and maintain control of it, ensuring it remains in its deployment bag. If deployment of the second canopy is inevitable, and it results in a stable “Bi-Plane” formation, leave the brakes stowed on both canopies and make gentle control inputs by pulling down on either of the left or right rear risers of the front canopy to initiate turns. Prepare for a PLF landing if necessary.
- Two Canopy Out (Side-By-Side) - Attempt to contain the (2nd) deploying canopy, main or reserve, and maintain control of it, ensuring it remains in it’s deployment bag. If deployment of second canopy is inevitable, and it results in a stable “Side-By-Side” formation, leave the brakes stowed on both canopies and make gentle control inputs by pulling down on either of the left or right rear riser of the dominant canopy to initiate turn.
- Two Canopy Out (Downplane) - Attempt to contain the (2nd) deploying canopy, main or reserve, and maintain control of it, ensuring it remains in its deployment bag. If deployment of the second canopy is inevitable, and it results in a “downplane” formation, disconnect the RSL (if altitude permits) & perform emergency procedures by pulling the cutaway handle, ensuring full release of the main risers, physically assisting if necessary.
- In any emergency scenario that requires a cutaway of the main canopy -
- If time & altitude permit, tell your student arch, grab the main lift web of their harness with their hands & tilt their head back.
- If time and altitude permit, attempt to capture the legs of the tandem student before initiating a cutaway.
NOTE: These additional position procedures should not prevent performing emergency procedures in a timely manner.
Source reference · pages 62–63
Student skills
Here are the points to be presented to the student in chronological order as they would happen on a jump:
- 1. Pre Jump Training - Initial briefing and instruction covering equipment, including aircraft procedures and emergencies.
- 2. Exiting the Aircraft & free fall - aircraft procedures, how to Move to the door of the aircraft and preparing for the jump. Exit practices and basic safety guidelines.
- 3. Canopy control - Steering and controlling the parachute canopy towards the landing area and landing procedures.
- 1. Pre Jump Training - Equipment Provide Instruction on the following items - Student accessories - Retrieve and display the following items prior to gearing up: altimeter (optional), jumpsuit, soft helmet, and goggles are a must. Select a tight suit. This will reduce extra drag from your student, aiding stability after exit. A soft helmet is recommended as it is less of a risk if the Tandem Instructor were to strike the student’s head during the jump. Student harness - Due to the complexity of properly adjusting the student harness, never allow the student to adjust their harness entirely on their own. They certainly may step into the harness and fasten the chest strap, but the remainder of the adjusting should be done by the Tandem Instructor. Explain the problem of the blood flow being reduced at the legs and the shoulders and the importance of proper harness adjustment. It is practically impossible for the student to do a good job adjusting the harness on his own.
- 2. Exiting the aircraft & Free Fall Demonstrate & explain the correct body position for both exit & freefall to your studen - The foundation for every stable exit and drogue deployment starts with comprehensive training on the ground. Instruct the student to lie down and practice the proper freefall position. Devoting several minutes to this practice can significantly impact their performance during exit and freefall. It's worth noting that exit requirements may vary from aircraft to aircraft, potentially causing some variations in position, but the fundamental principles remain consistent. IMPORTANT: Go to the plane or aircraft mock-up early & practice in-flight safety procedures. The in-flight instruction should include-
- When climbing into the aircraft and assuming the seating position, follow the outlined procedures from walking to the aircraft to altitude, including the hook-up process. During the climb-out and launch from the airplane, it's essential to familiarize yourself with the sequence. To practice, enter the plane and go through the entire jump sequence once or twice, incorporating an exit with the student's harness attached and tightened down. Additionally, review the recommended body position the student should adopt for the exit launch and freefall:
- Hands holding onto the same side of harness
- Elbows back
- Head back
- Arch Torso
- Feet together AND RETRACTED NOTE: We recommend this position and emphasize the importance of keeping the arms IN on exit to reduce the likelihood of door contact. Remember that it is far easier to control a student whose arms are close to the body.
- Arm extension following exit - This is simply a regular RW box body position with the arms out and comfortably bent. It should also be practiced in the prone position including the signal you intend to give for release and attaining this position. The signal can be a tap on the shoulders, and/or a shout in the ear. NEVER reach around in front of the student for any reason. It is important to instruct the student never to grab your arms or reach behind them at any time during the jump.
3. Canopy control as pic (pilot in command)
- A. Location of steering toggles - After opening, tell the student to look up to the risers & visually locate the steering toggles. Demonstrate release of the brakes, emphasizing the increasing wind speed as the canopy approaches full flight. Use the student's toggle position to release the brakes during this process. Conduct a canopy controllability test, including turns in both directions and a flare. Instruct the student to slip their hands into the toggles, grasp firmly, and follow your commands for control maneuvers.
- B. Steering the canopy - While the student is assisting in controlling the canopy, have them perform and identify the following flight modes:
- Full flight - Most students tend to pull on the toggles all the time. They must be taught to consciously leave the hands all the way up for full flight.
- Turns - Instruct the student to look in the direction of the intended turn, check for other canopies, and choose a ground heading. Practice turns in both directions, exploring flat and spiral turns. Teach the student that countering is unnecessary to stop a turn; simply return the toggle to the opposite level and wait for the turn to settle.
- Breaks - Have the student pull down on both toggles from the full flight position, noting the change in wind speed and noise. Explain the difference between braking and flaring for landing, highlighting that braking slows the canopy with increased descent, while flaring slows it with increased lift.
- C. Flaring the canopy - Practice flaring before entering landing pattern. Guide student through these steps:
- Have both arm raised all the way up in the full flight position.
- Start flare immediately upon tandem Instructor’s command.
- Flare symmetrically and fully in one smooth downward motion.
- Ensure a complete flare with arms in full, dowNward extension.
- Hold this position until landing or commanded otherwise.
Conduct the flare drill 3-4 times to familiarize the student with the procedure. Remind the student to stay relaxed yet ready to respond to flare commands during the landing approach. Assure them that the canopy will slow down when flared. Allow the student to assist with the landing only if they have demonstrated competent skill.
- D. Landing approach - it's crucial to communicate the canopy approach to the landing area to the student. Discuss the planned pattern or flight path, indicating the intended altitude at each turning point. Additionally, highlight of the wind and specify the expected landing point.
Passenger review check-
- Get into harness with assistance.
- Perform climb out with Tandem Instructor attached.
- Attain correct position prior to exit.
- Perform arm extension upon Tandem Instructor’s command.
- Grasp steering toggles upon command. Perform turns, braking, full flight and perhaps flaring upon Instructors command.
- Prepare for landing on Tandem Instructor’s command.
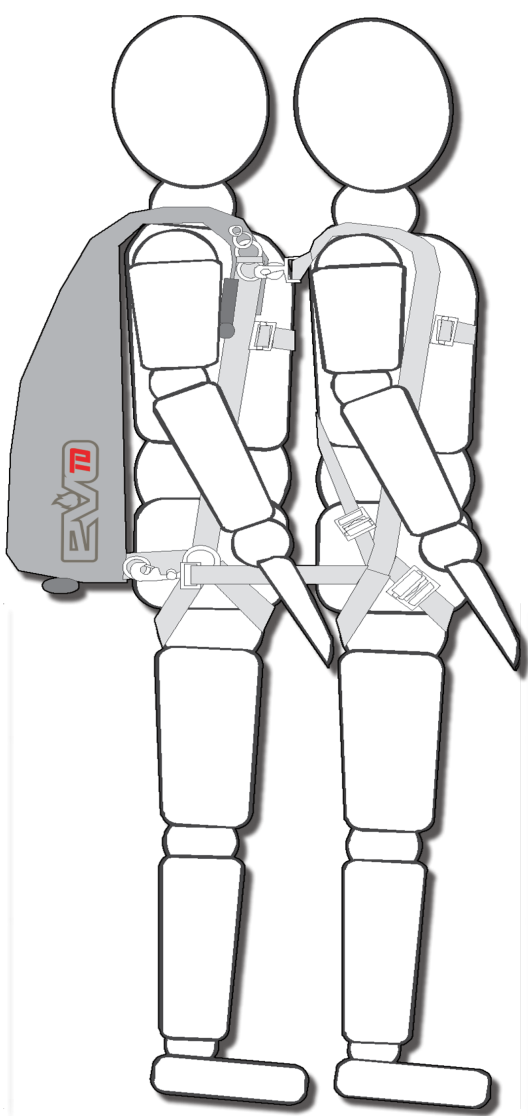
Source reference · pages 64–66
Additional activities
Participants minimum qualifications RW
These guidelines are not optional. They must be followed, or the Tandem Instructor and Tandem rig owner will be in violation of the User Agreement under which Tandem jumping is operated and will consequently no longer be allowed to legally perform Tandem Jumps.
For any relative work (RW) skydiver to accompany a Tandem pair, one of these three criteria must be met:
- RW skydiver must have a minimum of 500 relative work skydives
- RW skydiver must be either a current Tandem Instructor or a current AFF instructor.
- Have 300 relative work skydives and has minimum a current USPA coach rating.
- In addition to the above, the following must be met.
- RW skydiver must have made at least 100 RW jumps in the last year.
- Cameramen must have at least 100 camera jumps.
RW - TDM briefing
- If the Tandem Instructor does allow an RW skydiver to accompany them on a jump, a briefing MUST take place before covering these points:
- Never let anyone who is not a skilled RW skydiver accompany a Tandem, regardless of qualifications. This decision is solely at the discretion of the tandem instructor.
- Never pass directly over or under the Tandem pair during exit, drogue fall and deployment.
- Always leave room for drogue deployment.
- Always approach the Tandem pair cautiously & on level within sight of the Instructor. The Tandem pair has very little ability to change drogue fall velocity or to move horizontally and therefore cannot take evasive action.
- If grips are taken, they MUST be on the student and NOT on the Tandem Instructor.
- Accompanying RW skydiver must not attempt to open their main canopies in proximity to the Tandem pair. A minimum of 1000ft (300m) vertical separations required to avoid collision situations.
- RW must cease by 6500ft (1981M) AGL.
- The RW jumper must clear the airspace of the tandem pair prior to the tandem pair initiating main canopy deployment.
- The RW jumper must be briefed on the emergency procedure for “Drogue Entanglement with solo skydiver”.
Skydive with a hand-held camera (hand-cam)
Procedures - Minimum Recommendations for performing hand held camera (Hand- cam) tandem skydives. Due to the potential for distraction and the added complexity during tandem student hook-up and exit, the following are the minimum recommendations for instructors who wish to use a Hand-cam set up:
- Minimum 200 tandem skydives acting as Tandem Instructor.
- The first tandem skydive made after a seasonal layoff as tandem instructor should not be made with a Hand-cam.
- The Tandem Instructor should demonstrate and practice on the ground Emergency Procedure handle activations with a mock student attached and fully geared-up.
- Before taking a first time tandem student with a Hand-cam, the tandem instructor should.
- Make (2) solo (sport) skydives with the Hand-cam set up intended for use.
- Make (1) tandem skydive as a Tandem Instructor with an experienced (C Licensed or higher) skydiver, or Tandem Examiner in the Student Position, using the intended Hand-cam set up.
- The use of Hand-cam still requires the Tandem Instructor to perform post drogue deployment handles checks.
- The use of telescopic camera mounted poles, or any fixed camera pole is forbidden.
Wingsuit tandem jumps
- Wingsuit tandems will only be permitted after completion of wingsuit tandem training and obtaining of a firebird wingsuit tandem rating. (in active development)
Canopy separation requirements
- A minimum separation of 100ft (30m) is required under canopy at all times.

- CRW is positively banned on all tandem jumps under any and all circumstances.
- Wingsuit flybys are positively banned on all tandem jumps under any & all circumstances.
Source reference · pages 67–68
Lifespan, inspection and maintenance
Important components lifespan -
To maximize the lifespan of the harness and container system, it is crucial to perform regular inspections and maintenance on a monthly basis. Harsh conditions or frequent use can contribute to a decrease in the equipment's durability. It is the responsibility of the owner and operator to ensure the equipment functions optimally. Any issues should be addressed promptly with the manufacturer or a qualified rigger. The following guidelines are provided based on the expected lifespan of Tandem components. An appropriately certified rigger should assess whether the components are airworthy.
- Replace main canopy suspension lines every 350-500 jumps as needed.
- Replace main canopy every 1400 – 1600 jumps.
- Replace main risers every 600 jumps.
- Replace drogue centerline every 250 jumps.
- Replace the lower Drogue Bridle every 250 jumps.
- Replace drogue every 600 jumps.

Reserve parachutes must be opened, aired, inspected and repacked at the latest every 180 days or according to the requirements of the national competent authority.
Reserve component lifespans
- Reserve canopy is limited to 25 deployments, 40 pack jobs or 20 years in service, whichever comes first.
- Reserve Pilot Chute limited to 25 deployments.
- RSL limited to 25 deployments.
Once a component limit has been reached, it is no longer certified for use. If further use is intended, it must be returned to the manufacturer for possible recertification.
- The equipment should be re-examined every 12 months min.
- The main parachute canopy and the container system should be thoroughly examined every 50 jumps or every 120 days after assembly, whichever comes first.
- This examination is considerably more detailed than the inspection that is to be carried out each time the parachute is packed.
- Every 365 days the reserve parachute must be opened, aired and thoroughly inspected before it is re-packed by a rigger or equivalent specialist.
- The inspection can be carried out according to the following directions.
- The container should be examined in place that is clean, dry, well lighted and large enough that the parachute can be completely laid out.
inspection and maintenance - The following inspection sequence is systematic and meaningful. Gear inspections should cover ALL parts of your harness and container system, while paying particularly close attention to these areas:
- 3-Ring System - The 3-ring system must be perfect, the rings must be round and flawless. The closing loop must:
- Show no damage. The 3-ring system must open with the lightest pull, as soon as the cable is removed.
- The riser gets hard after a couple of jumps and may not release the 3-ring system.
- Twist the main riser with the 3-ring system after 120 days to keep the strap in a flexible state.
- Cutaway System - Refer to the 3 - Ring section for detailed information on inspecting the canopy releases.
- Reserve System - This covers the reserve ripcord, closing loop, pins, handle, housing, container, and related stitching. It is crucial NOT to attempt any repairs or alterations to ANY of these components unless you are a certified rigger. However, you can still identify minor issues before they escalate. Signs to watch for include damage to the reserve ripcord, frayed or worn closing loop, and frayed stitching on the container.
- Reserve Ripcord, RSL and Release Cable - Check the release handle for damages, as well as both release cables run freely and unobstructed. The Velcro should be clean and attached securely. The reserve ripcord cable should also run smoothly and unobstructed in its housing. Check the function of the RSL, its attachment points and the ease with which it is released and attached.
- Pilotchute, bridle and main deployment bag - Check the pilot chute and bridle for orderly attachment on the top surface of the canopy, as well as for damage. The parachute fabric and the reinforcement tapes, as well as their stitching, should not be damaged. Check the functioning of the pilot chute kill-line. The grommets on the d-bag, including the grommet on the bottom of the d-bag, should be undamaged, without sharp edges and firmly attached to the bag material. Replace old stowing rubber bands as necessary.
- Drogue - Drogue Chute Bridle and POD - Check the drogue chute and its bridle for secure attachment to the top skin of the canopy as well as for damage.
- The parachute fabric and the reinforcement tapes - As well as their stitching, should not be damaged. Check for perfect function of the drogue-chute kill line. If the kill line is twisted, straighten it. The grommets on the POD (Pack Opening Device—also known as the deployment bag), including the grommet at the bottom of the POD, should be free of damage, have no sharp edges and be firmly attached to the POD material. Replace old packing rubber bands.
- Closing Loops - closing loops are subject to wear and should be replaced upon the first sign of damage.
- Canopy Top Skin - The canopy should be completely spread out. Pay attention to all seams, potential tears, burns and separations.
- Canopy Bottom Skin - Turn the canopy over and check it in the same manner the
top skin was inspected. In addition, pay special attention to the suspension line attachments.
- Interior Ribs - Each rib of the canopy, from the nose to the trailing edge, should be examined. This re-quires crawling into each cell. Pay special attention to the reinforcement tapes, the suspension line attachment points and the pilot-chute attachment. Also check that the cross-ports are not frayed.
- Outer Side of Canopy - Lay the canopy on its side, so that the cells are stacked one on top of the other. In this way the condition of the stabilizers and slider stops can be examined.
- Suspension Lines - The entire length of the lines should be examined for damage. Pay special attention to the cascades and the connector links. Check that the connector links are securely fastened.
- Steering Lines - Check that the steering lines and secondary flairs run straight and orderly through the slider and also through the small ring on the main riser and are correctly fastened to the steering toggles. If the steering lines or secondary flairs are twisted, they should be straightened by twisting in the opposite direction.
- Slider - Should be checked for damage to the fabric, the reinforcement tapes and the seams. The grommets should have no sharp edges, must be tight and securely attached to the slider.
- Main Risers - There should be no apparent damage to the material, grommets or rings of the main risers. Check the performance of the Velcro and clean it if necessary.
- Harness, Hardware and Stitching - An examination of the harness, hardware and stitching can only be performed visually. Pay attention that the type-7 webbing (with a yellow fiber running along the outside edges) is not damaged and that no stitching is broken. All hardware must be free of corrosion and move freely as designed.
- Container - Inspect the fabric, stitching, binding tape, housings (housing clampos securely attached), Spandex, grommets and plastic stiffeners in the container flaps and have replaced any that are broken. Replace any grommets that are deformed, nicked, damaged, or that are pulling out of their setting.
- Passenger Harness - An examination of the harness, hardware and stitching can only be performed visually. Pay attention that the type-7 webbing (with a yellow fiber running along the outside edge) is not damaged and that there are no broken stitches. All hardware must be free of corrosion and move freely as designed. Check that the padding is in good condition and is easily moved. Examine the attachment hooks for perfect functioning
Note: should something unusual be noticed during inspection, contact the manufacturer immediately!
When it doubt - play it SAFE & contact us!
Fabric testing - should be done annually (at the appropriate repack cycle). It is not necessary to test a canopy before it is within one year after the date of manufacture. Use commercially available 1 inch (2,54 cm) fabric testing clamps with rubber faced jaws and appropriate scale. The scale should be calibrated once per year and be accurate within 1 lb. (0.4535 kg). The fabric test should be noted in the packing data card for the reserve parachute.
Three fabric pull tests should be performed on a canopy
- One on the left end cell top surface
- One on the center cell top surface near trailing edge
- One on the right end cell top surface The test should be at least 3inches (7.62cm) away from any seam or data panel. The test should be done chord-wise. An additional test must be performed on any stained or discolored areas. Lock the clamps securely avoid slippage. Mark the tested area with parachute ink. Note: the passed or failed fabric test in the packing data card.
SAFE practice -
- Yearly or as needed, operate the 3-Ring release system on the ground. Extract the cable completely from the housings and disconnect the risers. Clean the cables as needed with a 'non-residual" silicone spray and a clean cloth.
- While the system is disassembled, closely inspect it for wear. Check the white locking loops (the ones that pass over the smallest ring and through the grommet) to be sure they are not frayed.
- Check the hook & loop fastener on the cutaway handle & main lift web to be sure it is clean and adequately holds the handle.
- Check the cable ends for a smooth finish. The ends are finished at the factory to have a smooth, tapered surface. This prevents the cable from hanging up in the loop. Check the cable ends and consult a rigger or the manufacturer if a burr or “hook” is present.
- Check the stitching, including that which holds the large rings to the harness
- Check that all 3-Ring release housings are firmly clamped (behind right ring cover and under yoke).
- Take each riser and vigorously twist and flex the webbing near where it passes through each ring. The idea is to remove any set or deformation in the webbing. Do the same thing to the white loop.
- Check the housings for dents or other obstructions. Use the cable to do this.
- Clean and lubricate the release cable with a silicone spray. Spray on a paper towel and firmly wipe the cable a few times. A thin, invisible film should remain, too much will attract grit and dirt.
- Inspect the end fittings at the end of each housing for damage.
- Reassemble the system.
Inspect each time before the parachute is packed
Source reference · pages 69–72
Safe keeping and storage
- The container system should be kept dry (at 45-70% relative humidity) and cool (10-15°C / 50-60°F), in a container through which light will not pass. Ultraviolet light can cause invisible damage to the fabric through decay of the nylon fibers. The parachute canopies and the harness-container should be kept away from all types of corrosive substances such as lye, acids, fuels, varnishes and solvents. Also, storage in areas with operating electric motors ( electrosmog - O3 - ozone forming ) should be avoided.
- In extremely hot and humid climates the canopies should be re-packed every 30 days!
Source reference · page 73
Sources of equipment degradation and cleaning
Your EVOtd is manufactured primarily from nylon. Nylon is very durable, yet it is still susceptible to damage from several sources.
- Sunlight - The ultraviolet rays in sunlight quickly and permanently weaken nylon. Keep equipment out of direct sunlight whenever possible. Structural weakening of nylon is not immediately noticeable.
- Acids - Hangar floors, dirty car trunks and similar areas are where acids can be found. If contamination does occur, immediately and thoroughly wash the affected with plenty of warm soapy water. Baking soda may quickly neutralize most acids as an interim step prior to washing. If acid damage occurs or is suspected, an appropriately rated rigger must thoroughly inspect the equipment.
- Oils and Grease - Most petroleum compounds do not weaken nylon; they simply stain it. Warm, soapy water or isopropyl alcohol may remove such stains.
- Water - Water will not structurally damage your equipment however, prolonged agitation in fresh water weakens webbing or may cause some fabric and tape colors to bleed. Salt water may damage nylon and cause hardware to corrode if not immediately and thoroughly washed off with plenty of fresh water.
- Soil - Brush off the soil after it has dried and gently wash with warm soapy water. Make sure that the soil is not on or in components.
- Sand - Sand will weaken and cut webbing and fabrics of all types. Prolonged exposure to sand will shorten the life of the entire parachute assembly.
- Abrasion - Nylon will be damaged if dragged over concrete or other rough surfaces. Do not drag any part of the container system while transporting or packing.
- Perspiration - Minimize exposure to sweat while using or handling the container system.
Cleaning - Basically, parachute canopies & containers should only be cleaned with fresh water. The use of brushes or rough sponges should be avoided.
Check the drogue kill line length periodically!!!
- It is crucial to periodically inspect the drogue kill line to ensure the accurate length relation between the drogue bridle and the kill line.
- After contact with salt water, the parachutes and container should be rinsed with fresh water at least three times within the first 24 hours.
- The removal or oil, tar or similar substances should be discussed with the manufacturer. The equipment should not be cleaned in a washing machine.
- Only dry the canopies and container by hanging them in the shade. After cleaning the canopies and container should be subject to a thorough re-examination.
Steps to check the kill line:
- Anchor the Rapid link to the main deployment bag attachment point. Drogue bridle and kill line should be routed through the MDB attachment link.
- Extend fully the drogue bridle.
- Drogue & Kill Lines sizes:
- 1. Drogue Size MINI - 54” - Apply aprox. 10 lbs. of tension, pulling the drogue handle, stretching it out. Drogue attachment Larks knot to kill line should be 1.5” (39mm) from grommet for durability.
- 2. Drogue Size STANDARD 60” - Apply aprox. 10 lbs. of tension, pulling the drogue handle, stretching it out. Drogue attachment knot to kill line should be 7.5” from grommet for durability.
Source reference · pages 73–74
Repairs and alterations
When repairs are necessary, they should be performed only by the manufacturer or by a facility authorized by the manufacturer.
- Alterations or modifications be necessary, they shall be performed by the manufacturer. Alterations or modifications may only be carried out by the manufacturer or a manufacturer approved Master Rigger.
- Only official replacement parts or those approved by the manufacturer may be used.
- Disregard for these procedures can void the airworthiness!
Source reference · page 74
Replacement parts
- Firebird supplies all replacement parts for your EVOtd System.
- When ordering parts, include the serial number and date of manufacture of your equipment, found on the container data label, so the proper items can be quickly supplied.
Source reference · page 74
Assembly
Your EVOtd dual harness container system and quick reserve canopy must be inspected, assembled and packed by qualified personnel only (certified rigger).
The system must be assembled in accordance with the owner’s manual.
Source reference · page 75
Reminder from Firebird
Before using the EVOtd it is absolutely mandatory to have participated in tandem-pilot training according to the minimum requirements and performance limitations specified by the manufacturer. Every owner or user of the EVOtd must have read the manual and training instructions before the first use. The tandem-pilot training must be carried out exclusively through the manufacturer designated agent or examiner. Attention must be paid that, during training as well as in use, the EVOtd is only to be used within its operating limits. Wingsuit tandems will only be permitted after completion of wingsuit tandem training and issuance of a firebird wingsuit tandem rating.
You should contact a certified rigger in case any abnormalities are found.
When in doubt—safety first!
Should something unusual turn up during inspection contact the manufacturer for a thorough assessment of the issue. When in doubt—safety first!
Source reference · page 75
How to cut Lolon cables
IMPortant: Our FIREBIRD EVOtd comes with the yellow Lolon cutaway cables uncut. To size them correctly, please make sure the risers are attached to the 3-ring system of the EVO prior to cutting.
- 1. First cut right riser side(rsl side): Put tension on the riser and cut cable at height of the apex of the riser safety housing.
- 2. the NON RSL side: push the lolon cable all the way in prior to cutting the cable. this cable should be cut 2.5 cm (1”) shorter, below the housing apex line.
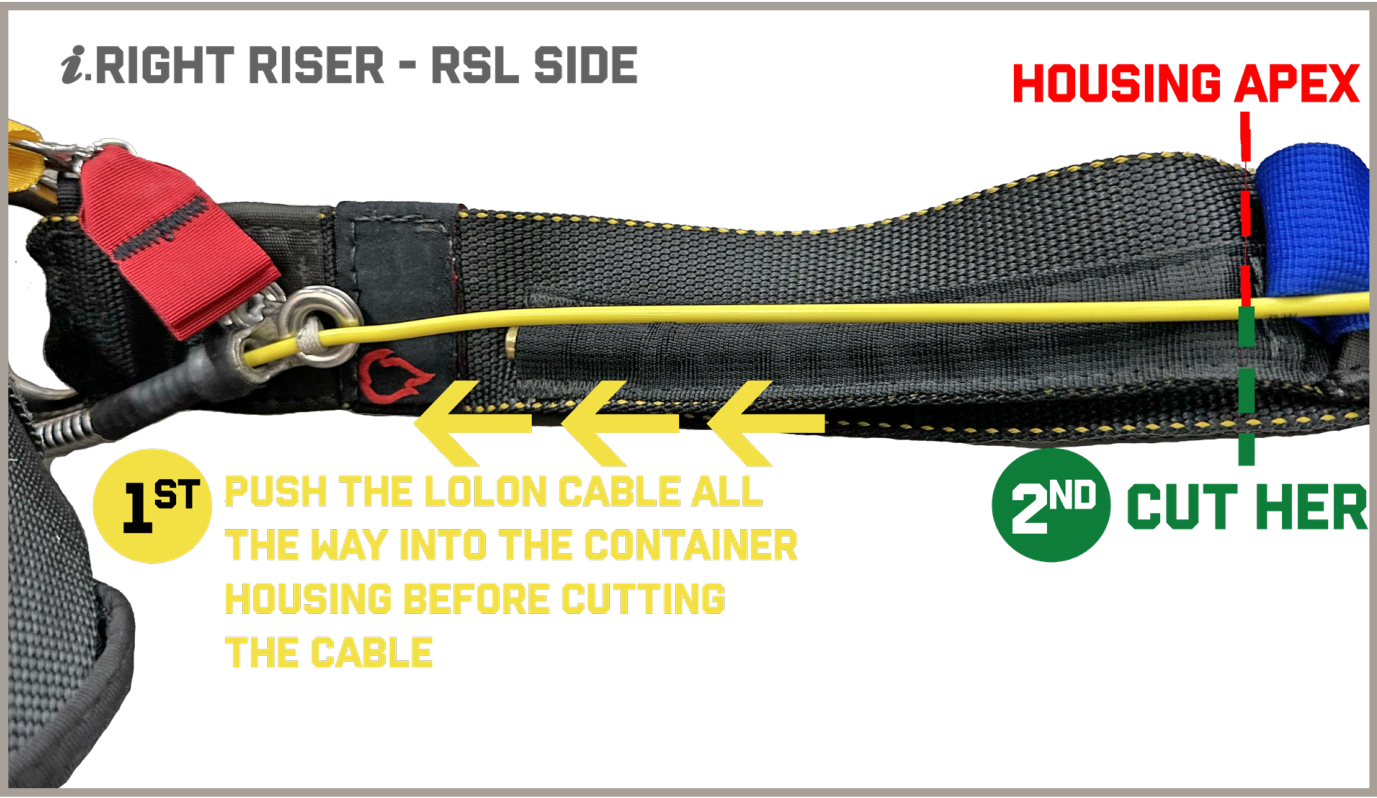
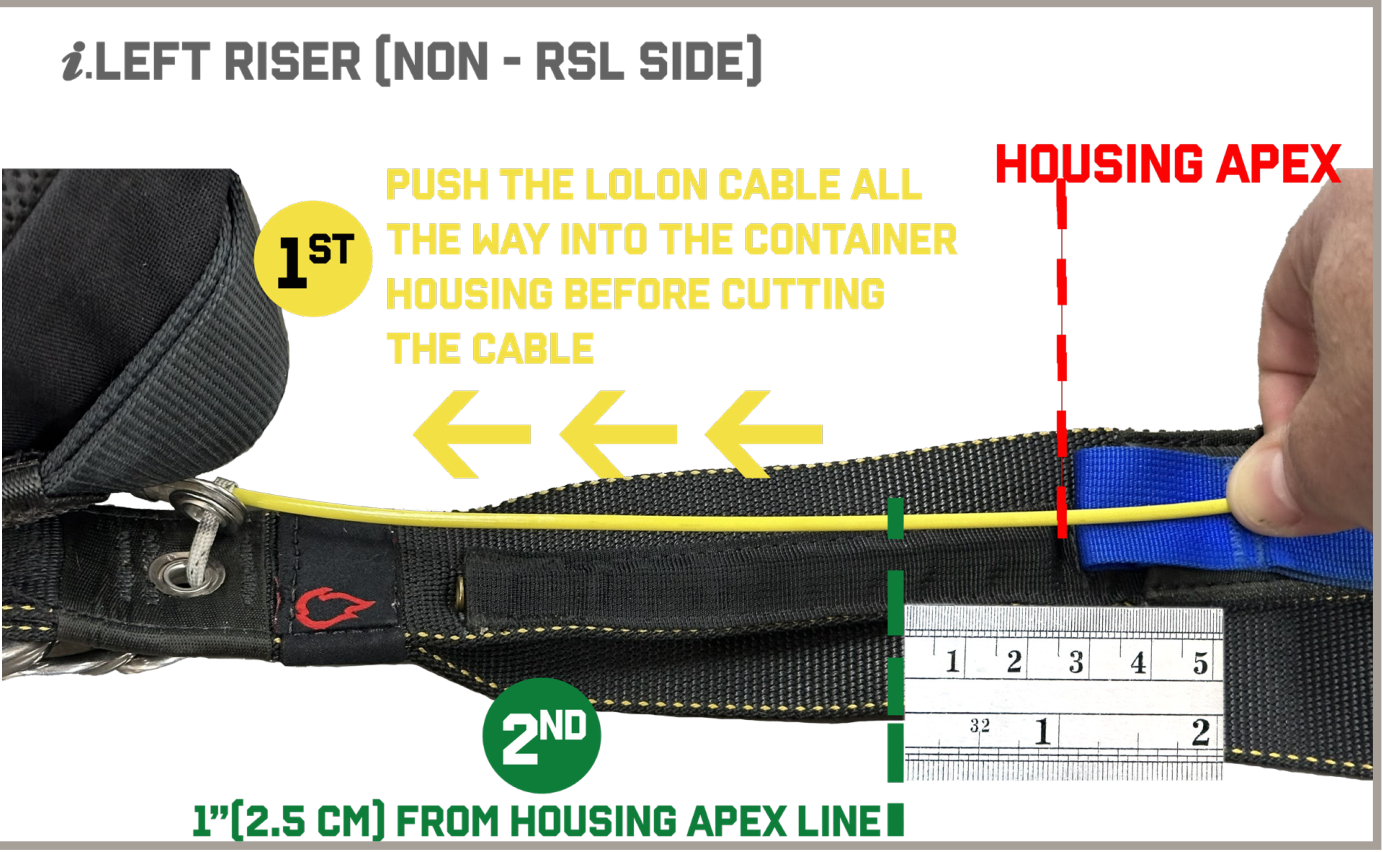
Source reference · page 76
Questions, contacts and spare parts
How to order spare parts
Email loft@flyfirebird.com with the following information:
- Serial number
- Part number needed, with details
- Customer name
- Shipping and billing address
We are available at your convenience to answer questions and provide further information.
| Contact | Details |
|---|---|
| Florida | 1405 Flightline Blvd, Deland, FL 32724, USA |
| Arizona | 409 North Main St, Eloy, AZ 85131, USA |
| usa@flyfirebird.com | |
| Telephone | +1 747 300 8880 |
| Website | www.flyfirebird.com |
Source reference · page 77
Register of valid pages and revisions
Register of valid pages / revisions
| Revision | Page(s) | Date |
|---|---|---|
| 01 | 7–48, 53–66 | 01.01.25 |
| 02 | 0 | |
| 03 | 0 | |
| 04 | 0 | |
| 05 | 0 | |
| 06 | 0 | |
| 07 | 0 | |
| 08 | 0 | |
| 09 | 0 | |
| 10 | 0 | |
| Web update: main closing sequence and Diagram CS1 | 36 | 10.29.26 |
Source reference · page 2
Manual index
This web edition follows the section headings at their actual locations in the supplied revision. The original index contains inconsistent page references and repeated section numbering. The appendix is listed as not applicable in the source index.
| Section | Source page |
|---|---|
| Warning and manufacturer disclaimer | 4 |
| EVOtd equipment limitations and certification | 5 |
| EVOtd tandem disc system | 6 |
| Features and parts list | 7 |
| Training and rating | 9 |
| Course outline | 10 |
| Harness and container | 13 |
| Student harness | 15 |
| The drogue system | 16 |
| The bungee system | 19 |
| SAFE / MARD system | 20 |
| Operating your EVOtd | 22 |
| Main deployment activation | 23 |
| Adjusting and inspecting your EVOtd | 24 |
| Adjusting the student harness | 25 |
| Inspecting the main canopy and components | 26 |
| AAD: mandatory use | 27 |
| Reserve and main canopy: packing and closing | 28 |
| Instructor certification: requirements and preparation | 38 |
| Exits, freefall and canopy control | 44 |
| Emergency procedure sequence | 52 |
| Standard jump procedure diagrams | 54 |
| Aircraft emergencies | 56 |
| Student refusal | 56 |
| Untimely canopy deployments | 57 |
| Emergency handle reference: courses of action | 59 |
| Drogue deployment problems | 60 |
| Drogue fall problems | 61 |
| Deployment problems | 62 |
| Student skills | 64 |
| Additional activities | 67 |
| Lifespan, inspection and maintenance | 69 |
| Safe keeping and storage | 73 |
| Sources of equipment degradation and cleaning | 73 |
| Repairs and alterations | 74 |
| Replacement parts | 74 |
| Assembly | 75 |
| Reminder from Firebird | 75 |
| How to cut Lolon cables | 76 |
| Questions, contacts and spare parts | 77 |
Source reference · page 3